Protected
Introduction
Protected pages can only be accessed with a logged in app user. App users are special app specific users that can be set up to access specific applications.
Login and registration is up to the specific applications. Either it allows user registration from a public page or user creation is handled in some admin panel instead.
Note that app users cannot exist without an application, and the users cannot access or log in if they are not associated with an existing application (as opposed to erply account users). These user sessions cannot access erply back-office applications and regular pages.
Public routes always are prefixed with either public/ or b2b/ (except on custom domains).
Setup
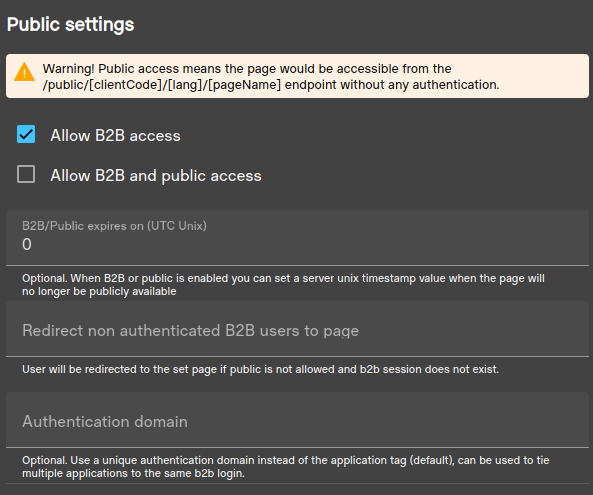
Set the page to allow b2b access to set this protection level.
This can be configured in the template editor mode under the ‘Publish setting’ right menu.
Note
It is also possible to set an optional expiration date to the page (UTC unix value) after this timestamp has passed on the server the will no longer be accessible using the b2b endpoint. Use authentication config input set the value.
Also note that this setting is based on applications or auth domains.
Each user requires the application domain to be able to create a valid session for the application. By default, the application domain is the applications uuid. You can use the ‘Authentication domain’ field to set a custom value - if the same value is set for multiple applications then the applications can share the users.
Use the ‘Redirect non-authenticated B2B users to page’ option to automatically redirect to login or error page invalid accesses.
User creation/registration
Users can either be created using a public registration form (for stores, b2b pages etc), or creation is managed internally within another page or application.
Manual app user creation
Here the creation and management of users would be handled by a protected page (either erply session or a different set of app users). Use the automat api endpoints to create the users and manage them. https://template-engine-eu10.erply.com/api/documentation/index.html#/app-user
Domains
Domains under the user determine what application pages the user can access.
Auth drivers
Auth drivers indicate what authentication methods the user is allowed to use to log in. Inbuilt methods: password, pin and openid
Open id
Open ID setup can be used to create custom sso methods for login. Each provider that is set up for the login page can then be used with the users to log in.
Creating a custom open id driver:
- In the login page template, navigate to the Publish settings -> OpenID Configuration tab.
- Use the ‘Add new configuration’ button to register a new open id provided (driver). Fill in the required fields and fields related to the provider. Note that the ‘Provider’ field will be used as the driver name. The ’email’ scope is also required as app users will be matched with the email.
- In the login command set the auth driver to the created one.
- In order for the users to be able to use it they would need to have the ‘ms_entra’ auth driver. Note that for open id auth drivers the value field will not be used.
- The jwksUrl endpoint needs to point to the public keys configuration.
This example assumes the open id configuration was given the provider name of ‘ms_entra’.
There is no limit to the open id providers. You can set up multiple providers to the same auth provider as-well (multiple app’s in ms entra for example).
Public registration page
With this you can create public facing endpoint where users can be created by customers themselves.
Domains
With inbuilt forms the domain is always taken from the registration template.
Auth drivers
With inbuilt from the auth driver used is always ‘password’
Setting up public registration page
Create a public page that implements the automat api’s registration form. Use the Session.Customer.ID to detect if the user is already logged in.
Optionally, the AutomatApi.B2BLoginRegisterInput.LoginOnSuccess can be used to automatically login
newly created user and AutomatApi.B2BLoginRegisterInput.Redirect to redirect the user to a specific
page after successful login.
Check the automat api B2BLoginRegisterInput data source docs for additional available fields.
Setting up public login page
Create a public page that implements the automat api’s login form. Use the Session.Customer.ID to detect if the user is already logged in.
Optionally the AutomatApi.B2BLoginInput.Redirect can be used to redirect the user to a specific page after successful login
