This document serves as a container of all possible template assembly options.
It mostly answers the questions like:
How to display components in UI?
How to fill components with the data?
How to properly bind input objects to the forms?
How to use delete action?
And so on.
Deprecation
Following is a list of functions that are deprecated. These should not be used when creating new applications and should be replaced when
refactoring existing applications.
Function
Description
Alternative
Model type data sources
All data sources that do not follow the following pattern: .Data.{API}.Api.{Name}… Except .Data.AutomatApi that is goerp internal api and ErplyApi.ConfigurationList that is composed by goerp
Use dynamic api data sources instead
staticFileLink helper
Used to generate full links to assets, this is replaced by .Tools.StaticLink. The old one does not support custom domain links and wasm builds.
Standalone application, selected by default when creating a new application
Bundle
A listing of several applications that do not need to be connected with each-other. Serves as a bundle to install or update
several applications in one go.
Module
Note
As of version 1.319.0 the new module v2 features are released. Read about its functionality here:
Read more about module v2
Extension to a specific full application.
Files in the module can be set as replacements for files in the target full application.
Modules will be installed when the full app is installed automatically but the replacements will not be enabled until
the user uses the configure modules functionality to enable it.
There is no limit to how many modules can be enabled at the same time, but only a single module can be active if multiple
of them target the same file in the full application. Goerp will generate the module configuration groups based on this -
modules that target unique files will be in a separate group and modules that target the same files will be in the same group.
Asset
Applications that can be shared between multiple applications.
Used to share styles, js functions or general purpose partials/pages.
Note that the version of the asset in the application indicates the minimum required version of the asset, installation
will make sure that at-least this version is installed. It will not downgrade the version on the account if it has a
higher version installed.
Asset package creator needs to make sure that updates to the app does not break used elements in previous versions, if
this cannot be done then a new application should be created instead.
Subsections of Application types
Modules
Modules V2
Module v2 features released as of version 1.319.0
Modules can be used to easily enable or disable certain features on existing applications with a toggle.
Connections to applications
Modules can be created for any application. V2 modules do not need to be added to the parent application, instead
it is connected to the applications from the module application itself.
Create of open a module type application in the development mode editor view
Move to the ‘Modules’ tab
Use the ‘Select application for module’ button to connect the module to needed application
The enable and disable checkbox here can be used to immediately enable the module.
By default, goerp does not limit the modules to groups like v1 modules did, but the following grouping can be used to
create a custom behaviour similar to it.
The custom group name field can be used to group modules to a custom radio group on the store and on the parent
applications configure modules area.
Automatically merged data
Note that if the module contains translations or variables then these are automatically merged to the applications
data when the module is enabled.
Modification type templates
With modules v2 the main file type for adjustments is the new type ‘modification’.
By itself it does nothing. We need to configure it to alter something on a source page.
Multiple modifications can alter the same source (no defined limit).
Create or edit a ‘modification’ type template in the module application.
Open ‘Modules’ tab in the editor for the template.
You will see several options:
For template - Select the target template we want to alter
Module type - Select the module behaviour
Replace all content - replaces all contents of the target
Prepend all content - adds the module template contents before the target content
Append all content - adds the module template contents after the target content
Anchor - looks for the value in the ‘Module tag’ field and adds the content instead of it
Replace by name - looks for the ‘Module tag’ html node and replaces its contents
Prepend by name - looks for the ‘Module tag’ html node and adds content before its content
Append by name - looks for the ‘Module tag’ html node and adds content after its content
Prepend by ID - looks for the specific html node by its id and adds content before its content
Configure modules
Use the configure v2 modules button on the parent application ‘Modules’ tab or in the editor application structure view
to enable and disable the modules.
In store
Note that v2 modules are not installed automatically from the store with the parent. Instead, the store will list all
available modules from the store to the user, and the user can decide what to install.
However, the application type ‘bundle’ can be used to package the parent and modules into a single installation.
Examples
Adding new file dependencies to the source
Here we add an extra static css dependency to the original, adding a new line to the head of the document.
To use applications for files, first we need to create an application entity.
Use the CREATE NEW -> Create new application from the menu to create one.
Give the application a good clean name, it should follow the following rules:
Not contain any special characters
Start with a capital letter
You can link templates to the application from the application view screen, or you can
link the template to the application in the template view under the ‘Publish settings’
right panel.
Note that templates in the application should have a unique name. Recommendation is to use
some kind of prefix related to the application to describe the templates.
Example: My Test App -> mta-my-page
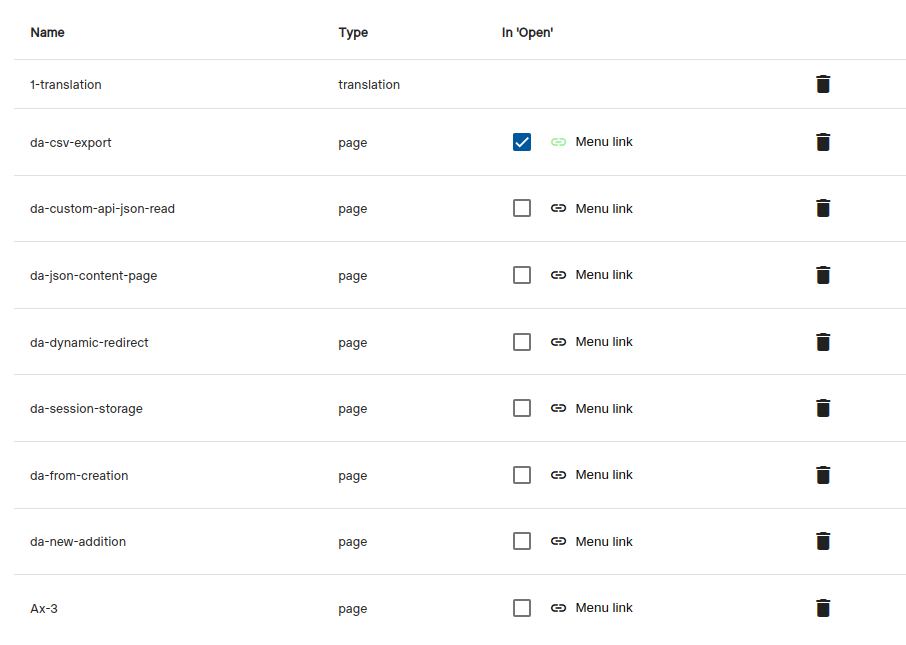
Templates and links
The linked templates list can be used to make the application create links to the application. There
are 2 kinds of links
Open menu link - this is the link that is created on the store application card, under the ‘Open’ button.
Menu link - this is an actual link that is added to the Erply menu
Green icon on the link button means a link has been defined.
Types
Currently, the application can be either a full, asset or module.
Use the ‘Publish settings -> Module replacement’ configuration on templates to same what template its meant to replace
as a module. Note that this setting is only used on module app’s and the replacement template type cannot be different from
the current templates.
Note
Asset and module type’s use a different kind of rating scheme and are not shown in the shop by default (visible with a filter).
Adding assets or modules to applications
Only full application can have assets and modules.
In the application edit screen navigate to the asset or module connection area (under templates).
Note
Note that the asset or module needs to be published to the store first.
Add assets/modules using the add button.
Update connected versions by just re-adding them.
Create version and publish
In order to share the application to other accounts we need to publish to the store.
Before the application can be published it needs to meet the following conditions:
Have publishing permissions on the account for the application uuid
Version needs to pass the application validation rules
Have a rate higher than 0
Valid application name, description and short description
Not include partials or static files that are not used by the application
Not include any critical validation errors
Unlinked partials or static files
Links to untrusted sources
Not use file names that are already used by another application
Has at-least one ‘Open’ menu link
has at-least one Erply menu link
To publish the application the workflow would be the following:
Validate version -> Create version -> Publish to the selected cluster
Logs
Application logs
The system collects application based errors into a short-lived memory that we can
access for approximate 1 hour.
This can be used for debugging purposes or to check if the application is causing errors.
These logs are only captured for items that are connected to an application.
What is being recorded
Failures in the editor for application connected templates
Failures in page view’s for any possible api’s or the view generation logic itself
Optionally the ‘debugDynApi=1’ can be added to the page parameters to record even successful requests. Note! If
the template was recently linked to an application and the template was not save/updated then it might need a new
re-save to properly start reading the debug logs.
This will make the application records all requests it makes even successful ones.
Where can the logs be seen
Template edit view under the ‘Application logs’ right section.
Under local application edit view. Content here is minimal as the api request data is not displayed.
Under store application installation view. Content here is minimal as the api request data is not displayed.
Store errors indicator
The store will also indicate with a bug icon for the application if it has recently encountered
errors.
Note that this will also capture template editing errors and can be used to reference encountered errors.
Moving applications
Moving application between accounts without using the store
Applications can be moved from one account to another without using the store interface. For this we can
export the application and then import it to the other account using the export and import functionality.
Navigate to the application you want to move
Edit the application under ‘Developer mode’
Move to the ‘Export’ tab
Open the ‘Export’ tab and click on the ‘Export’ button to download the application package
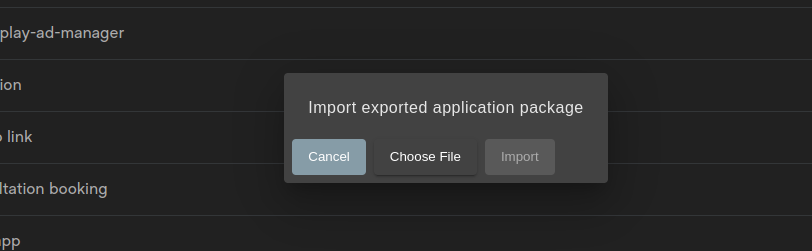
Import the application
Open the account you wish to move the application to and open the ‘Developer mode’ view.
Hover to the ‘Applications’ row to make the import button visible.
On the new modal select the previously exported zip file and click ‘Import’.
Wait for the process to complete. After this all the application should be available on the account.
Variables
Application static variables
Applications can use application accessible static variables that can then be used on all application
connected templates.
Useful when a similar value is being used in multiple templates and for optimization where a static value
is faster than trying to fetch one from an api.
These values can also be assigned into dynamic api requests parameters.
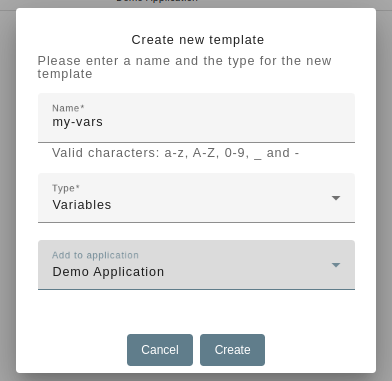
Create variables
In order to use the feature, first we need to create a ‘variables’ type file that is connected to the
application.
Note
Application should only have a single variables file, if multiple are connected only the first one of them will be used.
Contents
Contents of the variables file is in json format. The structure can have any kind of nesting or value types.
The values can just be printed to the template or be used in dynamic api chaining features.
The reading syntax is the same as reading dynamic api responses so all the same features and rules apply.
More about dynamic response reading
Security settings that can be changed per application
Note
Note that the setting here only apply to the selected application, they are not global.
Where to change:
Open “Developer mode”
Edit the desired application
Navigate to the “Security tab”
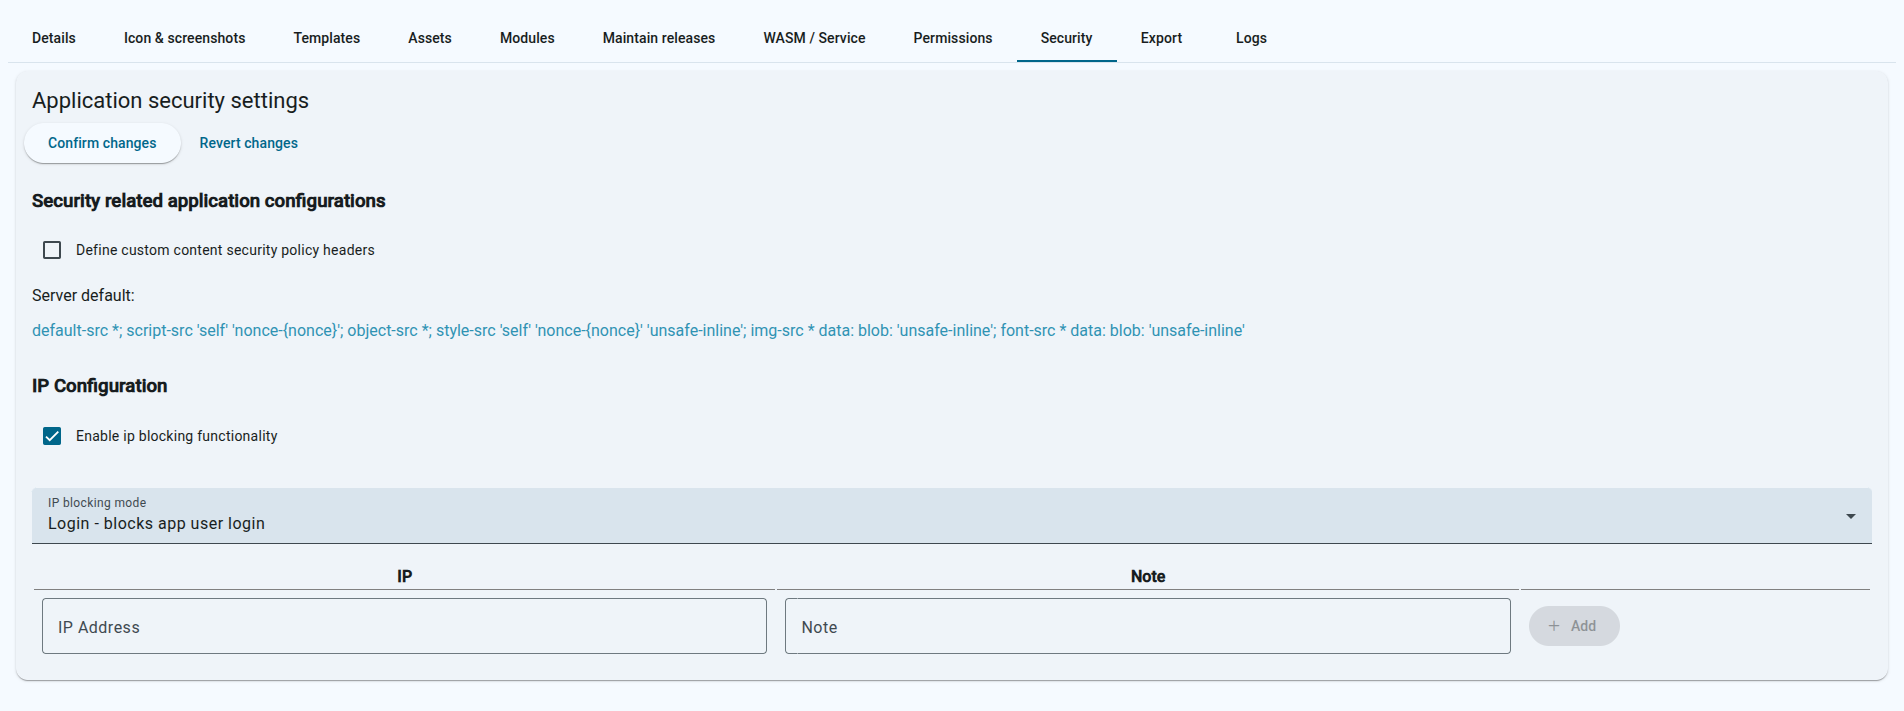
Custom CSP rules
The server will apply a default CSP ruleset (shown below), but you can disable this in the application security settings and provide a custom one instead.
The changes here will only take effect for the edited application.
It’s possible to also start blocking access to the application routes (or app user login) by IP.
The settings here work as a whitelist, this means when enabled without any ip inputs then all accesses are blocked.
Enter the allowed IP’s and an optional note who the IP belongs to.
When done then don’t forget to click on the “Confirm changes” button.
There are 2 modes for the blocking functionality:
Login block
This mode does not prevent access to view the pages but does block the app users from logging in.
View block
This mode blocks views of the pages entirely.
Subsections of Security
Permissions
Application permissions
The application permissions are used to control access to the application features. The permissions are defined in the application permissions file and can be assigned to app users by their groups.
Currently this works with app users only.
App users groups
Groups are used to assign permissions to app users. A user can have multiple groups.
Use the api to set the groups value for the users. The groups value is free text field that can have any value.
Permissions file
Create the ‘permissions’ type file in the application. The contents of the file are in json format.
First field is the type of the permissions (ex: UI)
Second field is the group name. This can be any value and is checked againts the current app user. If the current user does not have the group assigned then the given permission
action will be applied.
Ui rules alter the ui elements based on the defined rules. The rules are applied in the order they are defined in the permissions file.
Note
Currently the feature supports the following nodes: “input”, “button”, “a”, “form”, “div”, “select”, “textarea”, “aside”, “ul” and “label”
Element
The element field is a css selector that is used to select the elements that the rule will be applied to. The selector is applied to the entire application page, so it can be used to select any element on the page.
We can select by dom element, class or id. For example:
#email - selects the element with id “email”
.submit-btn - selects all elements with class “submit-btn”
button - selects all button elements
Action
The action field defines what will be done to the selected elements. The available actions are:
remove-no-group, remove - removes the element if the current user does not have the group assigned
remove-has-group - removes the element if the current user has the group assigned
add-class-no-group, add-class - adds a class to the element if the current user does not have the group assigned, class name is defined by the “class” field in the rule
add-class-has-group - adds a class to the element if the current user has the group assigned, class name is defined by the “class” field in the rule
Class
The class field is used to define the class name that will be added to the element when the action is “add-class”. This field is required when the action is “add-class” and is ignored for other actions.
WASM builds
Build automat applications into WebAssembly (WASM) to run them in web browsers. This allows you to create wasm applications with the same codebase as your web applications.
There are some limitations to be aware of when building for WASM:
JS loading by default in ‘blob’ mode, which means that all js code is loaded in a single blob, and it does not change in an already
loaded wasm application. This behaviour can be changed to ‘per-template’ in the builder settings, but it is currently experimental and may cause issues with already built applications that were built for the blob style mode.
B2B features work differently as it cannot contact used API’s directly (no access to erply session key). It uses a special proxy on the server to handle the request. This also means that the applications needs to be installed on the server as well for authentication and security purposes.
Severe bottleneck for asynchronous operations. Too many async operations may cause the application to behave erratically.
Some features are not yet supported in WASM builds (ex: helpers, tools etc). Create a feature request if you want to see a specific feature in WASM builds (and see the error in the console for a missing feature).
Build options
When building wasm applications there are multiple fields that can be set. Note that the initial values can be left as is, none of the fields need adjusting to create a build.
Some fields just set default values to the application and can be overwritten by url parameters on open time.
Name
Description
Can be altered with url parameter or post build session alteration
Version addition
Adds a unique suffix next to application build version. {version}-{version addition}
No. Used on build time only.
Client code
Adds a default client code to the build. Used when the link does not contain any client codes. Only use if the build is meant for a specific client otherwise leave empty.
Yes. Should be passed when opening the application.
Select JS serve method
Changes the way JS is being served from the wasm application. - Blob will compile all js to a single blob and serve it on startup. - Per template works like the server and js files are served as marked on template.
No. Used on build time only.
Select WASM api mode
Defaults to live. Offline is currently depracated as this mode directs all calls to the old offline ms. app_users is also deprecated as its replaced by app_users_v2. app_users_v2 when the application is using app users in b2b mode.
Yes. The mode can be changed at any time of the application. Leave empty for default live (regular bo users)
Select WASM cart mode
Switch cart mode to either the inv docs api or the internally built version. Only needed if the application actually uses cart functionality. Default is server where all inv docs cart calls contact the server. Internal will use the built in version instead.
Yes. This mode can be changed at any time of the application. Leave empty for live.
Use internal cart backup
Only shown and used when cart mode is internal. When selected then wasm will backup the cart to kvs and reload it when it starts.
Yes. This mode can be changed at any time of the application.
Additional applications
With this we can add extra applications (module v2 or even full applications) to the same wasm build. This is the way to make V2 modules available to the build, use the checkbox to set the module to enabled/disabled on application load.
No. Used on build time only.
Note that if we set default modes here during build time, then we do not need to select these values with the open link.
Builder updates
Check the changelog area for the information on major updates.
Changelog
Subsections of WASM builds
Builder changelog
This page contains the changelog for the builder. It is updated with each new release of the builder.
1.54.5
GS-25581 Updated targeted loads on services. Same page targets will no longer force the full re-render. Extended functionality to forms with actions.
GS-26908 Fixed a load order issue in dev builds that was overwriting data of templates when it was loaded in a specific order
1.54.4
App user model in session now includees the loginMethod field. The session will also include the app accesses and warehouse
accesses in the session. This is also filled when using app user with the back office auth driver.
GS-25581 Service builds: a nodes with targeted loads will no longer skip the main navigation
GS-25581 Service builds: data passes from the targeted loads from functions will now work similar to wasm
GS-26708 Dev builds: Configuration is now validated before it get loaded
GS-26708 Dev builds: Improved load and reload operation to be more lightweight
GS-26871 Added stale write guard for targeted loads elements to prevent old calls that might take time to complete from overwriting newer calls that already updated the content
1.54.3
Adjusted .Tools.GetMenuStructure to return the same level data as on the server
1.54.1 / 1.54.2
GS-26476 Adds support for InventoryApi dynamic api integration
GS-26490 CallTemplate calls will no longer append the ? character to the url without the query parameters or when the path input already contains one
GS-26490 The autofocus functionality of the server can now be mimicked by adding the attribute data-wsm-refocus on the body node of the current page
Added ApiCommandBroker to supported internal dynamic api’s
GS-25581 Improved service build targeted loads functionality so it supports detached forms from buttons
1.54.0
Local development build related updates
1.53.1, 1.53.2
Fixed an issue where template matching logic was case-sensitive from the default template link, causing it to fail on index as the index is always lower case
Various maintenance updates
1.53.0
GS-26283 Updated dataLoad to make automatic object to gjson conversions (imorted from server behaviour)
GS-26283 Added FDR api integration to wasm
GS-26283 Adds support for .Data.Files
Added automatic menu structure translation to service/wasm builds
GS-26284 Adds new optional 4th parameter to target load from functions .Tools.AddLoadTarget "wtl-table-b-page" "#table-b" "afterx" (mkMap "key" "val"). Contents are readable on that page from .Data.Parameters
Improved targeted load script for service builds, it will now also parse load parameters from form elements
1.52.2
Configuration update. No functional changes.
1.52.1
Fixed an issue where script tags would be purged of extra attribute tags and its type always adjusted to text/javascript
1.51.0 and 1.52.0
GS-25717 Service and app routes now support app routes navigation. It also supports navigation by template route alone if the app route is not provided.
GS-25581 Adds targeted loads fallback capability to service builds, so application builds would not lose functionality when built there. This is currently experimental and will likely receive further changes for its behaviour.
Adds helpers to be available dtSince and indexOfStringSlice
Adds tools helper to be available {{ .Tools.GetStaticNavPath "my-page" }}
GS-25845 Adjusted toTitle behaviour to match that of the server
Added new tools helper to list all applications and v2 modules that have been added to the build {{ .Tools.ListV2Modules }}
Build flow improvements: fixed an issue where the new flow would reach command line length limits on large applications.
GS-25834 Adds new tools helpers (for use in functions only) for B2B authentication (B2BLogin, B2BLogout, B2BLoginRegister, B2BRequestPasswordReset and B2BConfirmPasswordReset)
All take in the same json instruction as the corresponding calls on the api {{ .Tools.B2BLogin {“username”: “”, “password”: “”, “authDriver”: “password”} }}. The template field is filled automatically.
GS-25894 Adds new helpers to generate local bcrypt hashes and verify them {{ bcryptHash "my-password" }} and {{ bcryptVerify "my-password" "the-hash" }}
GS-25232 RunQueryV2 is now supported on service and wasm builds
Adds support for ApiLogFiles api in integrated dynamic API’s
GS-25602 Adds an option to render js scripts as per-template scripts (same as the server and service does) instead of the single blob. This is experimental and will likely break applications that have already been built with the default single blob setting.
Local Development builds
Local development with the builder.
Use the special service build locally to develop the applications. With this you can use local IDE and run the application locally.
Also use git repository on the files for easier development and version control.
The build here is closer to WASM/Service builds than the regular server build.
Some known functionality differences:
Not possible to run query templates against query api
Not possible to use server AI features
Warning
Note that this is an experimental version at the moment so there are some limitations and issues that may arise. Please report any issues you find.
Configuration
The file contains a configuration.json file where you can set up the configuration for the local development build.
The application structure used is the same as the export packages from the server.
If the application uses assets or modules (v2) then these should also be exported and put into the extra_directories field in the configuration file. This is needed for the builder to be able to include these in the build.
Edit the configuration file (configuration.json) as instructed.
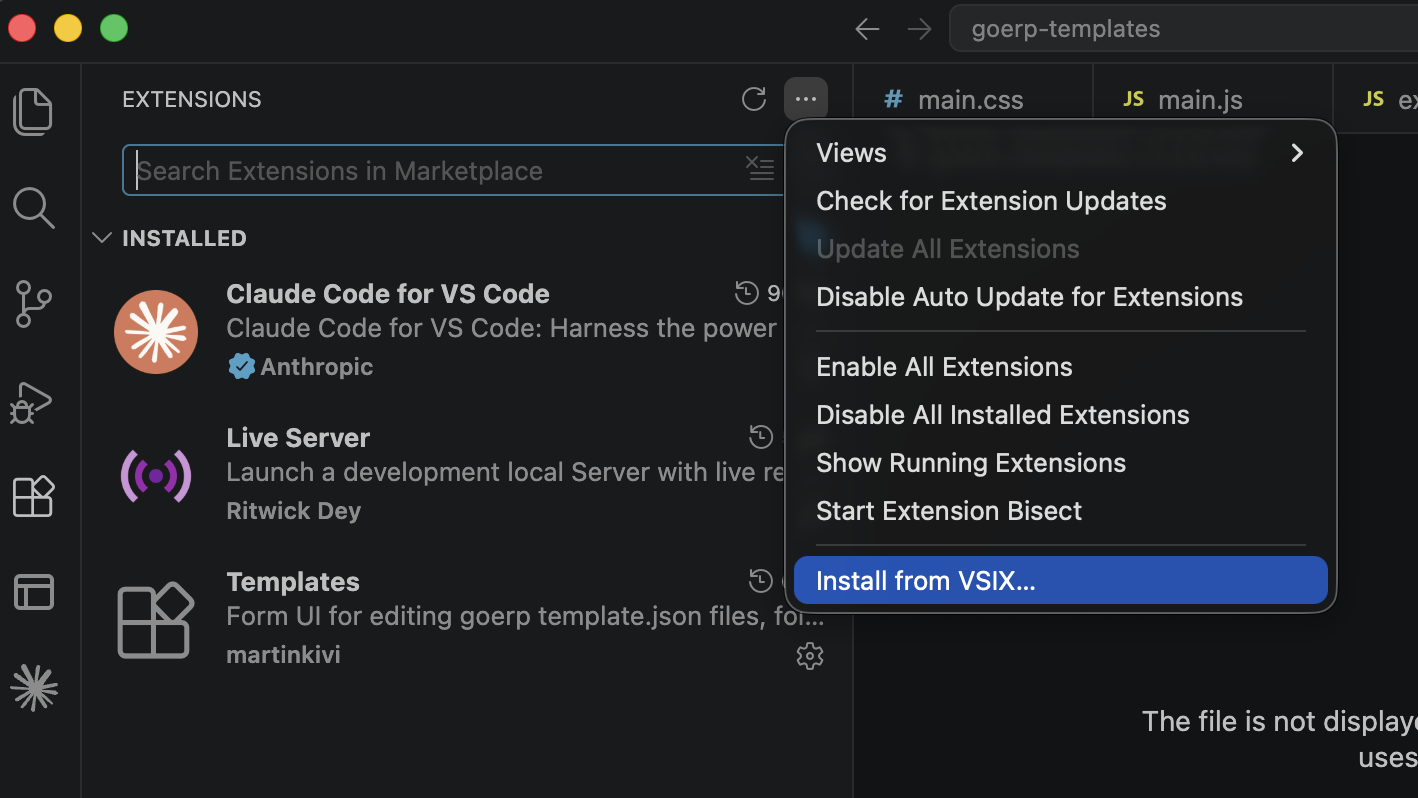
Development workflow with VS Code and local build
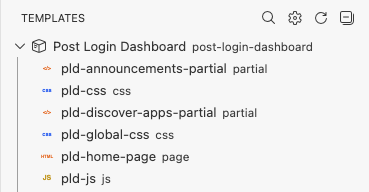
The extension adds two panels into VS Code, similar to the GoERP web editor:
Templates shows a list of templates in the current application and lets you quickly switch between them.
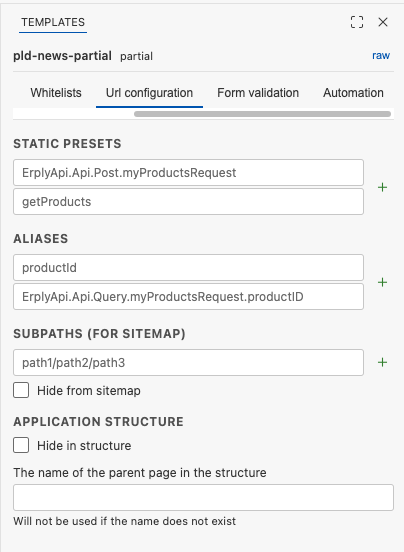
Template settings contains the “Publish settings”, “Modules”, “Whitelists”, “Url configuration”, “Form validation” and “Automation” tabs.
Start up the local build:
./automat serve
Edit and create templates, or use AI to generate/edit them. View the results locally.
Invoke the local build binary to upload the modified app to your Erply account:
./automat package-and-upload
Application templates
Subsections of Application templates
Templates
Subsections of Templates
Pages
GOERP uses golang templates while assembling the pages, so any options that are supported by go
templates may be applied here. Please refer to the official docs to get more information.
Pages creation process is like writing html code, including some features from go templating system.
Alternatively, GOERP have in-build layout system, so one layout can be re-used on many pages.
All default layouts located in the partials section of the editor. Layouts have suffix -layout.
Here is example for the complex page, using layouts:
{{ template "dev-v2-layout" . }}
{{ define "title-block" }} Title of the tab {{ end }}
{{ define "content-block" }}
All content goes here, basically <main></main> should be in this section
{{ end }}
{{ define "js-block" }}
All js code goes here, <script></script>{{ end }}
Content partials
Note
This section describes content partials, which have go-html content only. For java-script and css partials check “JS and CSS partials” section.
Partial is a part of document that can be re-used in several pages, which may be convenient if application consists of several pages with same content in some places. Let’s say we have application where navigation content repeated in every page, with partial we can put this content in one template and re-use it in every page. Sounds very convenient, but still they have some restrictions:
Partials can also contain unlimited partials, but the maximum depth (nested levels) is currently limited to 5
Partials cannot have js and css imports/blocks
Create partial
To create a partial, go to the template editor
and pick Create -> Create new template, then define name and select type Partial from the dropdown.
Editor will generate very simple initial code for the partial and append suffix -partial to the
template name:
{{ define "my-cool-partial" }}
<!-- Feel free to write your awesome component using HTML and powerful templating options -->{{ end }}
So lets update newly created partial with some content
{{ define "my-cool-partial" }}
<h1>Hello Goerp!</h1>{{ end }}
In the last section we created simple partial and injected into the page. There is dot in the end
of partial injection statement, which means that we are passing all data that was sent from back-end
with the response to the partial. In this case we can use any available variable field, for example
changing our <h1>Hello Goerp!</h1> to the <h1>Hello Goerp! Client code {{ .Data.Session.ClientCode }}</h1>
will print the client code number.
However, in some cases we may want to pass specific set of variables instead of all available ones.
In this case we can use in-build function that will produce variable of the key-value pairs (check
Built-in helper functions topic mkMap func for more details). So we need to update our partial to use the variable:
<h1>Hello Goerp! Client code {{ .clientCode }}</h1> and then pass this variable while injecting
the template in our page: {{ template "my-cool-partial" mkMap "clientCode" 123456 }}. Or we can
pass any part of available in page data, this will also work: {{ template "my-cool-partial" .Data.Session }}
and then <h1>Hello Goerp! Client code {{ .ClientCode }}; session key {{ .SessionKey }}</h1>
JS and CSS partials
Warning
According to the new CSP (Content Security Policy) requirements, all inline css and js content will be blocked by browser.
To create a css/js partial, go to the template editor
and pick Create -> Create new template, then define name and select type JS or CSS respectively.
Editor will create empty file and append suffix -css or -js respectively to the
template name. Now we can write any valid css/js code there, just like we would do in regular
.js or .css files.
Now, when static partial is ready, we can link it with the page like this:
<!doctype html><htmllang="en"><head><metacharset="UTF-8"><metaname="viewport"content="width=device-width, user-scalable=no, initial-scale=1.0, maximum-scale=1.0, minimum-scale=1.0"><metahttp-equiv="X-UA-Compatible"content="ie=edge"> {{/* Link css partial, as an option, calling linking function in a pipe */}}
<linkrel="stylesheet"href="{{ "partial-css"|staticFileLink}}"><title>Document</title></head><body> {{/* Page content */}}
{{/* Link js partial, as an option, using regular linking function call */}}
<scriptsrc="{{ staticFileLink "partial-js"}}"></script></body></html>
Java-script and css partials are static files, and they are not part of the goerp template.
To link our templates with the static partials (js, css), we can use helper function staticFileLink
like this: <link rel="stylesheet" href="{{ "partial-css" | staticFileLink }}">. Or make linking as
usual css and js imports: <link rel="stylesheet" href="https://link.to.css.file">
Layouts
GOERP have in-build layout system, so one layout can be re-used on many pages. This feature would be
very useful if application have many templates (pages) because with layouts we can encapsulate
all general html into one component (e.g. css and js dependencies, general html like header, footer,
menu, etc…).
Note
Layouts usage may look similar to the regular partial logic, however, they behave in absolutely
different way. The main difference between layout and regular partial is that the former one
contains code placeholders that are replaced with actual payload on the related page template,
and the latter one doesn’t have any placeholders and contains only code that is related to
this specific partial.
In other words:
in case of layouts, page template exports go-html content to the layout
through block keywords by define‘ing those blocks;
in case of partial, page template imports go-html content from the partial through
the template notation;
both, layout and partial, should be defined inside page by using template keyword, the only
difference is that layouts must be defined at very beginning of the page template.
both, layout and partial cannot include other partials as dependencies
Under pages topic we already covered briefly layouts feature. Let’s dive into more details now.
Very simple example (layout)
{{ define "simple-layout" }}
<!-- Let's say we want to encapsulate page content that is the same for all pages in our application --><!doctype html><htmllang="en"><head><metacharset="utf-8"><metaname="viewport"content="width=device-width, initial-scale=1"><!-- Default Erply styles --><linkrel="stylesheet"href="https://assets.erply.com/bo-prototype/_style.css"><!-- Maybe some custom styles --><linkrel="stylesheet"href="https://assets.my-company.net/style.css"><!-- Regular fonts from google --><linkhref="https://fonts.googleapis.com/icon?family=Material+Icons"rel="stylesheet"><!-- With this block we are creating placeholder which may be filled from the page template --><!-- Here we may inject page specific css links or static file dependencies --><!-- Please note, all block definition names must have -block suffix at the end --> {{ block "css-block" . }} {{ end }}
<!-- Add page specific title --><title> {{ block "title-block" . }} Default title {{ end }}
</title></head><body><menuclass="menu-container"><!-- This menu will be included into all dependent pages --></menu>{{ block "content-block" . }}
<main><p> Another cool feature of the placeholder blocks is that they may contain default content,
some kind of fall back in case if dependent page decides to leave this block undefined. So,
if page that is using this layout doesn't have <code>{{ define "content-block" }} {{ end
}}</code> section then <strong>this message shown by default</strong>.
</p></main>{{ end }}
<!-- Another sample how to pass some data from templates to the js using inputs --><inputtype="hidden"id="AUT_SESSION"value="{{ toJson .Session }}"><inputtype="hidden"id="REQUEST_STATS"value="{{ toJson .Data.RequestStats }}"><!-- global js dependencies --><scriptsrc="/assets/js/automat.deps.js"type="application/javascript"></script><scriptsrc="/assets/js/menu.bundle.js"type="application/javascript"></script><!-- placeholder for js dependencies, use static files to import js code -->{{ block "js-block" . }} {{ end }}
</body></html>{{ end }}
First of all, we are defining name of the layout, which must end with layout suffix. Don’t worry,
suffix will be added automatically when creating new template from editor and selecting layout
template type. So, for our sample during layout creation we enter simple name and -layout added
by default.
Next, we have some regular page content that is, potentially, repeated on every page in our
application.
The first block that would be replaced by content from the page that will use this layout is
{{ block "css-block" . }} {{ end }}. Then we have title placeholder:
{{ block "title-block" . }} Default title {{ end }} and then placeholder for the biggest part
of the page, - main section: {{ block "content-block" . }} {{ end }}. Check default (fall back)
content of this block in the sample. Finally, we have js placeholder where we can include any
js related to the page, please refer to css and js partials for more information on how to include
js and css code.
Warning
While defining blocks inside layout, always put -block suffix in names. If name will end with
something else then goerp parser will process them as regular partials and mess up template
parameters. This may lead to appear some unknown partials and mey produce unexpected behavior.
Very simple example (page)
Now, when we have defined the layout, we may want to use it inside our pages. Let’s say it 10th page
of our application:
<!-- Page creation always starting from importing our layout -->{{ template "simple-layout" . }}
<!-- Title for our 10th page -->{{ define "title-block" }} 10th page of application {{ end }}
<!-- The biggest part, - content -->{{ define "content-block" }}
<!-- Display errors -->{{ range .Data.Errors }}
<divclass="error-row"><span>{{ . }}</span></div>{{ end }}
<!-- Include partials -->{{ template "employee-query-form-partial" . }}
<!-- Write regular goerp template code --><table><thead><tr><th>Id</th><th>First Name</th><th>Last Name</th></tr></thead><tbody> {{ range .Data.AccountAdminApi.EmployeeList }}
<tr><td>{{ .Id }}</td><td>{{ .FirstName }}</td><td>{{ .LastName }}</td></tr> {{ end }}
</tbody></table><!-- Include js -->{{ define "js-block" }}
<scriptsrc="{{ staticFileLink "my-cool-js"}}"></script>{{ end }}
{{ end }}
First of all, we are importing layout to the page.
Tip
Notice dot at the end of layout definition? Yes, we can pass any data to the layout, with the dot
we are passing everything that page have. However, we can pass some custom data and, for example,
add tabs logic to the layout. Just a tip.
Next, we are defining title of our page with
{{ define "title-block" }} 10th page of application {{ end }}. Next, in our template we have
css-block, but we don’t need to include any css links/deps here, so we just skip this block.
Next goes content of the page, the biggest part. There we can use other templates-partials and
goerp templating logic.
Finally, we have js block implementation which includes static file.
When to use layouts?
Layouts are powerful feature of the goerp template engine. However, it is quite complex and may
produce some wierd behaviour if it is used in a wrong way. Better to avoid using layouts if they
are not simplifying your work, just follow KISS principles. Same advice regarding partials. For
example, if your application have 3 pages with simple form and a couple of tables, then maybe would
be more convenient to write all content inside one template-page, so don’t need to jump between
partials during development or maintaining.
Here is a short tips list when to use layout and when to avoid it:
Layouts are handy when
My application have many pages with repeated content (such as menu, tabs, dependencies, etc.)
I have many applications that reuses same code on every page. Please note, in this case you
still need to create duplicate layout and give it a new name, but you need just copy-paste the
content.
Avoid layouts when
My application have few pages and duplicating similar content wouldn’t take much effort
Routes
Routes are a special type of template that can be navigated to similarly to pages. They are used to create dynamic pages that can be accessed through a URL. Routes can also be used to create API endpoints that can be called from other applications.
Routes only work with application routes feature. This means the application needs to have a route defined and the route
template needs to have one defined as well.
Create a template with type ‘route’ to create a route template.
Internal and public routes
There are 2 types of routes: internal and public. Internal routes are only accessible from the internal session, while public routes can be accessed with app users session (public).
These routes add prefixes to the route URL:
Internal routes - /int/{app-route}/{route}
Public routes - /pub/{app-route}/{route}
Routing to the template
If we have an application that has route as ‘demo’ and the route template has route defined as ‘my-route’, we can navigate to it with the following URL:
https://automat-eu10.erply.com/int/demo/my-route
Required headers
For this to work we need to pass the required headers.
Internal routes
clientCode - the client code of the account
sessionKey - the session key of the user (when using internal routes, and we do not have a b2bKey)
b2bKey (optional) - this is the automat session, it’s set in the cookie app-r-{clientCode} or .Session.Key on the templates (it will still work without this being passed,
but it will be a bit slower, pass it always when we have one)
Public routes
clientCode - the client code of the account
b2bKey - this is the automat session, it’s set in the cookie app-p-{clientCode} or .Session.Key on the templates
Helpers
We can access the session similar to the pages
{{ $session := .Session.ClientCode }}
We can also use all the same regular helpers as in the pages:
{{ add 1 2 }}
We can call functions from routes similar to pages:
{{ .Tools.Func "demo-app-func" }}
Parameters
In routes we do not have the .Parameters helper instead we different helpers to fetch specific parameters.
Query parameters
Read incoming query parameters with the .Query helper. This will return the value of the query parameter as a string.
{{ $id := .Query "id" }}
Path parameters
Read the path1, path2, path3, path4 and path5 parameters with the .Param helper. This will return the value of the parameter as a string.
{{ $s2 := .Param "path1" }}
Json
If we expect that the body is send in json format. The result is gjson.Result object that we can use to read the values from the json body.
{{ $s3 := .RequestJson }}
Body
If the body is anything else than json we can read it as a string with the .RequestBody helper.
{{ $s4 := .RequestBody }}
Header
We can read the header values with the .Header helper.
{{ $s5 := .Header "X-Custom-Header" }}
Method
We can read the method of the request with the .Method helper.
{{ $method := .Method }}
Set response content type
By default, the content type of the response is set to text/html. We can change it with the .SetContentType helper.
{{ .SetContentType "application/json" }}
Set response header
We can set the header of the response with the .SetHeader helper.
{{ .SetHeader "X-Custom-Header" "value" }}
Respond
Note that as soon as we call respond then rest of the template does not execute. This is useful when we want to return a response immediately without executing the rest of the template.
The first parameter is the status code and the second parameter is the response body. The response body can be any string, for example json string.
{{ .Respond 200 `{"data": "Hello World"}` }}
Pagination
To implement pagination, query parameters are usually used, which indicate how much data should be returned on the current page, how many records per page should be displayed, and what page number should be shown.
The most commonly used query parameters for pagination are:
Page or PageNo: current page number (starting from 1).
RecordsOnPage: number of elements per page (usually used to limit the amount of data returned per page).
For example, a request to get the first 20 items of a product listing on the second page might look like this:
GET /products?page=2&RecordsOnPage=20
Note
NOTE For pagination to work it is important to place it inside the GET form and add the pagination data.
Pagination example
This code is for a pagination component that displays and navigates through a table of data with 20
records per page by default. It includes previous and next page buttons, a dropdown menu for selecting
the number of records to display per page, and a button to update the table based on the selected number of records.
<formmethod="get"data-pagination><!-- Pagination interface --><divclass="pagination aligner aligner--contentStart aligner--centerVertical"><!-- Previous page button --><buttonclass="button--icon button--outlined icon-Chevron-Left"id="previous-button"></button><!-- Current page number --><inputtype="hidden"name="Data.Example.PageNo"id="page"value="{{ .Data.Example.PageNo }}"><pclass="aligner aligner--centerVertical"> Page {{ .Data.Example.PageNo }} </p><!-- Next page button --><buttonclass="button--icon button--outlined icon-Chevron-Right"id="next-button"></button><!-- Results per page dropdown --><pclass="aligner aligner--centerVertical">Results per page</p><selectclass="select margin-left-16 aligner aligner--centerVertical"name="Data.Example.RecordsOnPage"id="select"><optionvalue="20"{{ifeq"20"$.Data.Example.RecordsOnPage}}selected{{end}}>20</option><optionvalue="50"{{ifeq"50"$.Data.Example.RecordsOnPage}}selected{{end}}>50</option><optionvalue="100"{{ifeq"100"$.Data.Example.RecordsOnPage}}selected{{end}}>100</option></select><!-- Show button to submit selected number of results per page --><buttonid="show"class="button button--primary">Show</button></div></form>
Goerp server returns errors with every response. Errors are available in .Data.Errors variable which
is array of strings. So it is possible to go through this array and display errors on page.
Adding small block into the page (or into layout) may look like that:
{{ range .Data.Errors }}
<divclass="error-row"><span>{{ . }}</span></div>{{ end }}
In addition to errors, response contains success flag which is available only after posting form
with POST action and may be found in .Data.FormControl.PostActionSuccessful. So, right after errors
block may be reasonable to add success message as well.
{{ if .Data.FormControl.PostActionSuccessful }}
<divclass="success-row"><span>Success!</span></div>{{ end }}
Note
NOTE When you add the errors and success flag, you are not writing any flags. Goerp editor will check errors and success flag by itself.
Form inputs
Subsections of Form inputs
Validation
The validation script is already embedded inside the script bundle.js
In order for the field to be important, it is enough to write in the required in input
<divid="Mobile-error"><inputtype="text"requiredclass="input input-fullWidth"id="Mobile"name="Mobile"placeholder="(e.g., +1 800 555 5555)"<!--Itisimportanttowritepatternparametrs--> pattern="[\d+\- ()]*">
<!--It is important to write the notification field in--><pclass="text-error text-small"id="Mobile-text"style="display: none;"> Required and should only contain numbers, plus, dashes, and spaces</p></div>
This pattern checks that an email address starts with one or more alphanumeric characters, which can be followed by any number of dots, hyphens, plus signs, and percent signs. This is followed by the @ symbol followed by the domain name
For zipcode
pattern="^\d{5}(?:[-\s]\d{4})?$"
This pattern checks that the Zipcode meets the following criteria: Consists of 5 digits
For phone
pattern="[\d+\- ()]*"
Ready patterns Types
For string
pattern="^[a-zA-Z\s]+$"
For numbers
pattern="^?\d+$"
Checkbox
The value of the checkbox is set based on the checkbox state. If checked, then it is true, otherwise false.
Please note that input should have form-input class.
<inputtype="checkbox"id="formInputOnlineAppointmentsEnabled"class="form-input"name="AccountAdminApi.WarehouseInput.OnlineAppointmentsEnabled"{{if.Data.AccountAdminApi.WarehouseInput.OnlineAppointmentsEnabled}}checked{{end}}><!-- if not checked, passed hidden field, otherwise both but first one have higher priority (FIFO) --><inputtype="hidden"name="AccountAdminApi.WarehouseInput.OnlineAppointmentsEnabled"value="false"><labelfor="formInputOnlineAppointmentsEnabled">Online appointments</label>
Public/b2b pages
Introduction
Regular pages will be restricted with the erply back-office sessions, this means that the pages cannot be viewed without
a valid erply user session.
We can use the b2b/public sessions to set pages to no use the back-office session.
For that we have 2 options:
Public session - these sessions are completely public and do not require a user to log in at all.
Protected session (app user) - pages that can only be viewed by logged in app user. App users are special users
that are managed in the application itself.
Permission
Public pages are protected by 3 different methods.
Erply user group permissions - on installation a user group is created
goerp-app-users-group, all data fetches to erply api’s will use
the rights of this group.
Dynamic api request whitelist - a list of calls that are allowed with the dynamic api feature.
Parameter whitelist - a list of parameters that we allow to be used.
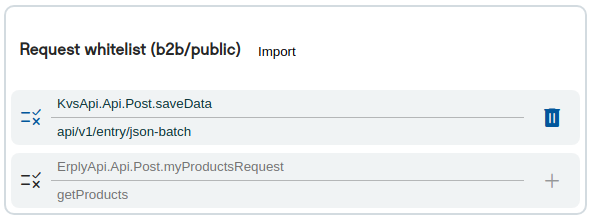
Dynamic api request whitelist
The whitelist is under the ‘Publish settings’ tab in the editor view.
When enabled the dynamic requests would need to be added to the page
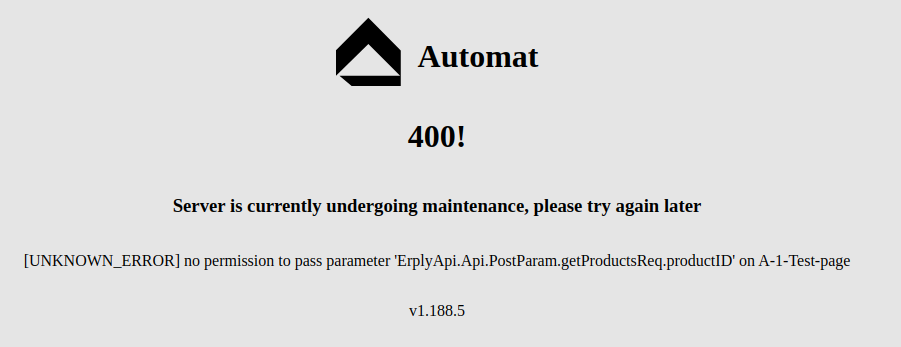
Parameters whitelist
The following error is given when on public pages we send a parameter that is not added to the whitelist.
The whitelist can be accessed under the ‘Publish settings’ in the editor view. The parameter whitelist counts
in presets and request the whitelist (when used) so the values there do not need to be duplicated here.
When enabled the used parameters need to be filled to the list of the page.
If the permissions were previously set to the aliases then we can also use the ‘Import from alias’ button
to automatically fill them based on the alias settings.
As of 1.234.5+ disabling of these features is not recommended and will be disabled for new templates.
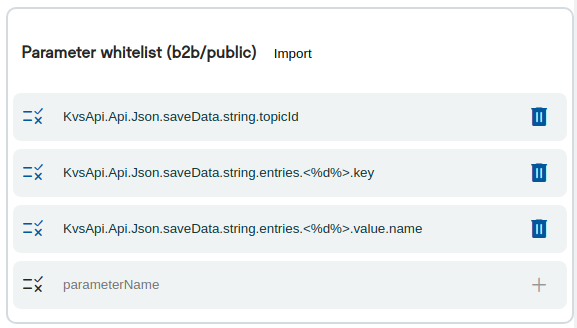
Pattern matching rules for parameter whitelist
The whitelist supports pattern matching for the parameters. That would be very helpful when working
with the json that contains or generates arrays. At the moment pattern matching is supported
for digits <%d%> and string <%s%>.
To define a placeholder just put a <%d%> in the place where actual parameter name may have a
number. Can be defined as many placeholders per parameter as needed.
Protected pages can only be accessed with a logged in app user. App users are special app specific users that can
be set up to access specific applications.
Login and registration is up to the specific applications. Either it allows user registration from a public page
or user creation is handled in some admin panel instead.
Note that app users cannot exist without an application, and the users cannot access or log in if they are not associated
with an existing application (as opposed to erply account users). These user sessions cannot access erply back-office
applications and regular pages.
Public routes always are prefixed with either public/ or b2b/ (except on custom domains).
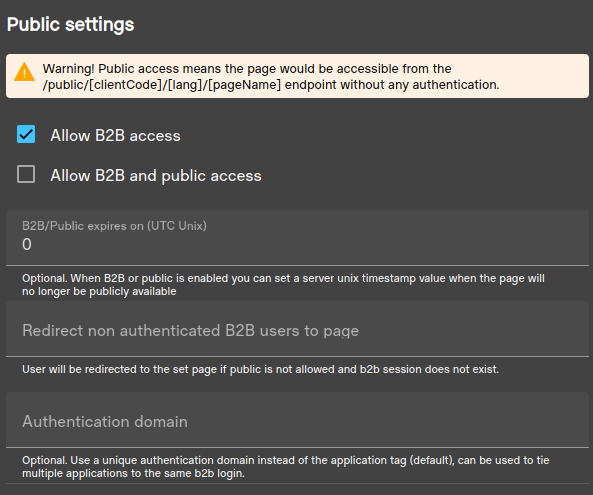
Setup
Set the page to allow b2b access to set this protection level.
This can be configured in the template editor mode under the ‘Publish setting’ right menu.
Note
It is also possible to set an optional expiration date to the page (UTC unix value) after this
timestamp has passed on the server the will no longer be accessible using the b2b endpoint.
Use authentication config input set the value.
Also note that this setting is based on applications or auth domains.
Each user requires the application domain to be able to create a valid session for the application. By default,
the application domain is the applications uuid. You can use the ‘Authentication domain’ field to set a custom value -
if the same value is set for multiple applications then the applications can share the users.
Use the ‘Redirect non-authenticated B2B users to page’ option to automatically redirect to login or error
page invalid accesses.
User creation/registration
Users can either be created using a public registration form (for stores, b2b pages etc), or creation is managed internally
within another page or application.
Domains under the user determine what application pages the user can access.
Auth drivers
Auth drivers indicate what authentication methods the user is allowed to use to log in.
Inbuilt methods: password, pin and openid
Open id
Open ID setup can be used to create custom sso methods for login. Each provider that is set up for the login page
can then be used with the users to log in.
Creating a custom open id driver:
In the login page template, navigate to the Publish settings -> OpenID Configuration tab.
Use the ‘Add new configuration’ button to register a new open id provided (driver). Fill in the required fields and
fields related to the provider. Note that the ‘Provider’ field will be used as the driver name.
The ’email’ scope is also required as app users will be matched with the email.
In the login command set the auth driver to the created one.
In order for the users to be able to use it they would need to have the ‘ms_entra’ auth driver. Note that for open id
auth drivers the value field will not be used.
The jwksUrl endpoint needs to point to the public keys configuration.
This example assumes the open id configuration was given the provider name of ‘ms_entra’.
<formmethod="post"><inputtype="hidden"name="AutomatApi.B2BLoginInput.Redirect"value="b2b-2-members-page"><inputtype="hidden"name="AutomatApi.B2BLoginInput.AuthDriver"value="ms_entra"><buttontype="submit"> Microsoft SSO
</button></form>
There is no limit to the open id providers. You can set up multiple providers to the same auth provider as-well (multiple app’s in ms entra for example).
Public registration page
With this you can create public facing endpoint where users can be created by customers themselves.
Domains
With inbuilt forms the domain is always taken from the registration template.
Auth drivers
With inbuilt from the auth driver used is always ‘password’
Setting up public registration page
Create a public page that implements the automat api’s registration form.
Use the Session.Customer.ID to detect if the user is already logged in.
Optionally, the AutomatApi.B2BLoginRegisterInput.LoginOnSuccess can be used to automatically login
newly created user and AutomatApi.B2BLoginRegisterInput.Redirect to redirect the user to a specific
page after successful login.
Check the automat api B2BLoginRegisterInput data source docs for additional available fields.
<!-- Read registration errors --><divclass="my-error-container"> {{ range .Data.Errors }}
<spanclass="my-error-message">{{ . }}</span> {{ end }}
</div>{{ if .Session.Customer.ID }}
<h1>Already registered</h1>{{ else }}
<h1>Register a new user</h1><formmethod="post"><inputtype="hidden"name="postActionEntity"value="B2BLoginRegisterInput"><inputtype="hidden"name="postActionRedirect"value="b2b-login-demo-page"><!-- Configure autologin and redirect --><inputtype="hidden"name="AutomatApi.B2BLoginRegisterInput.LoginOnSuccess"value="1"><inputtype="hidden"name="AutomatApi.B2BLoginRegisterInput.Redirect"value="b2b-2-members-page"><br><labelfor="firstName">First name</label><inputtype="text"id="firstName"name="AutomatApi.B2BLoginRegisterInput.Firstname"><br><labelfor="lastName">Last name</label><inputtype="text"id="lastName"name="AutomatApi.B2BLoginRegisterInput.Lastname"><br><labelfor="email">Email</label><inputtype="text"id="email"name="AutomatApi.B2BLoginRegisterInput.Username"><br><labelfor="password">Password</label><inputtype="password"id="password"name="AutomatApi.B2BLoginRegisterInput.Password"><br><buttontype="submit">Register</button></form>{{ end }}
Setting up public login page
Create a public page that implements the automat api’s login form.
Use the Session.Customer.ID to detect if the user is already logged in.
Optionally the AutomatApi.B2BLoginInput.Redirect can be used to redirect the user
to a specific page after successful login
<!-- Read login errors --><divclass="my-error-container"> {{ range .Data.Errors }}
<spanclass="my-error-message">{{ . }}</span> {{ end }}
</div>{{ if .Session.Customer.ID }}
<p>Welcome {{ .Session.Customer.FirstName }}</p>{{ else }}
<formmethod="post"><labelfor="username">Email</label><inputtype="text"id="username"name="AutomatApi.B2BLoginInput.Username"/><br><labelfor="password">Password</label><inputtype="password"id="password"name="AutomatApi.B2BLoginInput.Password"/><br><buttontype="submit">Login</button></form>{{ end }}
Back office auth driver
This is a special auth driver that will:
Automatically create a connected app user to the back office user when it does not exist (or connect it if one with the same username exists).
Log the app user in to goerp without exposing the erply session (meaning the user cannot switch to regular back office applications).
To enable this driver, set the following to the app users login:
Set the login driver to ‘back-office’ (depending on if the api is used the input might look different)
Allow to use back-office driver on the login template settings tab : Publish settings -> Login -> Allow back office auth driver
When this is set the login form checks against the back office user (username and password).
Public
Introduction
Public pages are accessible without any login.
Setup
This can be added in the template edit view and enabling the “Allow B2B and public access” setting.
Note
It is also possible to set an optional expiration date to the page (UTC unix value) after this
timestamp has passed on the server the will no longer be accessible using the b2b endpoint.
Use authentication config input set the value.
These routes can be accessed by prefixing the routes with /public/
Starting from version 1.246.0, GoErp allows to use dynamic api features while creating register,
login and others b2b authentication calls. This allows to create multiple requests and chain data
between them, including authorization calls.
Note
Those API calls works properly only inside GoErp templates, because b2b (public) authentication
depends on the template configuration, therefore all b2b API endpoints requires b2bKey to be
sent in the request header. This key is available inside session and could be chained to the
API request header.
A simple registration page using API and dynamics. All page configuration steps remains same as for
model based b2b authentication.
<h1>Register page</h1><formmethod="post"><inputtype="hidden"name="AutomatApi.Api.Post.register"value="v1/b2b/register-user"><!-- Use chaining to pass b2b key to the header --><inputtype="hidden"name="AutomatApi.Api.Header.register.<-b2bKey"value="Session.key"><!-- Use .Tools.B2bAuthDomain to get the domain --><inputtype="hidden"name="AutomatApi.Api.Json.register.string.domain"value="{{ .Tools.B2bAuthDomain }}"><!-- Setup redirect on succeed, if needed. It will be triggered only if all calls in this
template are successful. So, if registration fails, we stay on this page, very useful. --><inputtype="hidden"name="Form.Redirect"value="10-b2b-in-page"><fieldset><labelfor="firstname">Firstname:</label><inputid="firstname"name="AutomatApi.Api.Json.register.string.firstname"value=""><labelfor="lastname">Lastname:</label><inputid="lastname"name="AutomatApi.Api.Json.register.string.lastname"value=""></fieldset><fieldset><labelfor="username">Username:</label><inputid="username"name="AutomatApi.Api.Json.register.string.username"value=""><labelfor="password">Password:</label><inputid="password"name="AutomatApi.Api.Json.register.string.password"value=""></fieldset><!-- Login would be performed automatically only if this parameter set to 1 --><inputtype="hidden"name="AutomatApi.Api.Json.register.string.triggerLoginAfterRegister"value="1"><buttontype="submit">Register</button></form>
Note
Please note that if the triggerLoginAfterRegister parameter is not passed or set to 0, the user
will be registered but not logged in. Although, Form.Redirect will be triggered anyway and try to
access the protected area (10-b2b-in-page in this case). Therefore, while user not logged in, the
10-b2b-in-page page configuration will redirect to the login page (if configured). So, this could
be confusing.
Login page
Here we will just use the username and password, and redirect to the protected area when successful.
<h1>Login page</h1><formmethod="post"><inputtype="hidden"name="AutomatApi.Api.Post.login"value="v1/b2b/login"><!-- Use chaining to pass b2b key to the header --><inputtype="hidden"name="AutomatApi.Api.Header.login.<-b2bKey"value="Session.key"><!-- Use .Tools.B2bAuthDomain to get the domain --><inputtype="hidden"name="AutomatApi.Api.Json.login.string.domain"value="{{ .Tools.B2bAuthDomain }}"><!-- Setup redirect on succeed, if needed. It will be triggered only if all calls in this
template are successful. So, if login fails, we stay on this page, very useful. --><inputtype="hidden"name="Form.Redirect"value="10-b2b-in-page"><fieldset><labelfor="username">Username:</label><inputid="username"name="AutomatApi.Api.Json.login.string.username"value=""><labelfor="password">Password:</label><inputid="password"name="AutomatApi.Api.Json.login.string.password"value=""></fieldset><buttontype="submit">Login</button></form>
Samples
In the following sample we have a registration, login and a members area. This shows how we restrict the members area
to only read results for the logged in customer.
Page setup
Note
The public features only work if the registration, login and any members pages belong to the same application or auth
domain.
Registration page
A simple registration page with minimal inputs.
<!DOCTYPE html><html><body><h2>Register a new user</h2><formmethod="post"><inputtype="hidden"name="postActionEntity"value="B2BLoginRegisterInput"><inputtype="hidden"name="postActionRedirect"value="b2b-2-login-page"><divclass="user-box"><inputtype="text"name="AutomatApi.B2BLoginRegisterInput.Firstname"required=""><label>Firstname</label></div><divclass="user-box"><inputtype="text"name="AutomatApi.B2BLoginRegisterInput.Lastname"required=""><label>Lastname</label></div><divclass="user-box"><inputtype="text"name="AutomatApi.B2BLoginRegisterInput.Username"required=""><label>Email</label></div><divclass="user-box"><inputtype="password"name="AutomatApi.B2BLoginRegisterInput.Password"required=""><label>Password</label></div><!-- Read possible registration errors --><div> {{ range .Data.Errors }}
<span>{{ . }}</span> {{ end }}
</div><buttontype="submit">Register</button></form></body></html>
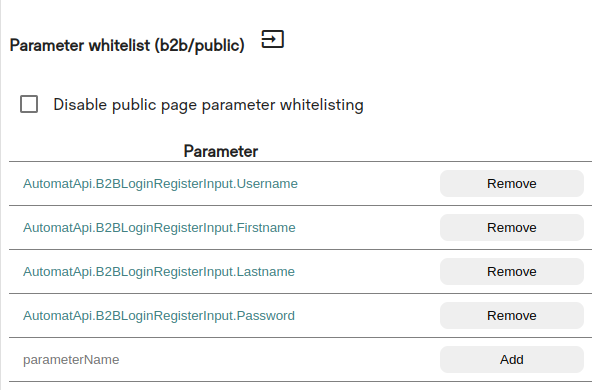
For publish settings we enable the ‘Allow B2B and public access’ checkbox
Also since registration allows more fields to be used we also need to fill in the parameter whitelist of
the value we will allow to be used, in this case we will fill the ones we have defined in the form.
Login page
Here we will just use the username and password, and redirect to the members area when successful.
<!DOCTYPE html><html><body> {{ if .Session.Customer.ID }}
<h2>Already logged on!</h2> {{ else }}
<h2>Login</h2><formmethod="post"><inputtype="hidden"name="AutomatApi.B2BLoginInput.Redirect"value="b2b-2-members-page"><divclass="user-box"><inputtype="text"name="AutomatApi.B2BLoginInput.Username"required=""><label>Username</label></div><divclass="user-box"><inputtype="password"name="AutomatApi.B2BLoginInput.Password"required=""><label>Password</label></div><divclass="my-error-container"> {{ range .Data.Errors }}
<spanclass="my-error-message">{{ . }}</span> {{ end }}
</div><buttontype="submit">Login</button></form> {{ end }}
</body></html>
For publish settings we enable the ‘Allow B2B and public access’ checkbox.
Login model parameters are automatically whitelisted, so we should not need to fill them here.
Members page
On the members page we will generate a simple list of documents for the currently logged on member.
We use the preset to read session id to the request and prevent it from being adjusted via any parameters.
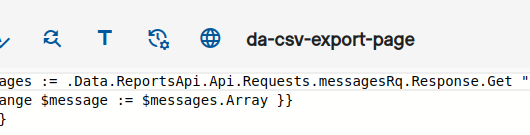
<!DOCTYPE html><html><body><h1>Members page</h1><formmethod="post"><inputtype="hidden"name="AutomatApi.B2BLogoutInput.Logout"value="1"><buttontype="submit">Logout</button></form><h2>Welcome {{ .Session.Customer.FirstName }} to the members area</h2><!-- Erply api response data in the 'records' field --><h2>My orders</h2><formmethod="POST"><!-- Request definition --><inputtype="hidden"name="ErplyApi.Api.Post.getDocs"value="getSalesDocuments"data-preset-val="getSalesDocuments"><buttontype="submit">Reload orders</button></form><ul> {{ $salesDocs := (.Data.ErplyApi.Api.Requests.getDocs.Response.Get "records").Array }}
{{ if $salesDocs }}
{{ range $salesDocs }}
<li>{{ .Get "id" }} / {{ .Get "type" }} / {{ .Get "clientName" }}</li> {{ end }}
{{ else }}
<li>You currently have no orders!</li> {{ end }}
</ul></body></html>
Note
By default all public access groups do not have access to read documents. This right needs to be given under the public
user groups (starting with ‘app_public’ and ‘app_b2b’) by the account administrator in the backoffice.
Every application or authentication domain will have a separate user group with rights assigned to them.
For publish settings we enable the ‘Allow B2B access’ checkbox as we will only want logged in members to access it.
We also set the redirection to the name of the login page, so whenever its being accessed without a proper session
it will be automatically redirected.
We are also using dynamic api here, so we will add the ErplyApi.Api.Post.getDocs -> getSalesDocuments to the request
whitelist.
Under URl configuration we add the preset ErplyApi.Api.PostParam.getDocs.<-clientID : Session.customer.ID
This will write the current session customer id to the request when it is being done, since we do not allow the parameter
to be adjusted in the parameters list then it cannot be changed to anything else.
Workflow
To test it:
Register a new user
Login with the created customer
The members area only displays the members sales documents (use backoffice to create them or create a new page
that creates the documents for the member using the same method)
Url alias
Introduction
Url alias features allow as to generate better url’s for the application. Using of dynamic api can
generate a large url parameters set that cannot be easily read.
Alias feature adds the following functionalities:
Custom path parameters that can be used on any page
Alias mapping that can be used to map parameter values to other parameters
Single parameter can be assigned to multiple values so multiple api calls would not require a separate
parameter if the value is the same.
Custom path parameters
Each route can use up to 3 custom parameters (path1, path2 and path3).
If we had a page accessible from /my-store.
We can navigate to the page also with /my-store/something_1 , /my-store/something_1/something_1 and /my-store/something_1/something_2/something_3
To read the values we can use regular custom parameters fetch.
this would mean that we can load the product api call with the custom parameter, and we would not need to use the
dynamic api parameter declaration syntax in the url as it would be aliased to the correct value.
Note that the same parameter can be mapped to multiple parameters so if there are multiple api calls that expect the
same value then we can use this to just use one in the url.
Path to alias
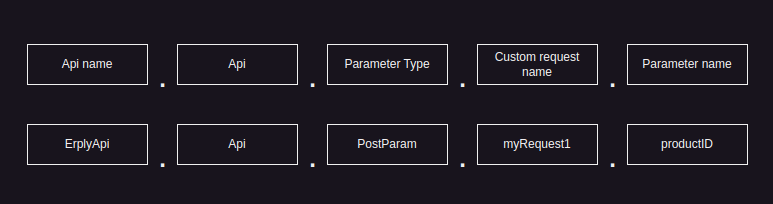
We can also map path parameters to the aliases. For this just use the one of the path parameters (path1, path2 or path3).
This would mean that we can navigate to the page by just /my-store/101 and this would map the value of 101 to the
ErplyApi.Api.PostParam.productsRq.productID parameter.
Content types
Introduction
With inbuilt methods its possible to make the server render page content data with different content type
header or even produce a file stream for the content.
For this to work we would need to construct the data in the template in correct format we expect to return.
Methods to return
There are 2 ways we can make these calls
Using the appropriate query parameters
/my-csv-page?CSV=1
Using file type suffix
/my-csv-page.csv
Note that -page suffix is not required, a link without it will lead to the correct route.
/my-csv.csv
Supported content types
Type
Parameter
Path suffix
Pdf
?PDF
.pdf
Xml
?XML
.xml
Csv
?CSV
.csv
Json
?JSON
.json
Txt
?TXT
.txt
Additional parameters
Pdf
PDF.FileName - Server will produce the data as a file stream instead, giving the file the requested name
PDF.PageWidth - Set a custom page width (this will override the page size value)
PDF.PageHeight - Set a custom page height (this will override the page size value)
Xml
XML.FileName - Server will produce the data as a file stream instead, giving the file the requested name
Csv
CSV.FileName - Server will produce the data as a file stream instead, giving the file the requested name
Json
JSON.FileName - Server will produce the data as a file stream instead, giving the file the requested name
Txt
TXT.FileName - Server will produce the data as a file stream instead, giving the file the requested name
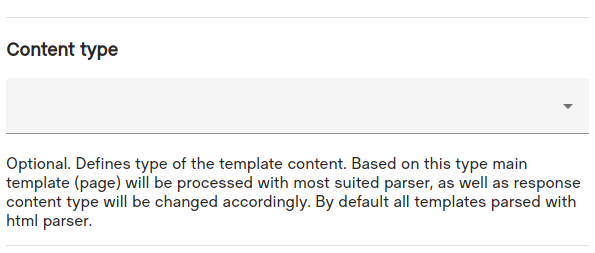
Setting content type in the template
This will apply same rules as setting the content type in the url, but in this case entire template
would be processed using most suited template processor (not related to PDF). For example, setting
content type to json or xml would process template through text processor, not html, removes all html
related validations/encoding and makes process much faster.
Navigation
Introduction
Only page, css and js types can be accessed with the url.
Regular implementation url’s in the editor would look like this
This will produce the sitemap file for us when accessing it from the approriate endpoint with the correct
document type suffix.
{instance}/{clientCode}/en/editor/my-sitemap.xml
You can also manually produce and edit as you like.
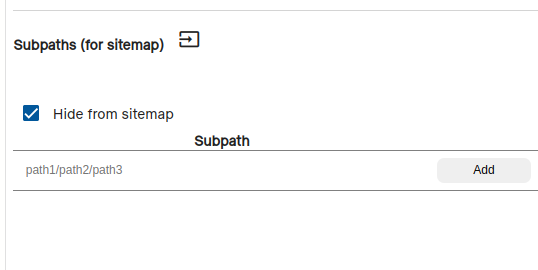
Mapping sub paths
If some pages are using the sub paths features then we can use the url configuration sub paths area to map them. This
will make the automat api return all mapped sub paths to the sitemap.
We can use the hide checkbox there to make the page not be generated into the sitemap aswell.
Robots
We can use the txt type renderer to output the robots.txt file.
Note that this is only useful for instances that implement a custom domain, as the robots file
needs to be at the root of the page.
A basic robots file would have the following content and would be called using the .txt document type suffix.
GoERP UI library contains a standard component named “Unified menu”. Applications must use this component
for navigation within the app.
Menu position
The menu bar can appear at the top of the page — or the left side of the screen.
Menu position can be set in HTML by toggling a class name:
class="menu--topnav"
vs
class="menu--sidebar"
The position should be set according to user preference, so that when the
user navigates from app
to app, the menu always appears in the same position.
Read the preference from a CAFA setting, using the call GET /configuration. Parameters:
application=GOERP
name=goerp-menu-position
level=User
level_id=<current user ID>
NB! Set the following header to the request:
Look-Deeper: true
If there is no preference set for this particular user, CAFA will return the accountwide setting
as the fallback.
Possible values:
top
side
If the setting does not exist or the value is empty, assume side as the default.
(If you want to create a settings page where the user can change the preference, use the same
“application” and “name” to update the setting in CAFA.)
Tailoring the menu to your app
When integrating the component, make sure that the following elements display information
appropriate to your app:
App name
App icon
Version number
Link to app store (the “Upgrade” button)
Standard elements
The component also contains several standard navigation elements, to let the user navigate
between apps, tell them where they are right now and give them a
set of base features on every screen:
Account number
Company name
Username
Language switcher
Account switcher
Link to dashboard: “Switch application”
Logout link
Wiki link
Dashboard
On new accounts, the whole “back office” is meant to be a collection of GoERP apps.
The user logs in and arrives at a dashboard that presents these apps as a grid of icons.
Clicking an icon launches the respective app (and installs it if needed).
To switch to another application, the user needs to return to the dashboard.
Therefore, apps must have a “Home” icon or a link labeled as “Switch application” that would let
them navigate back.
Dashboard URL
GoERP has a special URL for representing the dashboard; navigating to this URL
auto-forwards the user to an actual dashboard page.
The special URL is:
/{clientCode}/{isoLanguageCode}/go-to-landing
Example:
/12345/en/go-to-landing
By default, it redirects to
/{clientCode}/{isoLanguageCode}/start-main
“start-main” is a page from the GoERP app “Start page”. This app gets autoinstalled when needed.
Configuring the URL
The default can be overridden with a CAFA setting:
Both level=Company and level=User CAFA settings are respected; therefore
it is possible to create
this config as either a user preference (level=User, level_id=<user's ID>)
or an accountwide setting (level=Company).
The value of the CAFA setting must be a string. The following placeholders are supported:
The base URL (https://example.erply.com/12345/) is available as variable {{ .Session.User.BOLoginUrl }}.
Parameter lang is the current language. Use {{ .Session.Language.LegacyCode }}. Please always set this parameter; if the user has switched to a particular language, they want this language to be remembered as they navigate through the system.
Parameter section identifies the page: the form or the list view.
Parameter edit is used on forms and indicates the ID of the record. If you want to open a new empty form, use edit=new.
Prefilling back office forms
On an empty form, any field can be prefilled with a URL parameter. Use the form field’s name attribute
as the URL parameter name.
The following URL opens a new invoice form. (For clarity, it has been split into multiple lines.)
The document’s type will be set to “Receipt” (ID = 2),
Back office forms can be configured to redirect to other URLs.
If a customer installs an app that manages products, they can make a product card always open in that app.
(And likewise, employee forms can open in an employee app, and customer cards in a CRM app).
At the moment this is a manual CAFA configuration step that must be done individually on each account.
Go to Settings > Configuration Admin > App configuration.
Click “Add new configuration” to create a new setting.
Fill in the form as follows:
Field
Value
Application
bo_ui
Level
Company
Level ID
leave empty
Type
ui_replacements
Name
Use any value, for example the name of the app that is going to handle the redirects
Value Type
JSON
Value
Define a JSON object as instructed below.
Example (shown with all possible supported adjustments, all components optional):
{"redirect_creation_form":[{"section":"prodin","url":"https://example.com/{CLIENT_CODE}/new-inventory-registration-page"}],"redirect_edit_form":[{"section":"product","url":"{GOERP_URL}/{CLIENT_CODE}/{ISO_LANGUAGE}/edit-product-page?productID={RECORD_ID}"}],"redirect_page":[{"section":"products","url":"https://example.com/{CLIENT_CODE}/product-list"}],"add_tabs":[{"section":"orgperC","name":"metadata","title":{"en":"Metadata","fr":"Métadonnées"},"url":"{GOERP_URL}/{CLIENT_CODE}/{ISO_LANGUAGE}/customer-metadata-page?customerID={RECORD_ID}"}],"replace_tabs":[{"section":"orgperC","name":"contracts_new","title":{"en":"A better tab for customer contracts"},"url":"{GOERP_URL}/{CLIENT_CODE}/{ISO_LANGUAGE}/customer-contracts-page?customerID={RECORD_ID}","replace":"orgperC_contracts"}]}
Erply section name can be found from the URL: it’s the keyword following “§ion=…” Product card is product,
inventory registration form is prodin, employee form is orgperB and so on.
The redirect URL supports placeholders:
{GOERP_URL} - Base URL of Erply app store apps.
{CLIENT_CODE} - Account number
{RECORD_ID} - Record ID
{LANGUAGE} - Three-letter language code (used in Erply back office)
{ISO_LANGUAGE} - Two-letter language code (used in app store apps)
As many JSON objects can be created as needed.
Cache
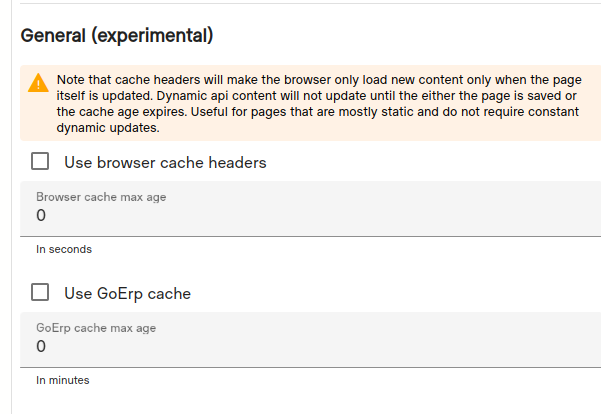
Introduction
Cache features are optional features that can be used to make the page loads quite a bit faster.
These features mean that api requests are not always made and the created content is loaded from cache instead.
GoErp implements 2 different caching options. The options are disabled by default as it can affect the behaviour
of the pages quite a bit.
The cache settings are only available for page type templates. The settings area can be found under the ‘Publish settings’
area in the template edit view.
Browser cache headers
Cache is separate for every client.
This feature utilizes the default browsers cache mechanism using the modified date values and cache max-age modifiers.
With this feature the browser caches the contents and sends a request with the modified date value on the next request,
the server will respond with not modified if the value has not changed.
Note that the modified value in this case it the date when the page template was updated, any changes from used api’s in
the template do not update the value.
Can be used to speed up templates that do not always need the most up-to-date values. You can specify the max-age in
seconds. Content will be re-loaded if the max-age is reached or the template page is updated.
GoErp server cache
Single cached element for all clients.
The feature caches the contents on the server instead and returns the data without running the api requests. The cached
data is shared between multiple requests.
Should only be used on pure static pages or pages that serve non-current session related data.
A custom age value can be provided in minutes.
Use cases
Mostly static data pages.
Pages that run slow running api requests or api mock pages where fresh by the second data is not always required.
Browser cache headers with a small age can also be used to make a false sense of speed or reduce possible flickering, but
note if the data indeed changes it can appear jumpy depending on the layout of the page.
Custom func template can be used as functions. These templates only return the specified content and ignore the
rest of the string content on them.
Note that func template do not have access to the usual .Data values in the template, anything that is to be used in
there would need to be passed as arguments or loaded in the func with api calls.
Returning values
We specify the content we want to return with .Return in the func type templates.
For example (da-test-func):
This string will not be returned.

{{ .Return "this-will-be-returned" }}
And to call the func template we use it like this (da-test-page):
{{ .Tools.Func "da-test-func" }}
The output printed to the template here would be “this-will-be-returned”
Note that the function will return the first .Return value, anything that is after the first return will not
be executed.
We can use regular template logic to pick the first value
{{ if $something }}
    {{ .Return "will return if the condition is true" }}
{{ end }}
{{ .Return "if the condition is not true then it will return this instead" }}
Reading arguments
We can read arguments with the .Arg {index} command.
Note that out of index arguments will always return an empty string.
To pass arguments to the functions we append the values to the func like with regular templates (da-test-page):
To read the arguments in the func template (da-test-func):
<!-- Will get the value of "some-string" -->{{ $argument1 := .Arg 0 }}
<!-- Will get the value of 2025 -->{{ $argument2 := .Arg 1 }}
Api calls in functions
Func types have access to the app state functionality. This gives us better control over the api calls.
Read about the functionality in the App state section.
Error
On extreme cases we can also make the function fail the entire flow. Calling this will display the goerp error page
with the given error message.
Nothing after the error call will execute.
{{ .Error “my error message” }}
Subsections of Func type templates
App state
App state
Note
The app state object is currently only available in the func type templates
The app state object can be used to make immediate api calls using the same dynamic api instructions.
The object can also store the instructions and results for later use.
Simple call api (.Fetch)
This method does not store the instructions or the result. Use for one time api calls that always need to have fresh data.
The call has 1 argument, that it expects to be a map of dynamic api instructions. Same as form inputs or static
url configuration values.
For example:
“ErplyApi.Api.Post.myRequest1”: “getProducts”
Note that the instructions support all the same functionalities as the regular dynamic api (multiple requests, grouping, chaining etc).
Use the ‘mkMap’ helper to create the instructions set.
Using the fetch here will run the instructions immediately and will not proceed with template execution until the api calls
are complete. We can use the results immediately in the template code.
The calls object organizes the api calls from the instructions similarly to dynamic api. For example, we called
erply api with our own request name “myRequest1”, so we will read the results like this:
If the instruction set included more api calls then the results would be available according to the api and request names.
Call api and store instructions and results (.FetchAndStore)
This method stores the instructions and the results. We can then use shorter versions of the call to run the
instructions again for fresh data or return the already completed results.
Note
Note the store will share data based on the following rules:
Regular - client code, app and current session
Automation - each automation will have a separate context (2 separate automations cannot share data)
Like all store functions, they support an optional second arguments (string value). That can be used to group the instructions.
We can then use the given name to either run the same instructions again or return the stored results.
If we do not provide the name value then by default all instructions will be set to the empty name (all further updates and
runs will overwrite the values).
This method returns stored results or re-runs the stored instructions if there are not stored results.
Note that the call will not return anything if we do not have any stored instructions.
To refresh the stored results we can just run the FetchAndStore call on the same set name.
Store instructions without running them immediately
Stores the call instructions but does not run them immediately. Can be used to initialize api calls for later use.
In this example we store 2 different sets with “p1” and “p2” names, but we do not run them. We can later than just
use the FetchStoredResults to run the calls.
If we call the store function on an existing namespace then it will replace all values. If we want to just replace a
single value in an existing set then we can use the patch call.
Expecting that we have previously stored and instruction set to “p1” name:
There are also calls that make the changes asynchronously. Note that using these the result will not be visible on the page
that makes the call. Namespace cache can be used to fetch the results later (note check the unique namespace feature below
if async is used together with cache).
There is also no in-built method to check/signal when the calls finish.
ASyncFetch
ASyncFetchAndStore
ASyncFetchStored
Shared variants
Note
Shared variants share the results and instructions on the same client code and application. So only use for data that
is meant to be shared.
On automations the shared variant has no effect as data is still only available to the same automation.
Check the unique namespace feature below if there is a need to share the data on the entire client.
This feature can speed up application loads considerably as api call needs to be done only once between multiple sessions.
For use in stores for data that does not really change. Making a fresh call on the same set can be used to refresh the
set.
Functionality of the shared sets is the same as the other store capable functions, just append the name with Shared.
SharedFetchAndStore
SharedFetchStored
SharedFetchStoredResults
SharedStore
SharedPatchStore
SharedReset
Setting own unique cache namespace
This feature can be used to set an own unique cache key to the values. This means that the data will not be automatically
namespaced to the current application or session.
Mostly useful for special cases:
There is a need to share/reset cached data between multiple applications and sessions on the same account.
Applications that update cached data with async app data calls.
In order to use this prefix the namespace value with the following value:
If you are building a B2B software product on top of GoERP, read this guide to learn how to implement sign-up, onboarding and login.
B2B (business-to-business) products have a two-level hierarchy: there is a company (or a “business”, “tenant”, or “organization”) and multiple user accounts underneath it.
The person signing up is a representative of a business, and most likely, they will want to share the environment with co-workers or employees.
In contrast, if your software product is oriented to the B2C market, you can skip most of the advice in this document and check out only the section on custom domain names and app users.
Signup in short
The company signing up needs an Erply account (even if the users are not supposed to interact with Erply directly).
The account will be identified by a six digit “account number” or “client code”. It is a multi-user environment. Permissions can be adjusted via user groups.
A few user groups are created by default, and the person signing up will automatically get a user account with administrator permissions.
User and group management does not have to be built from scratch; there is a standard Erply app, “Users and Employees”, that already does that.
Log into Erply and open the app store (Apps -> App Store). Search for the apps named “SignUp App” and “Login app”.
Clone these apps (copy their templates into a new app). Change the HTML templates, replace the standard Erply design with your own. Add other helper pages as needed (landing, features, FAQ, pricing, support).
All the fields you see on the default signup form are required for creating an Erply account (but you can add more fields if needed).
The “Country” dropdown determines which datacenter the Erply account will be created in. If you do not offer these options and the account gets created in an inappropriate datacenter, the server maintenance windows will conflict with customer’s hours of business.
Make the signup and login templates public (“Publish settings” > “Allow B2B and public access” in the editor sidebar). This means that everyone can visit the URL without authentication.
Verify in an incognito window that you can open the pages.
Further customization
Within the signup app, it is possible to do more setup work. In the repository there is a page with plain signup only (template "sign-up-page") and an alternative page that also sets a default dashboard page to the account (template "sgn-signup-cafa-page")
Possible extra steps:
Create an account (organization, tenant) on another software platform as well
Change configuration parameters or CAFA settings
Including the dashboard URL. This is explained on the next page.
Prefill the Erply account with data
Delete, create or modify user groups
Create a wizard app if needed
If the setup process is lengthier, or it requires the user to give input and make choices, it is better to write it as a separate “wizard app”.
This can be a conventional GoERP app. Ask GoERP team to make it autoinstallable, and redirect user to that app once the signup is complete.
The user can then continue the process in the wizard app.
Post-signup experience
After the signup (or the setup wizard), and after each login, the user should be redirected to a dashboard.
This is meant to be the “navigation home”, the place where the user returns to after completing a task, and where they pick the next feature they want to use.
Build a dashboard that matches the needs of your user. It does not have to be dynamic or configurable; a simple static page is fine.
Once you have the page, you can issue a CAFA call from the signup app, to designate it as the
account’s dashboard. Detailed instructions are here.
Within you apps, always use the special redirection URL "go-to-landing" to link to the dashboard (do not hardcode dashboard URL)
The dashboard can also be part of the main app, but it is recommended to keep apps modularized and small. Smaller apps are easier to develop and there is less risk when pushing updates.
One way to split the functionality into apps is:
core features
setups, wizards, importers, admin pages
optional add-ons (as separate apps, or as modules of the main app)
The GoERP team can configure any app as autoinstallable (so that if a user attempts to open a page from that app, and the app is not installed yet, the installation process will start automatically).
Domain name
The signup / landing page can be set up on a non-Erply domain.
This process is similar to setting up a GoERP-powered website (erply.com, salonkeep.com, finetrek.com) and is done using Cloudfront.
At the moment, it is a manual setup process that Erply Ops can perform upon request. Routes of the new domain are mapped to the corresponding GoERP URLs—for example, so that
The GoERP-powered signup / landing page still needs to be served from one designated account.
Create an Erply account specially for serving this website, keep access controlled and enable two-step authentication. Separate sandbox/development from production.
Make changes to your signup page on a development account, publish a new version of the app, then log into the designated account and install the app update. When publishing, it is possible to restrict
which other accounts will see this app in the store.
After authentication, though, the user will be redirected to erply.com environment.
Authentication is tied to the erply.com domain. After login, the server sets a client cookie that is scoped to the erply.com domain. This is necessary since all the APIs are also located under erply.com.
Creating a large set of Cloudfront routes that would cover every possible account number, is unfeasible.
Regular users and app users
GoERP supports two classes of users: regular users and app users.
Regular users are traditional Erply users. A user is always linked to an employee record and belongs to (one) user group; the permissions are inherited from the user group. The predefined user groups are “administrators”, “sales representatives”, “cashiers” and “accountants”, but the administrators are free to rename those, create additional groups and so on.
For managing regular users, see the “Users & Employees” app in the app store. You can add a link to this app to your custom dashboard.
App users are more lightweight and are native to the GoERP platform. Authenticating an app user is not dependent on any Erply APIs.
App users come especially handy in two scenarios:
1 - When the users of this app are supposed to interact with this app only, and must be isolated from the core business. Ecommerce sites are a good example; you want to implement customer logins, without giving the customers access to billing, inventory, pricing and customer data.
However, we also implemented app users in Erply cost reporting app. Although cost reporting is used by employees most of the time, there might also be a partner or a contractor who needs to submit a reimbursement report,
2 - When you compile the app into WebAssembly and ship it as a native app (iOS, Android, Windows, Linux, Mac), or when it has to work offline. Therefore, apps with app user support by design do not/cannot redirect to an external login page (like GoERP does by default). Login must be compiled into the app.
Therefore, implementing app users requires the following steps:
Bulk - Contains multiple calls in a single query template, optionally the calls can be sent in a single transaction.
Bulk queries
Cache
The query results can be cached using special helpers in query templates. These work for both single and bulk queries.
When used then automat will return the cached results if they exist. The second parameters is how many minutes the cache will be valid. If the cache is expired or doesn’t exist then the query will be executed and the results will be cached for future use.
{{ .SetCache 10 }}
Optionally we can also reset the cache if needed. This will do both return fresh results and reset the cache timer with the new results.
{{ .ResetCache }}
Results
Result is given as gjson.Result type. We can then read it similar to dynamic api results.
The regular query call will fail the entire template render process if the query fails. Use the new V2 method if the application
requires special customer error handling for possible query or db issues.
{{ $res = .Tools.AppData.RunQueryV2 "demo-app-single-query" }}

{{ if $res.IsSuccess }}
    {{ .Tools.DebugLog "ok" }}
{{ end }}

{{ $res.Result }}
Check if there was an error and then record it where needed
{{ $res = .Tools.AppData.RunQueryV2 "demo-app-single-query" }}

{{ if $res.IsSuccess }}
    {{ .Tools.DebugLog "ok" }}
{{ end }}


{{ if $res.IsError }}
    {{ .Tools.DebugLog $r.Error }}
    {{ .Tools.AddError $r.Error }}
{{ end }}

{{ $res.Result }}
Fetch the manual errors on the page (need to be after the function execution)
When we use the .Tools.AddError to set manual errors.
<div>
    {{ range .Tools.Errors }}
        <span>{{ . }}</span>
    {{ end }}
</div>
Subsections of Query
Single query calls
Send a single query call and use its results.
Usage
Read arguments
Read an argument values from input index.
The value keeps its original type. Note that gjson.Result type does not convert to the contained type automatically so
it would need to be converted first (ex: value.Int, value.String etc).
{{ $id := .Arg 0 }}
Set query
Sets or replaces the current query.
{{ .SetQuery `SELECT id FROM product` }}
Add query
Appends to the query. Useful when adding conditional query elements.
{{ .AddQuery ` WHERE id = ?` }}
Return column types
By default, all values in the result are returned as strings (or not at all). By setting the column types we can return the values in their original type.
{{ .SetColumnTypes "id" "int" }}
Arguments
Important!
Always use ? placeholders and the following set argument call for queries. This protects against injections,
filling argument values directly into queries poses severe security risks.
{{ .AddArg $id }}
From array argument helper
We can use a helper to fill query in values from an array.
{{ .AddQueryAndArgsFromArray ` WHERE id IN (?)` $ids }}
From string argument helper
We can use a helper to fill query in values from a comma separated string.
Available types for the third parameters: string, int, float
{{ .AddQueryAndArgsFromString ` WHERE id IN (?)` $ids "string" }}
Bulk query calls
Send multiple query calls in a single query template. Optionally the calls can be sent in a single transaction.
Usage
Read arguments
Read an argument values from input index.
The value keeps its original type. Note that gjson.Result type does not convert to the contained type automatically so
it would need to be converted first (ex: value.Int, value.String etc).
{{ $id := .Arg 0 }}
Bulk call size
Set the amount of calls in a single bulk query template. This is required to be set before any calls are added.
If we intend to send 3 calls in a single bulk query template then we would set the size to 3.
{{ .SetAsBulkQuery 3 }}
Transactional bulk query
We can send the calls in a single transaction by setting the transactional flag to true. This means that if any of the calls fail then all of the calls will be rolled back.
{{ .SetInTransaction }}
Set query
Sets or replaces the query in the given index.
Note that in bulk we always pass the index of the call as second parameter. This is required to differenciate the calls from each other.
{{ .SetBulkQuery `INSERT INTO prodgroup (name_eng) VALUES (?)` 0 }}
Add query
Appends to the query in the given index. Useful when adding conditional query elements.
{{ .AddBulkQuery ` WHERE id = ?` 0 }}
Return column types
By default, all values in the result are returned as strings (or not at all). By setting the column types we can return the values in their original type.
{{ .SetBulkColumnType "lastInsertId" "int" 0 }}
Arguments
Important!
Always use ? placeholders and the following set argument call for queries. This protects against injections,
filling argument values directly into queries poses severe security risks.
{{ .AddBulkArg $id 0 }}
Using first query values in send index calls
Sometimes we need to use the results of the first query in the following calls. We can do this by using the ‘first query values’ argument in the following calls.
Note that we need to set the column types for the returned values in the first query for this to work.
{{ .AddBulkArg "0.lastInsertId" 1 }}
From array argument helper
We can use an helper to fill query in values from an array.
{{ .AddBulkQueryAndArgsFromArray ` WHERE id IN (?)` $ids 0 }}
From string argument helper
We can use a helper to fill query in values from a comma separated string.
Available types for the third parameters: string, int, float
{{ .AddBulkQueryAndArgsFromString ` WHERE id IN (?)` $ids "string" 0 }}
AI calls
Automat has inbuilt AI calls support. All applications can use this feature.
Only thing needed is to load tokens under the account.
To check the current token count or add more install the following application from automat store: Resource Quota and Purchase
Methods
There are 2 methods to call the AI for data generation from automat templates.
Invoke
In this mode we call the AI to generate a single output. In this mode we will need to pass all the context ourselves if
we want it to process anything custom.
Note that all the input will count towards token usage.
The input data matches that of the bedrock calls, so adjust it as required.
The default model currently will be selected as “global.anthropic.claude-sonnet-4-6”.
You can pass an optional second parameter to the AIInvokeModel to select a different one (that is enabled).
Parameters:
Invoke request json structure based on the model used
In this mode we can improve the behavior with 2 ways:
We need to use pregenerated knowledgebase for context.
We can continue the session so we can improve on the token and context usage in the same chat session.
Example knowledge base (erply context): LUBFWEYSPM (eu-west-1)
Parameters:
The prompt
(optional) - Leave empty when starting the session. The response will return a session id, use that to pass to the next possible
prompt to continue that session context
The knowledge base id.
(optional) - Select a specific AI model. Leave empty to use a default model.
Region where the knowledge base will be taken from. Or if the model is directed to a specific region, then this needs to match that.
The definition of the model consists of Api name, model name and field (including nested fields)
name(s) separated by dot “.”: {ApiName}.{ObjName}.{Field}, e.g: ErplyApi.Customer.FullName or
ErplyApi.Customer.Address.City, where ErplyApi is name of the API, Customer - name of the
model and rest is the field or if this is struct, then with nested fields.
If definition used as template data (wrapped into {{}}), then it should have prefix .Data,
e.g. {{ .Data.ErplyApi.Customer.FullName }}
If definition used in the form input names, then omit .Data prefix,
e.g. <input name="ErplyApi.Customer.FullName">
Each model name should have specific suffix which describes the scope where it is used:
Query (e.g. CustomerQuery) represents query model, usually used in search forms and submitted
as a GET request
Input(optional) (e.g. CustomerInput) represents the input model, mostly used in forms during
create or update actions. It is optional, an entity considered as an input object if there is no
suffix specified. Input models can be used in form input names and optionally in values as data
sets. One API entity may have multiple Input models.
Dto (e.g. CustomerDto) represents a data transfer object, usually it consists of one or many
entities from different APIs. May be used in previews or tables.
List (e.g. CurrencyList) represents the list of simple entities, usually used for populating
dropdowns.
Goerp has some built-in service variables, which can be used to pass some processing settings or to
get some service variables, such as session key, client code, etc.
Dynamic api gives an alternative way to handle the data. As opposed to the older model based handling.
For benefits this functionality relies on the api’s business logic entirely and does not need adjustments to models once
the api’s change.
It also allows to create as many request as you want against the same api and implements various
data manipulation helper functions.
Requests are defined by either input parameters from the browser (query or post) or by
static preset values. Preset values are values that are saved to the template during its
save time and this means that changing values cannot be used with them.
The syntax of the requests is the following
Api name Name of the api in question, reference the dynamic data source docs in the editor
for the full list of options.
Api Always has the value of Api, this tells the system that we intend to use the dynamic
api functionalities.
HTTP Method The http method that is to be used for the api call.
Get
Post
Put
Patch
Delete
FTPGet
FTPPut
Custom request name Custom name for the request you define, we use it later to set parameters
and read the results.
Requests naming
Request names are case-sensitive. Prefer giving self-explanatory names to the requests, so they will not
confuse while developing huge template with many requests. For example, if request made for v1/products
and used method Get, then name it getProducts, but not something like request1, records, etc.
Also, GoErp have reserved names that cannot be used while defining the name for request.
Reserved names:
Session (with Capital S, session is ok to use)
Parameters (with Capital P)
Storage (with Capital S)
Using in a form
The definition of the name is given to the form input name and the endpoint to call from that api is given
as the value.
Note that the value should not start with the character /.
The call is made when the page is accessed only when the parameter is actually passed. In the sample above
the parameter is registered in the form but is never actually sent as a parameter to the server.
In order to load the data we would need to submit the form.
The method of the form would define how the parameter is passed to the server either via query parameter
or a post parameter.
We can also load parameter into links to make the api to be called right away (before the page is enriched with data):
?ReportsApi.Api.Get.someReportsCall=v1/POSDay
This link would load the data when it is opened.
Defining static presets
When opening a page via url that has no query parameters then even if we have defined some api call into form
they would not be triggered.
Regular form values are not read from the template content, rather it is just written there to make the actual calls
by the browser.
There is a way however to set defaults to parameters, these values are saved during template save time
and are static values. This means that dynamic values that change in the template view process cannot be
passed onto them, the values that are added to it are the exact values that will be used for the request.
This allows the request to be made with some default values and to make it load something when a page
is opened without any parameters.
For this we can use the data-preset-val attribute on the inputs
Note that these do not need to be in the form as we might never send the parameter if we never
intend to send the form. In this case a single hidden input that is not part of a form is enough.
If the browser passes a parameter to the same value it will overwrite the preset value.
Url configuration static presets
From version 1.179.1 we can also set static preset values in the editor under the “URL configuration” menu.
These name:value pairs work the same way as regular preset value definitions, but when defined here the values
do not need to be in the template body at all.
Useful for pages that generate content that might not want to view the input but automatic loading of content
is required.
Request parameters
Defining request parameters
To pass parameters to the api we will use similar syntax like the one we use to define the requests.
The custom request name here should match exactly the one we used to define the request.
In the following example we add the query parameter currencyId for the request we defined as myReportsCall
Similar to the way we can give default values to requests we can also give default values to parameters.
Note that the values here are static meaning that we cannot add placeholders to the data-preset-val attribute.
The value is being saved on template save time and will not change during the page view process.
<formmethod="get"><inputtype="hidden"name="ReportsApi.Api.Get.myReportsCall"value="v1/POSDay"data-preset-val="v1/POSDay"><!-- We make the page load with currency ID 1, however we still allow it to be overwritten by the parameter --><labelfor="currencyId">Currency ID</label><inputid="currencyId"type="number"name="ReportsApi.Api.Query.myReportsCall.currencyId"data-preset-val="1"><buttontype="submit">Fetch</button></form>
If the browser passes a parameter to the same value it will overwrite the preset value.
Parameter types
Parameters are passed either via query or as post parameters. Samples here are generated into
form inputs, but they can as well be used in url query parameters (name=value).
This means the input will keep its value after the possible form submit and page reload
QueryBulk
Allows to pass as many query parameters as needed using one input. Parameter name here doesn’t matter
actually as it would be ignored anyway, but we can always name it url just to make it clear to read
If the api expects one of the parameters to be a path parameter we would define the request with
a placeholder and follow it up with a value for this placeholder.
Json inputs can be composed in a couple of different ways.
Input construction
With this method we will construct json with multiple input fields.
We also need to define the type of the field for the json constructor. Type is given just
before the parameter name. In many cases parameter name may represent the xpath in json, like
string.inner.name will result in {"inner":{"name":""}}
Omitting key definition after the dot will result in setting input value as a root object to the
json body.
Supported values
string - result: ({"name":"foo"})
number - result: ({"name":123})
boolean - result: ({"name":true})
json - result: ({"name":{"foo":"bar"}}). Allows to set any json structure.
delete - (special case to delete entire path from the json, value of the input would be ignored because only path is needed)
Starting from version 1.201.1, GoErp allows to make json modifications more flexible, like
predefined json, connecting json parts from another request and many more. Check how it works
with CAFA sample.
Raw
To send some custom data to the api endpoint that does not use a specific format (json, post params etc).
Note that the key name here is not important (myCustomData) and it will not be used in the request.
Usable for franchise accounts. Where the HQ account can make calls against certain stores. Note that the user
on the HQ account needs to have access to the specified store through the multi account users feature.
Using the value here will run the api call against that specific franchise account store.
Cache
Can be used to speed up page loads by caching certain api calls that do not use any parameters and are used mostly to
fill selections. Items will be stored against the session and will refresh automatically within 1 hour (this can be altered
with the duration parameter).
Define the cache key with a value of 1 to use the cache features. Adjusting the value to 0 or removing the key will disable
the feature.
Optionally you can set a different duration for the cached elements (in seconds).
This works together with the cache parameter and needs to exist when the data element is created.
If this value is not provided then the data will be cached by default for 3600 seconds.
The dynamic functionality returns the entire api response json content back as special
json object that we can manipulate with special commands to get back data.
Specifying the request to get the data for
If we had for example previously defined a request like this
The json values by default have special type that is always converted to a string when used in the template.
This means that if the intention is to use these values in some inbuilt helper function that expects a certain type
and the expected types are not what is expected then the function can break the template entirely.
To prevent this we can cast the values to the correct type in the functions.
{{ if eq (.Data.PricingApi.Api.Requests.myCall.Response.Get "age").Int }} 37 }}
<!-- Do something -->{{ end }}
These are special functions that can be used against the dynamic api json response content, to do special
conversions or other special functions with them.
Note that the following functions can also be used on the same result, for example we want to flatten and get unique values
at the same time.
It’s possible to chain different api fetches together. This is useful when a second api call would depend on the
results of the first.
Warning
By default, all subsequent requests will be skipped if parent one fails. Although, it is possible
to configure this behavior by making link optional. More details
Available chaining options
NB! Chaining options supported through value AND through data-preset-val parameters
Every request input parameters may be chained with other request and with data from GoErp in-build data sets.
In-build data sets:
Session (check structure of the Session by printing it out {{ toJson .Session }})
We can use the grouping definition to set the order of calls.
The pipe | at the end indicates grouping and the number says the order.
Multiple requests can have the same group number, this means they would be done at
the same time, and they do not depend on each other.
It is recommended to make as few requests as possible. This means that creating requests in first api response
loops is not recommended as it would take a large performance hit.
Instead, we can use special helper functions to collect the id’s and make a separate calls.
|@commaSepStr converts all the id’s of the get products response to comma separated string input for the pricing api.
Then we assign this value to productId parameter using the <- sign.
The value syntax here is similar to how the Get function works, so we can also assign single values when needed.
<!-- Add the id value of the first result --><inputtype="hidden"name="PricingApi.Api.Query.getPrices.<-productIDs"value="getProducts.Response.0.id">
Make chained link optional
Dynamics provides option to make link optional, which means, if parent request fails or there is no
data in chained location then request would be still executed but with empty parameter (from version 1.262.1: query, path and headers parameters will be skipped instead of empty values).To make link
optional just put ? after the link operator <-, like this <-?:
Dynamics provides option to skip the chain when parent has a value. That option could be useful
when we need to create a new record only if the parent request has no data. To skip the chain,
put ! after the link operator <-, like this <-!:
<!-- getPrices would be not executed if getProducts.Response.0.id has id in there --><inputtype="hidden"name="PricingApi.Api.Query.getPrices.<-!productIDs"value="getProducts.Response.0.id">
Define multiple sources for chaining
Sometimes we need to get first non-empty value from multiple sources. This can be done by using the
|| operator between sources. This will take the first non-empty value from the provided set of
sources. If all sources are empty and chain not optional, then request will be not executed. Works
with presets as well.
We can use the json query mechanism to get items from other api responses, or we can use the old-fashioned
id matching.
Query features
Using the inbuilt query features to return exact values. This can be useful when dealing with more complex
pages that try to compose multiple requests.
<ul>{{ range .Data.PIMApi.Api.Requests.getProducts.Response.Array }}
<!-- As values returned by the _Get_ function do not have a specific type we need to cast it into one --> {{ $productId := (.Get "id").Int }}
<li> Product code: {{ .Get "code" }}<br><!-- Get the price_with_tax value from the prices array by matching the productID there with current iteration id --> Price: {{ .Data.PricingApi.Api.Requests.getPrices.Response.Get (printf `#(productID==%d).price_with_tax` $productId) }}
</li>{{ end }}
</ul>
Id matching
Iterating through the second set is also an option. For something smaller this will probably be enough.
<ul>{{ range $product := .Data.PIMApi.Api.Requests.getProducts.Response.Array }}
<li> Product code: {{ $product.Get "code" }}<br> {{ range $price := $.Data.PricingApi.Api.Requests.getPrices.Response.Array }}
<!-- Still need to cast to the appropriate types --> {{ if eq ($price.Get "productID").Int ($product.Get "id").Int }}
<!-- Get the price_with_tax value if the id matches --> Price: {{ $price.Get "price_with_tax" }}
{{ end }}
{{ end }}
</li>{{ end }}
</ul>
Sample
In here we fetch a list of products and generate a list of images for them.
<divclass="my-error-container"> {{ range .Data.Errors }}
<spanclass="my-error-message">{{ . }}</span> {{ end }}
</div><inputtype="hidden"name="PIMApi.Api.Get.getProducts"data-preset-val="v1/product"><inputtype="hidden"name="PricingApi.Api.Get.getPrices|1"data-preset-val="v1/products/price-tax-rate"><inputtype="hidden"name="PricingApi.Api.Query.getPrices.warehouseID"data-preset-val="1"><inputtype="hidden"name="PricingApi.Api.Query.getPrices.<-productIDs"data-preset-val="getProducts.Response.#.id|@commaSepStr"><ul> {{ range .Data.PIMApi.Api.Requests.getProducts.Response.Array }}
<!-- As values returned by the _Get_ function do not have a specific type we need to cast it into one --> {{ $productId := (.Get "id").Int }}
<li> Product code: {{ .Get "code" }}<br><!-- Get the price_with_tax value from the prices array by matching the productID there with current iteration id --> Price: {{ $.Data.PricingApi.Api.Requests.getPrices.Response.Get (printf `#(productID==%d).price_with_tax` $productId) }}
</li> {{ end }}
</ul>
A more complex sample
This is a more complex sample that uses multiple api calls to save a new customer and various other
elements related to the customer.
Errors: {{ .Data.Errors }}<br/><h1>Customer input with address and fetching customer with all data in place</h1><formmethod="post"><!-- requests initialization --><inputtype="hidden"name="CRMApi.Api.Get.customerGroups"value="v1/customers/groups"data-preset-val="v1/customers/groups"><inputtype="hidden"name="CRMApi.Api.Post.createCustomer"value="v1/customers/individuals"><inputtype="hidden"name="CRMApi.Api.Post.createAddress|1"value="v1/addresses"><inputtype="hidden"name="CRMApi.Api.Get.customer|1"value="v1/customers"><inputtype="hidden"name="CRMApi.Api.Get.getAddress|2"value="v1/addresses"><inputtype="hidden"name="CRMApi.Api.Put.createAttribute|2"value="v1/attributes"><inputtype="hidden"name="CRMApi.Api.Delete.delAttribute|3"value="v1/attributes/{id}"><inputtype="hidden"name="CRMApi.Api.Get.getAddressTypes|3"value="v1/addresses/types"><inputtype="hidden"name="CRMApi.Api.Get.getBusinessAreas|3"value="v1/business/areas"><inputtype="hidden"name="CRMApi.Api.Get.getAttributes|4"value="v1/attributes"><!-- presets data --><inputtype="hidden"name="CRMApi.Api.Query.customerGroups.take"value=""data-preset-val="50"><!-- customer post, depth = 1 --><br/>First name:
<inputtype="text"name="CRMApi.Api.Json.createCustomer.string.firstName"value="{{ .Data.CRMApi.Api.Requests.customer.Json.Get "firstName"}}"><br/>Last name:
<inputtype="text"name="CRMApi.Api.Json.createCustomer.string.lastName"value="{{ .Data.CRMApi.Api.Requests.customer.Json.Get "lastName"}}"> {{ $gId := (.Data.CRMApi.Api.Requests.customer.Json.Get "customerGroupId").Int }}
<br/>Group: <selectname="CRMApi.Api.Json.createCustomer.number.customerGroupId"> {{ range $cg := .Data.CRMApi.Api.Requests.customerGroups.Response.Array }}
<optionvalue="{{ $cg.Get "id"}}"{{ifeq($cg.Get"id").Int$gId}}selected{{end}}> {{ $cg.Get "name.en" }}
</option> {{ end }}
</select><!-- address post, depth = 2 --><br/>Address street:
<inputtype="text"name="CRMApi.Api.Json.createAddress.string.street"value="{{ .Data.CRMApi.Api.Requests.createAddress.Json.Get "street"}}"><inputtype="hidden"name="CRMApi.Api.Json.createAddress.number.<-customerId"value="createCustomer.Response.id"><inputtype="hidden"name="CRMApi.Api.Json.createAddress.number.typeId"value="1"><!-- get created customer, depth = 2 --><inputtype="hidden"name="CRMApi.Api.Query.customer.<-ids"value="createCustomer.Response.id"><!-- get created address, depth = 3 --><inputtype="hidden"name="CRMApi.Api.Query.getAddress.<-customerIds"value="customer.Response.#.id|@commaSepStr"><br/>Attribute int:
<inputtype="number"name="CRMApi.Api.Json.createAttribute.number.value"value="int"><inputtype="hidden"name="CRMApi.Api.Json.createAttribute.string.entity"value="customer"><inputtype="hidden"name="CRMApi.Api.Json.createAttribute.string.name"value="test-dynamic-4"><inputtype="hidden"name="CRMApi.Api.Json.createAttribute.string.type"value="int"><inputtype="hidden"name="CRMApi.Api.Json.createAttribute.number.<-record_id"value="customer.Response.#.id|@commaSepStr"><!-- get created address, depth = 4 --><inputtype="hidden"name="CRMApi.Api.Path.delAttribute.<-id"value="createAttribute.Response.id"><inputtype="hidden"name="CRMApi.Api.Query.getAttributes.entityName"value="customer"><inputtype="hidden"name="CRMApi.Api.Query.getAttributes.<-recordIds"value="customer.Response.#.id|@commaSepStr"><br/><buttontype="submit">Submit</button></form><h1>Created customer</h1>{{ $cs := .Data.CRMApi.Api.Requests.customer.Response.Array }}
{{ if $cs }}
<br/>Response count: {{ len $cs }}
{{ $c := index $cs 0 }}
{{ $cId := ($c.Get "id").Int }}
<br/>ID: {{ $cId }}
<br/>First name: {{ $c.Get "firstName"}}
{{ $cgId := ($c.Get "customerGroupId").Int }}
<br/>Customer group: {{ .Data.CRMApi.Api.Requests.customerGroups.Response.Get (printf `#(id==%d).name.en` $cgId) }}
<br/>Addresses: {{ $.Data.CRMApi.Api.Requests.getAddress.Response.Get (printf `#(customerId==%d)#.street` $cId) }}
{{ end }}
<h1>Attributes</h1>{{ $attrs := .Data.CRMApi.Api.Requests.getAttributes.Response.Array }}
{{ if $attrs }}
{{ range $attrs }}
<br/>{{ .Get "name" }} | {{ .Get "type" }} | {{ .Get "value" }}
{{end}}
{{ end }}
A sample using chaining in reading images
A sample where we connect CDN images to product groups.
In here we can see that we can connect items that naturally do not have a connection in the database.
Before this sample 2 images have been created using the CDN api create image endpoint.
context: erply-product-group
productId: 0 for default and 3 for the existing one
<!-- Define request 1 for product groups --><inputtype="hidden"name="PIMApi.Api.Get.myProdGroups"value="v1/product/group"data-preset-val="v1/product/group"><!-- Chain images from CDN api, use results from first as input --><inputtype="hidden"name="CDNApi.Api.Get.myImages|1"value="images"data-preset-val="images"><inputtype="hidden"name="CDNApi.Api.Query.myImages.context"data-preset-val="erply-product-group"><inputtype="hidden"name="CDNApi.Api.Query.myImages.<-productId"data-preset-val="myProdGroups.Response.#.id|@commaSepStr"><p>Groups</p><ul> {{ range .Data.PIMApi.Api.Requests.myProdGroups.Response.Array }}
{{ $groupId := (.Get "id").Int }}
<li> {{ .Get "name.en" }} (ID: {{ $groupId }})
<!-- Fetch images for this group id using the dynamic query method --> {{ $images := $.Data.CDNApi.Api.Requests.myImages.Response.Get (printf `images.#(productId==%d)#.key` $groupId) }}
<ul> {{ if $images.Array }}
<!-- print matching items --> {{ range $images.Array }}
<li><imgsrc="{{ $.Session.Services.CDNApi.URL }}/images/{{ $.Session.ClientCode }}/{{ . }}?width=200&height=200"></li> {{ end }}
{{ else }}
<!-- Print default --><li><imgsrc="{{ $.Session.Services.CDNApi.URL }}/images/{{ $.Session.ClientCode }}/jJumxcXTSamiGhJgDGJ1kGFyQx4iqtksv4R3MnEsIc4APVqt2v.png?width=200&height=200"></li> {{ end }}
</ul></li> {{ end }}
</ul>
Result should look like this
Form redirect
Form redirect with dynamic api
Dynamic api uses a different kind of redirect from the models.
This redirect is only triggered if all the calls in the request succeed. If even one of them fails
(errors model in the response contains something) then by default redirection is not triggered.
However, there is a way to define optional requests that allowed to fail.
We define the redirection with Form.Redirect parameter
The syntax here is exactly the same as with responses, only difference is that instead of the usual {{ and }}
escapes we use [[ and ]] instead.
Use Form.AllowedToFailRequests input name to pass request names that allowed to fail and make redirect
to the desired page even if they failed. Request names should be separated by comma (,)
<!-- Assign the first id from the response to the redirect link --><inputtype="hidden"name="Form.Redirect"value="da-dynamic-redirect?someParameter=[[ .Data.PIMApi.Api.Requests.request1.Response.Get `0.id` ]]">
Sample
<formmethod="get"><!-- For 'request1' use your own custom identifier, use it to access the results --><inputtype="hidden"name="PIMApi.Api.Get.request1"value="/v1/product"><!-- Only redirects if all form containing requests succeed --><inputtype="hidden"name="Form.Redirect"value="da-dynamic-redirect?wat=[[ .Data.PIMApi.Api.Requests.request1.Response.Get `0.id` ]]"><inputtype="hidden"name="Form.AllowedToFailRequests"value="request1"><buttontype="submit">Redirect on success</button></form>
Input helpers
Helper functions for input
These are functions that help in generating input in a certain format that is difficult to create
using regular html inputs.
@doNotSkipOnEmpty
Allows to set a value to the input even if the value is empty.
@pimFilter & readPimFilter
Note
The regular pimFilter does not support ‘or’ operator between conditions and the operator always set to ‘and’. It also does
not support nested conditions. If the operator between conditions is needed or nesting of conditions then look for
the pimFilterV2 helper instead
PIM api filter structure is in json format and simple input by default cannot use it in a clean way. The following
functions help in generating the filters for it.
This is used at the end of the input name definition
Due to json filter structure and special characters in the instructions it’s not possible to read the value back
into the input fields using regular methods. For this we can use another helper function
Used to help generate pim filter json type structure from html inputs. Similar to the version 1 of the pimFilter
only that this one supports different operators between conditions and optionally also nesting of conditions.
Also since the ordering of the elements is important then the order helper should also be used when using the V2 variant.
Syntax for it is as follows:
Name of the field in pim
Operator: =, !=, >=, <=, in, not in, contains and startswith
Type of the value: string, number, bool
Optional. Add a nested group identifier, this is a random string value that group similar values to a nested group.
Note that in and not in operators expect the value to be a comma separated list of values.
Due to json filter structure and special characters in the instructions it’s not possible to read the value back
into the input fields using regular methods. For this we can use another helper function readPimFilterV2
Optionally we can also create nested filters with the group identifier parameter.
Do not forget to update the order of the functions and also the operator between possible groups.
In the sample we provide it a value of ‘a’, but the value is user defined. Everything with the value
will be nested in the same array.
Functions that related to the Json parameter type.
JSON field names may contain @ symbol, so function section definition starts with @{ and ends with }
to avoid collisions. E.g. @{order(1);foo(bar,rab)}. Functions separated by semicolon ;. Function
parameters separated by comma ,.
@order
Defines the order of inputs related to the json generation process.
In next sample initial structure of the json input would always be executed first and only then all
other inputs. This allows us to predefine the payload of json body and then change only necessary
fields.
(Optional) Adjust by date value (minute, hour, day, month or year)
(Optional) Integer (negative or positive) for the adjustment value
(Optional) Static value to suffix the formatted date on output
(Optional) Turn the static value to a prefix instead
Note it’s important to give the preset value of “default” for the function to insert the date value.
This is so that possible manual values will never be overwritten.
<!-- As suffix, without the 6th optional parameter --><inputtype="hidden"name="PIMApi.Api.Query.myRequest1.date@{setDefaultDate(UTC,2006-01-02,2006-01,day,0, 00:00:00)}"value=""data-preset-val="default"><!-- Would generate: 2024-08 00:00:00 --><!-- As prefix with the 6th parameter --><inputtype="hidden"name="PIMApi.Api.Query.myRequest1.date@{setDefaultDate(UTC,2006-01-02,2006-01,day,0,00:00:00 ,true)}"value=""data-preset-val="default"><!-- Would generate: 00:00:00 2024-08-->
It’s also possible to set the function to read the current accounts timezone configuration value instead.
To do this set the timezone value to from-conf.
Doing this the function will look for the value from accounts configuration:timezone value, if the value is not set
or has an invalid value then it defaults to UTC.
@formatDate
Used to alter the date format to formats that the possible api requires.
Mostly useful when the visual representation of the value in the UI is not the same as the api requires.
For example of the api needs unix but the UI should display regular year, month and day.
Parameters:
Timezone (use ‘from-conf’ to get the timezone value from accounts configuration)
(Optional) Adjust by date value (minute, hour, day, month, year, year, dtFirstDayOfWeek, dtLastDayOfWeek, dtFirstDayOfMonth, dtLastDayOfMonth, dtFirstDayOfYear or dtLastDayOfYear)
(Optional) Integer (negative or positive) for the adjustment value. for “dt” related types first applies adjustment then sets specific time. “dt” for weeks accepts only 0 or 1, which is bool for isSunday
(Optional) Static value to suffix the formatted date on output
(Optional) Turn the static value to a prefix instead
<!-- In this sample we take the value of 2024-04-25 and set it as unix timestamp when the api request is made --><inputtype="text"name="PIMApi.Api.Query.myRequest1.date@{formatDate(UTC,2006-01-02,unix)}"value="2024-04-25">
With the optional date adjustment parameters.
<!-- In this sample we take the value of 2024-04-25, append 5 days and set it as unix timestamp when the api request is made --><inputtype="text"name="PIMApi.Api.Query.myRequest1.date@{formatDate(UTC,2006-01-02,unix,day,5)}"value="2024-04-25">
Using the optional suffix and prefix.
<!-- As suffix, without the 7th optional parameter --><inputtype="hidden"name="PIMApi.Api.Query.myRequest1.date@{formatDate(UTC,2006-01-02,2006-01,day,0, 00:00:00)}"data-preset-val="2024-04-25"><!-- Would generate: 2024-08 00:00:00 --><!-- As prefix with the 7th parameter --><inputtype="hidden"name="PIMApi.Api.Query.myRequest1.date@{formatDate(UTC,2006-01-02,2006-01,day,0,00:00:00 ,true)}"data-preset-val="2024-04-25"><!-- Would generate: 00:00:00 2024-08-->
@encode
Version 1.222+
Can be used to encode the value. Supports base32, base64 and hex.
Default is base64 if parameter is omitted, provide the parameter to use a different encoding.
<!-- Defaults to base64 --><inputtype="text"name="ReportsApi.Api.Query.myRequest1.someData@{encode}"value="some value to be encoded"><!-- Request specific --><inputtype="text"name="ReportsApi.Api.Query.myRequest1.someData@{encode(base64)}"value="some value to be encoded"><!-- Hex example --><inputtype="text"name="ReportsApi.Api.Query.myRequest1.someData@{encode(hex)}"value="some value to be encoded">
@decode
Version 1.222+
Can be used to decode an encoded api response value to a string (supports base32, base64 and hex).
Default is base64 if parameter is omitted, provide the parameter to use a different encoding.
<!-- Defaults to base64 --><inputtype="text"name="ReportsApi.Api.Query.myRequest1.someData@{decode}"value="some value to be encoded"><!-- Request specific --><inputtype="text"name="ReportsApi.Api.Query.myRequest1.someData@{decode(base64)}"value="some value to be encoded"><!-- Hex example --><inputtype="text"name="ReportsApi.Api.Query.myRequest1.someData@{decode(hex)}"value="dGVzdA==">
@hash
Version 1.222+
Can be used to hash an api value according to an algorithm. Supports md5, sha1, sha256 and sha512.
Defaults to sha1 if the parameter is not provided.
<!-- Defaults to sha1 --><inputtype="text"name="ReportsApi.Api.Query.myRequest1.someData@{hash}"value="some value to be encoded"><!-- Request specific --><inputtype="text"name="ReportsApi.Api.Query.myRequest1.someData@{hash(sha1)}"value="some value to be encoded"><!-- md5 example --><inputtype="text"name="ReportsApi.Api.Query.myRequest1.someData@{hash(md5)}"value="value to be hashed">
@encrypt / @decrypt
Version 1.254+
This can be used to encrypt the data that is being saved in the api (kvs for example). This means that the data
will only be readable when the correct key is provided.
The feature uses AES cipher, and the protection strength is determined by the given key length.
Note that the keys need to use the correct length (16, 24 or 32)
16 characters : AES-128
24 characters : AES-192
32 characters : AES-256
Setting the keys to requests
Set the key for the request so the encryption knows what it needs to use.
<!--
Remember that ordering is important here as we need the system to always have the key before any encryption.
In this sample we use the chaining to take the key from the variables file, but the value can be taken from
any other api call or from a hardcoded value.
--><inputtype="hidden"name="KvsApi.Api.Encrypt.myRequest1.<-key@{order(1)}"value="Variables.someKey"data-preset-val="Variables.someKey">
Also note that if the save and read is done on the same page then the key should be added for both calls.
Encrypting the values
Once we have set the key then we can use the encrypt helper on the values we want to protect.
<!--
Use the order here to make sure that this is done after the key set.
Any api string value can be protected like this (limited to the max length of them).
--><inputtype="text"name="KvsApi.Api.Json.myRequest1.string.value@{order(2);encrypt}"value="some value to be encoded">
Decrypting
Remember to set the key for reading, otherwise the api will return an unreadable string.
<!-- When reading we also need to set the key --><inputtype="hidden"name="KvsApi.Api.Encrypt.myRequest2.<-key"value="Variables.someKey"data-preset-val="Variables.someKey">
Use the decrypt tools helper to read the data.
Note
The method will not inform you of an invalid or missing keys, instead it will generate random garbage values every single load.
<ul>{{ range .Data.KvsApi.Api.Requests.myRequest2.Response.Array }}
<li>{{ $.Tools.Decrypt (.Get "value").String }}</li>{{ end }}
<ul>
Sample
A simple save and read sample using kvs api.
<formmethod="post"><inputtype="hidden"name="KvsApi.Api.Post.myRequest1"value="api/v1/entry"><inputtype="hidden"name="KvsApi.Api.Encrypt.myRequest1.<-key@{order(1)}"value="Variables.someKey"data-preset-val="Variables.someKey"><inputtype="hidden"name="KvsApi.Api.Json.myRequest1.string.topicId"value="5afb02fc-04a5-4524-a816-4381f97b1few"><inputtype="hidden"name="KvsApi.Api.Json.myRequest1.string.key"value="my-value"><inputtype="text"name="KvsApi.Api.Json.myRequest1.string.value@{order(2);encrypt}"value="some value to be encoded"><buttontype="submit">send</button></form><inputtype="hidden"name="KvsApi.Api.Get.myRequest2|2"value="api/v1/entry"data-preset-val="api/v1/entry"><inputtype="hidden"name="KvsApi.Api.Encrypt.myRequest2.<-key"value="Variables.someKey"data-preset-val="Variables.someKey"><inputtype="hidden"name="KvsApi.Api.Query.myRequest2.topicId"value="1"data-preset-val="5afb02fc-04a5-4524-a816-4381f97b1few"><br><ul>{{ range .Data.KvsApi.Api.Requests.myRequest2.Response.Array }}
<li>{{ $.Tools.Decrypt (.Get "value").String }}</li>{{ end }}
<ul>
@toArrIndexParameters
Can be used to generate multiple request parameters based on input array from another dynamic result.
For use cases where the api expects indexed requests.
Basically wraps entire content into provided suffix and prefix. This function always accepts two
parameters, if there is more or less than two, then initial value is returned.
Starting from version 1.201.1, GoErp allows to make json modifications more flexible, like
predefined json, connecting json parts from another request and many more.
Let’s take CAFA as an example, as it will use most of the modification options.
<h1>Dynamic CAFA</h1><formmethod="post"><!-- Defining variables to get rid of very long value definitions in the inputs --> {{ $putConfBody := .Data.CaFaApi.Api.Requests.putConf.Json }}
{{ $getConfStateResp := .Data.CaFaApi.Api.Requests.getConfState.Response.Get "0" }}
<!-- 1. Load initial state of the configuration --><inputtype="hidden"name="CaFaApi.Api.Get.getConfState"value="configuration"data-preset-val="configuration"><!-- 2. provide query parameters for the configuration entry --><inputtype="hidden"name="CaFaApi.Api.QueryBulk.getConfState.url"value="application=my-app&level=Company&name=dynamic-sample"data-preset-val="application=my-app&level=Company&name=dynamic-sample"><!-- 3. Create save call with initial json payload --><inputtype="hidden"name="CaFaApi.Api.Put.putConf|1"value="v3/configuration"> {{ if $getConfStateResp.Exists }}
<inputtype="hidden"name="CaFaApi.Api.Json.putConf.json.<-@{order(1)}"value="getConfState.Response.0"> {{ else }}
<inputtype="hidden"name="CaFaApi.Api.Json.putConf.json.@{order(1)}"value='{"application":"my-app","level":"Company","name":"dynamic-sample","value":{}}'> {{ end }}
<!-- 4. Optionally, check updated state of the entry. --><inputtype="hidden"name="CaFaApi.Api.Get.getConfFinal|2"value="v3/configuration/{id}"><inputtype="hidden"name="CaFaApi.Api.Path.getConfFinal.<-id"value="putConf.Response.id"><!-- 5. Modify section, use same approach to as many fields as needed --><br/>Cat Murka age:
<inputtype="text"name="CaFaApi.Api.Json.putConf.number.value.pets.murka.age"value='{{ if $putConfBody.Exists }}{{ $putConfBody.Get "value.pets.murka.age" }}{{ else}}{{ $getConfStateResp.Get "value.pets.murka.age" }}{{ end }}'><buttontype="submit">Submit</button></form><h2>Before update</h2>Murka age: {{ .Data.CaFaApi.Api.Requests.getConfState.Response.Get "0.value.pets.murka.age" }}
<h2>After update</h2>Murka age: {{ .Data.CaFaApi.Api.Requests.getConfFinal.Response.Get "0.value.pets.murka.age" }}
Firstly, we need to have current state of the configuration, so we are loading it from the api
with getConfState request. Later we can use it for the “first page loading” event to display
current state.
Here, with QueryBulk parameter type we are preparing a bunch of static query parameters to get
specific configuration entry, based on application, level and name.
This part of the code allows as to prepare initial body of the json payload. We are getting the
payload from getConfState if it is available, or generating totally new one otherwise. Also,
we are using input functions
feature to define the order for json input parameters. By default, GoErp receives all parameters
in a chaotic order. But we need to be sure that initial structure assignment goes always first,
so we are defining order by setting it to 1. Additionally, we need to assign the payload to body
as a root object. To do that, just omit key definition after the dot (with key: .json.key, and
without: .json.).
Optionally, we are defining request getConfFinal to retrieve configuration updated state,
just to see that configuration was changed. In most cases it is not needed in real applications.
In this section we are making modifications to the configuration object and making sure that
UI displays correct value for each case: 1) first load of the page and 2) after update event.
We know, that if json body of the put request is available, then we came to this page right after
save, otherwise it is first loading. Variables were defined just to make input value look smaller.
The final working example with a couple more fields after removing all unnecessary stuff:
<!-- Vars section -->{{ $putConfBody := .Data.CaFaApi.Api.Requests.putConf.Json }}
{{ $getConfStateResp := .Data.CaFaApi.Api.Requests.getConfState.Response.Get "0" }}
<h1>Dynamic CAFA</h1><formmethod="post"><inputtype="hidden"name="CaFaApi.Api.Get.getConfState"value="configuration"data-preset-val="configuration"><inputtype="hidden"name="CaFaApi.Api.QueryBulk.getConfState.url"value="application=my-app&level=Company&name=dynamic-sample"data-preset-val="application=my-app&level=Company&name=dynamic-sample"><inputtype="hidden"name="CaFaApi.Api.Put.putConf|1"value="v3/configuration"> {{ if $getConfStateResp.Exists }}
<inputtype="hidden"name="CaFaApi.Api.Json.putConf.json.<-@{order(1)}"value="getConfState.Response.0"> {{ else }}
<inputtype="hidden"name="CaFaApi.Api.Json.putConf.json.@{order(1)}"value='{"application":"my-app","level":"Company","name":"dynamic-sample","value":{}}'> {{ end }}
<inputtype="hidden"name="CaFaApi.Api.Get.getConfFinal|2"value="v3/configuration/{id}"><inputtype="hidden"name="CaFaApi.Api.Path.getConfFinal.<-id"value="putConf.Response.id"><!-- Modify section --><br/>Cat Murka age: <inputtype="text"name="CaFaApi.Api.Json.putConf.number.value.pets.murka.age"value='{{ if $putConfBody.Exists }}{{ ($putConfBody.Get "value.pets.murka.age").String }}{{ else}}{{ ($getConfStateResp.Get "value.pets.murka.age").String }}{{ end }}'><br/>Cat Murka breed: <inputtype="text"name="CaFaApi.Api.Json.putConf.string.value.pets.murka.breed"value='{{ if $putConfBody.Exists }}{{ ($putConfBody.Get "value.pets.murka.breed").String }}{{ else}}{{ ($getConfStateResp.Get "value.pets.murka.breed").String }}{{ end }}'><br/>Cat Murka kind: <inputtype="text"name="CaFaApi.Api.Json.putConf.string.value.pets.murka.kind"value='{{ if $putConfBody.Exists }}{{ ($putConfBody.Get "value.pets.murka.kind").String }}{{ else}}{{ ($getConfStateResp.Get "value.pets.murka.kind").String }}{{ end }}'><br/><buttontype="submit">Submit </button></form>
Form drafts
It’s possible to instruct the form to keep certain dynamic api parameters for api requests but not trigger the corresponding
api request with the post until instructed to do so.
This can be used to make ‘drafts’ from inputs that will not trigger the api calls.
Hold all api request
The following form entry will prevent all dynamic api calls from triggering, but keeps all the parameters intact.
Note that this also affects api calls that are done by presets.
Server will not run any dynamic api calls when the value of the Form.HoldDraft is true. Inputs against these calls can be changed
and posted without the actual calls being initiated.
<formmethod="post"><inputtype="hidden"id="req"name="ErplyApi.Api.Post.myRequest1"value="getProducts"><labelfor="id">Records on page</label><inputtype="text"id="id"name="ErplyApi.Api.PostParam.myRequest1.recordsOnPage"value="{{ index .Data.Parameters "ErplyApi.Api.PostParam.myRequest1.recordsOnPage"}}"><labelfor="hold-state">Hold draft</label><inputtype="checkbox"id="hold-state"name="Form.HoldDraft"value="true"><buttontype="submit">send</button></form>
Hold specific api calls
In order the enrich data with additional possible api calls but hold others as drafts we can use a different input.
All dynamic requests that have the names will not be executed.
Can possibly make stepper type templates using this method.
In this sample the same ‘Send’ will run request1 and request2 in sequence.
<formmethod="post"><inputtype="hidden"id="req"name="ErplyApi.Api.Post.myRequest1"value="getProducts"><inputtype="hidden"id="req"name="ErplyApi.Api.Post.myRequest2"value="getProducts"><labelfor="id">Records on page</label><inputtype="text"id="id"name="ErplyApi.Api.PostParam.myRequest1.recordsOnPage"value="{{ index .Data.Parameters "ErplyApi.Api.PostParam.myRequest1.recordsOnPage"}}"><labelfor="id">Records 2 on page</label><inputtype="text"id="id"name="ErplyApi.Api.PostParam.myRequest2.recordsOnPage"value="{{ index .Data.Parameters "ErplyApi.Api.PostParam.myRequest2.recordsOnPage"}}"> {{ if ne .Data.ErplyApi.Api.Requests.myRequest1.Response.Exists true }}
<inputtype="text"id="hold-state"name="Form.HoldDraftFor"value="myRequest2"> {{ end }}
<buttontype="submit">send</button></form>
Making FTP requests
Since v1.277.0 GoErp supports FTP requests in dynamics. This feature allows to upload or
download files to/from servers through FTP protocol as well as a couple of additional actions like
moving files, getting directory list, etc.
Warning
Since v1.301.3FTPGet and FTPPut are deprecated and will be removed in future versions.
Instead, use FTP as a method while initializing the request and pass action name in cmd
through PostParam.
Input parameters
Initialization of the request is made through FTP method type. Like so:
<input type="hidden" name="CustomApi.Api.FTP.file" value="localhost:2121">. Value in this case
contains the FTP server host with port. Port is mandatory parameter. If provider not specified the
port, then the default ports for ftp 21,2121, and for ftps 990.
Actions request and response parameters
All requests expecting credentials and cmd to be passed through PostParam type:
cmd - FTP command (or action). All available commands are listed below.
schema - ftp or ftps. If not set, then GoErp will try to get it from the link and if fails then uses ftp.
username - FTP server username.
password - FTP server password.
get
Input parameters:
cmd - get
path - Path to the file on the server. Example: /path/to/file.txt.
Displaying the names of files and directories in the specified path (subdirectories not included). Every element in the list has detailed information about entry.
{"error":"550 Could not access file: open /tmp/my-data: no such file or directory","status":"error"}
Form control
Always used with forms. Goerp application handles all pages with one dynamic handler and pages may
have multiple forms. When the page is processed by the handler, then all forms and related input
models are involved. We need to know the exact model to be sure that after submitting the form POST
request, the right model gets processed. This model name should be passed with the postActionEntity
input name.
All form control fields:
postAction - what action should be applied to the entity, currently there is only one option -
delete, if passed then form control should also have postActionIds input included. If postAction
is not specified, then by default applied save/update action.
postActionIds - entity ID’s separated by comma (,). Those are input parameters for performing
changes under specific entities (in most cases deleting them)
postActionEntity - defines the model name which is related to the form. Needed only for the
save, update and delete options (not needed in query type forms). Supports multiple entities, each
of them should be defined in separate input with the same name, check Multi-entity form topic in
this section.
postActionRedirect - defines the link where to redirect after successful post action (not
applied to delete action and to forms with GET method)
Do not use any form control inputs while submitting the form using GET method (at least for now
there is no practical use of form control options in GET requests).
Use GET requests to fetch multiple data for tables using Query model, or to fetch
single Input entity (usually just passing its ID) while defining link to the edit form.
Query models always connected with the List models. When defining the List model in your
template,
GOERP will make request to the related API and fetch data based on the Query parameters.
<formmethod="get"id="query-form"><labelfor="query-parameter-1">Query parameter 1:</label><inputtype="text"id="query-parameter-1"name="Api.ModelQuery.Field"value="{{ .Data.Api.ModelQuery.Field }}"><labelfor="query-parameter-2">Query parameter 2:</label><inputtype="text"id="query-parameter-2"name="Api.ModelQuery.AnotherField"value="{{ .Data.Api.ModelQuery.AnotherField }}"><buttontype="submit">Find</button></form><!-- Use List entities to actually apply the query, otherwise Query parameters will be ignored --><ul> {{ range .Data.Api.ModelList }}
<li>{{ .Name }}</li> {{ end }}
</ul>
POST for create and update actions
Let’s take a look into simple create/update example form:
<formmethod="post"id="post-form"><!-- For saving action need to pass only postActionEntity, which will ensure that you are working with correct model --><inputtype="hidden"name="postActionEntity"value="ModelInput"><!-- Optionally, use redirect option to redirect to the specified page after successful saving --><inputtype="hidden"name="postActionRedirect"value="https://erply.com/"><!-- Next 2 fields are related to actual model parameters --><labelfor="input-1">Input 1:</label><inputtype="text"id="input-1"name="Api.ModelInput.Field"value="{{ .Data.Api.ModelInput.Field }}"><labelfor="input-2">Input 2:</label><inputtype="text"id="input-2"name="Api.ModelInput.AnotherField"value="{{ .Data.Api.ModelInput.AnotherField }}"><buttontype="submit"id="save">Save</button></form>
Often we need to make reference from the list of rows to the specific entity edit form. In this case
pass entity ID from the selected row to the edit link by attaching it to the Input ID (some input
models doesn’t have Input suffix, but you can check in data source definitions in editor if model
have “write” option):
<!-- Use built-in .Session object to access account related configuration --><!-- Use prefix '$' if linking made inside the range loop, otherwise omit it --><ahref="/{{ $.Session.ClientCode }}/{{ $.Session.Language.Code }}/example-page?Api.ModelInput.Id={{ .Id }}"target="_self"class="table-action-button"><iclass="button nowrap button--transparent icon-Edit-Line"></i></a>
POST for delete action
Delete actions should be made by following next steps:
Form must have method parameter set to POST
Inside the form set hidden postAction input to delete
Inside the form set hidden postActionIds input to entity IDs (separated by comma) that should be
deleted (using custom JS or predefined goerp components)
Inside the form set hidden postActionEntity input to the entity name that should be deleted. If
it is row in the table, then that entity should have suffix List (e.g. WarehouseDtoList
or WarehouseDtoList). If deleting from the single entity edit form, then suffix may be Input
or just model name, check data sources definition in the editor for exact model names. Please
note, postActionEntity value shouldn’t have API definition, just model name.
<formmethod="get"id="entity-table-id"><inputtype="hidden"name="postAction"value="delete"><inputtype="hidden"name="postActionIds"value=""><inputtype="hidden"name="postActionEntity"value="ModelList"><!-- Add submit button if delete modal not used --><!-- <button type="submit">DELETE</button>--></form><!-- and then somewhere in the list range --><ul> {{ range .Data.Api.ModelList }}
<li>{{ .Name }}</li><!-- If used delete-confirm-partial component, then define next parameters inside the button --><buttondata-form-id="entity-table-id"data-delete-identifier="{{ .Id }}"data-post-action-entity="ModelList"class="button button--transparent nowrap table-action-button action-row-red form-delete-button"><iclass="icon-Trash-Empty-NotFilled"></i></button> {{ end }}
</ul><!-- As an option, somewhere in the end of the page import delete-confirm-modal from goerp components and use it --><!-- to delete one or many entities. Or write your own deletion logic -->{{ template "delete-confirm-partial" .}}
Multi-entity form
GOERP now supports multiple entities definitions in one form, which allows to save data of many
different, unrelated entities at once.
Note
Multi-entity form supports only one postAction type for all scoped entities. For example, it cannot
be used to delete one and create another entity at once. Only delete for all related entities OR
create/update for all related entities.
Let’s say we need to create warehouse and point of sale records by submitting them in one form, then
code would look like this:
<formmethod="POST"> {{/* Define entity names that should be processed */}}
<inputtype="hidden"name="postActionEntity"value="WarehouseInput"><inputtype="hidden"name="postActionEntity"value="PointOfSale"> {{/* Warehouse input data */}}
<fieldset><legend>Warehouse:</legend><labelfor="name-eng">Name eng:</label><inputtype="text"id="name-eng"name="AccountAdminApi.WarehouseInput.Name.en"value="{{ .Data.AccountAdminApi.WarehouseInput.Name.en }}"><labelfor="name-est">Name est:</label><inputtype="text"id="name-est"name="AccountAdminApi.WarehouseInput.Name.et"value="{{ .Data.AccountAdminApi.WarehouseInput.Name.et }}"></fieldset> {{/* Point of sale input data */}}
<fieldset><legend>Point of sale:</legend><labelfor="name-pos">Name:</label><inputtype="text"id="name-pos"name="AccountAdminApi.PointOfSale.Name"value="{{ .Data.AccountAdminApi.PointOfSale.Name }}"><labelfor="name-shop">Shop name:</label><inputtype="text"id="name-shop"name="AccountAdminApi.PointOfSale.ShopName"value="{{ .Data.AccountAdminApi.PointOfSale.ShopName }}"></fieldset></form>
Bulk-entity form
Some input entities in GOERP may be submitted as a bulk (having multiple records in scope of one
form submit), allowing to create or update multiple records at once. Such inputs have array types in
data source definition - []string (e.g. ErplyApi.ProductInSupplierPriceList). Also, bulk
input fields may be a part of some complex input entities (e.g. ErplyApi.SalesDocumentInput)
accepts many Row’s as part of the input.
Warning
Every row in the bulk should always have same order of inputs as others (check samples).
All rows in the bulk should always have same amount of inputs. For example, goerp will fail
if one row contains Name and Code and second one have ID, Name and Code. If ID
undefined, then pass empty value with an input.
Bulk-entity form sample
<formmethod="POST"> {{/* Define entity name that should be processed */}}
<inputtype="hidden"name="postActionEntity"value="ProductInSupplierPriceList"> {{/* Empty row (to add new) */}}
<fieldset><legend>Create row:</legend><labelfor="spl-id">Supplier price list ID:</label><inputtype="text"id="spl-id"name="ErplyApi.ProductInSupplierPriceList.SupplierPriceListID"><labelfor="product-id">Product ID:</label><inputtype="text"id="product-id"name="ErplyApi.ProductInSupplierPriceList.ProductID"></fieldset><h2>Existing rows</h2> {{/* Populate existing rows for update */}}
{{ range $i, $el := .Data.ErplyApi.ProductInSupplierPriceListList }}
<fieldset><legend>Row {{$i}}:</legend><labelfor="spl-id-{{$i}}">Supplier price list ID:</label><inputtype="text"id="spl-id-{{$i}}"name="ErplyApi.ProductInSupplierPriceList.SupplierPriceListID"value="{{$el.SupplierPriceListID}}"><labelfor="product-id-{{$i}}">Product ID:</label><inputtype="text"id="product-id-{{$i}}"name="ErplyApi.ProductInSupplierPriceList.ProductID"value="{{$el.ProductID}}"></fieldset> {{ end }}
</form>
Subsections of Bulk-entity form
Sales document sample
<!-- Display possible api errors --><div> {{ range .Data.Errors }}
<span>{{ . }}</span> {{ end }}
</div><formmethod="post"><!-- Field used by goErp to state what we want to save --><inputtype="hidden"name="postActionEntity"value="SalesDocumentInput"/><!-- Need to set the ID of the existing document --><inputtype="hidden"name="ErplyApi.SalesDocumentInput.ID"value="{{ .Data.ErplyApi.SalesDocumentInput.ID }}"><table><thead><tr><th>Product ID</th><th>Amount</th><th>Price</th></tr></thead><tbody> {{ range $row := .Data.ErplyApi.SalesDocument.Rows }}
<tr><td><!-- Stable row id is used by erply api to determine existing rows
the api always replaces all rows so adding a single row means all rows need to be resaved --><inputtype="hidden"name="ErplyApi.SalesDocumentInput.RowStableRowID"value="{{ $row.StableRowID }}"><inputname="ErplyApi.SalesDocumentInput.RowProductID"value="{{ $row.ProductID }}"></td><td><inputname="ErplyApi.SalesDocumentInput.RowAmount"value="{{ $row.Amount }}"></td><td><inputname="ErplyApi.SalesDocumentInput.RowPrice"value="{{ $row.Price }}"></td></tr> {{ end }}
<tr><td><inputtype="hidden"name="ErplyApi.SalesDocumentInput.RowStableRowID"value="0"><inputname="ErplyApi.SalesDocumentInput.RowProductID"value=""placeholder="Product ID"></td><td><inputname="ErplyApi.SalesDocumentInput.RowAmount"value="0"></td><!-- Manual pricing allowed? --><td><inputname="ErplyApi.SalesDocumentInput.RowPrice"value="0"></td></tr></tbody></table><!-- Erply api returns this boolean as a string 0 or 1 for some reason --> {{ if eq .Data.ErplyApi.SalesDocument.Confirmed "1" }}
<h2>Confirmed documents cannot be edited</h2> {{ else }}
<buttontype="submit">Save</button> {{ end }}
</form>
Session
Contains service information, like session key, client code, etc…
Syntax: {{ .Session.ClientCode }} Full list of parameters:
.Session.ClientCode
.Session.SessionKey

.Session.User.ID
.Session.User.FullName
.Session.User.EmployeeID
.Session.User.EmployeeName
.Session.User.GroupID
.Session.User.BOLoginUrl // Back office url for current user

<!-- Services May be extended in feature -->
.Session.Services.ErplyApi.URL
.Session.Services.Auth.URL
.Session.Services.AccountAdmin.URL
.Session.Services.Assignments.URL
.Session.Services.CaFa.URL
.Session.Services.PointOfSaleApi.URL
.Session.Services.UserApi.URL
.Session.Services.WMSApi.URL
.Session.Services.CrmApi.URL
.Session.Services.PricingApi.URL
.Session.Services.PimApi.URL
.Session.Services.VinApi.URL
.Session.Services.InventoryTransactionApi.URL
.Session.Services.InventoryDocumentApi.URL
.Session.Services.IntLog.URL
.Session.Services.ReportsApi.URL
.Session.Services.WebhookManager.URL
.Session.Services.EMSApi.URL
.Session.Services.EInvoiceApi.URL
.Session.Services.KvsApi.URL

.Session.Language.Code
.Session.DefaultLanguage.Code

.Session.AccountConfiguration.configurations
Some notes about specific parameters:
.Session.AccountConfiguration.configurations contains all erply configuration parameters
.Session.Language.Code two letter code of the currently set account language
.Session.DefaultLanguage.Code two letter code of the default account language
Parameters
Not controlled by goerp, can be used to mirror some data after submitting the form. Basically, goerp
will return all assigned parameters data with the response.
Let’s say we want to pass some data to the next page, using regular query parameter:
It’s possible to instruct the server to validate incoming parameters to certain rules.
Register the rules on page “Form validation” configuration section.
Enable and disable feature
You can use the toggle button to disable or enable the entered rules.
Rules
The parameter name is the full parameter name to be validated.
Type can be any of the following:
required - checks that the parameter exists
type - currently can have the value of a number, checks if the parameter is a valid number
min - checks that the numeric value is higher or equal to the given value
max - checks that the numeric value is lower or equal to the given value
minLength - checks that the string value is at-least the given characters long
maxLength - checks that the string value does not exceed the given amount of characters
pattern - checks if the input is valid to the regex pattern (ex: .{8,})
Validation
The validation is completed for each rule and the errors are returned in the regular .Data.Errors array.
{{ range .Data.Errors }}
    {{ . }}
{{ end }}
Version
Holds current version of the goerp server, usage: {{ .Version }}
Preset queries
Goerp have an option to define Preset queries, which will be saved into the template data and
executed every time when page loaded without passing any form data. Usually preset option is used
while querying the table of records. However, inputs also may have preset option in very specific
cases. Check data source definitions in editor to ensure if model supports presets or not.
To use presets, just add input tags somewhere in the template, but outside any form, and set desired
values:
<body><inputtype="hidden"name="Preset.Api.ModelQuery.FieldOne"value="1"><inputtype="hidden"name="Preset.Api.ModelQuery.FieldTwo"value="two"><!-- When template loaded from the store, goerp already knows the filter criteria based on presets --><!-- and this list will contain records that are corresponds to preset query inputs --><ul> {{ range .Data.Api.ModelList }}
<li>{{ .Name }}</li> {{ end }}
</ul></body>
Warning
Define all Preset inputs outside the form, so they will not mess up with form data (In most cases
goerp editor will throw an error during saving). That make sense, because
they are not related to the form at all, consider them as “imports” in javascript, so write them
somewhere in the beginning of the document (page or partial, in case of partial inside
“content-block”)
Chaining models
Tip
Despite dynamics, models have very restricted options for data chaining. Switching to the dynamic
data model
is strongly recommended, except cases when using model approach is more convenient or dynamic model
not usable at all. But keep in mind, models are significantly less flexible in comparison with
dynamics.
Chain models with in-build data sources
Currently, models supports chaining with in-built data sources only. Those are: Session, Storage
and Parameters.
Note
If source doesn’t contain data, then chaining would be skipped and target
parameter would be set to the empty value.
Tip
There is also option to save data from data models to the Storage. Check storage guides
for more information.
Session
<!-- in presets --><inputname="Preset.ErplyApi.SalesDocumentQuery.ClientID<-"value="Session.customer.ID"><!-- inside the form --><formmethod="post"><inputname="ErplyApi.SalesDocumentQuery.ClientID<-"value="Session.customer.ID"></form>
Storage
<!-- in presets, expects that storage have the value, otherwise chaining would be skipped --><inputname="Preset.ErplyApi.SalesDocumentQuery.ClientID<-"value="Storage.customerID"><!-- inside the form, expects that storage have the value, otherwise chaining would be skipped --><formmethod="post"><inputname="ErplyApi.SalesDocumentQuery.ClientID<-"value="Storage.customerID"></form>
Parameters
<!-- in presets, expects that storage have the value, otherwise chaining would be skipped --><inputname="Preset.ErplyApi.SalesDocumentQuery.ClientID<-"value="Parameters.customerID"><!-- inside the form, expects that storage have the value, otherwise chaining would be skipped --><formmethod="post"><inputname="ErplyApi.SalesDocumentQuery.ClientID<-"value="Parameters.customerID"></form>
Request statistics
Response data now contains some statistics of performed request. Current structure of the
.Data.RequestStats parameter is:
RequestStats.TotalTime (Total time spent by performing entire request, including parsing and api calls)
RequestStats.TemplateProcessingTime (Time spent on template preparation and processing)
RequestStats.APICallsTotalTime (Total time of API calls, for DTO may exceed Total request time because some requests performed in parallel)
RequestStats.APICallsCount (Number of API calls)
RequestStats.APICalls[] (Array containing APICall elements)
RequestStats.CacheTotalTime (Total time spent on caching, not available at the moment)

APICall.Took (Time spent on this particular call, without parsing)
APICall.Endpoint (API endpoint)
APICall.ResponseCode (API http response code)
There is a number of built-in functions exposed to the template interface that can be used to format
or alter data before it gets rendered to the browser.
encapsulates an HTML attribute from a trusted source
htmlAttr(htmlAttrStr) string
{{ htmlAttr `dir=“ltr”` }}
urlSrc
encapsulates a known safe URL or URL substring
urlSrc(urlStr) string
{{ urlSrc “/trusted/url” }}
uuid
generates UUID V4
uuid() string
{{ uuid }}
transformToCp
Converts UTF-8 string to the one of desired code page options
transformToCp(source, codepage) string
{{ transformToCp “¡¢£” “iso8859_1” }}
sanitizeHtml
Sanitizes htlm. If Policy set to “UGC”, it will remove all potential XSS injections. Having policy set to “strict” (or without any policy) will remove all html tags from the string.
sanitizeHtml(sourceStr, policyStr) string
{{ sanitizeHtml “
FOO
” “strict” }}
The functions that accept a single parameter can also be used with the pipe notation.
The date formatting feature uses the go date formatting, as such the same format layouts are
expected. Check https://gosamples.dev/date-time-format-cheatsheet/ for information on how the form
the formats. Default format 2006-01-02T15:04:05Z07:00.
Some dt prefixed functions returns timeObject, which is golang struct. This struct may be used
while calling multiple functions in a pipe, check examples for how-to-use tips.
All timeObject related functions description could be found on the official golang documentation
portal. Check all functions that starts from func (t Time).
Time related account configuration variables
Almost every account have default time related configurations, like timezone and formats. Timezone
may not exist for accounts that shares many timezones (e.g. most of the USA accounts), in this case
timezone should be configured by account owners.
<!-- DT date manipulations --><p><!-- Get a usable date object --><!-- Basic current server time (UTC) --> Server current time: {{ dtCurrent }}
</p><p><!-- Get current time in a specific timezone / location --><!-- #1 parameter here is the tz timezone identifier value
get a reference for the available values in https://en.wikipedia.org/wiki/List_of_tz_database_time_zones --> Current time in TZ: {{ dtCurrentIn "America/New_York" }}
</p><p><!-- Use an input in any possible format from another source --><!-- #1 parameter is the input date value --><!-- #2 parameter is the input date format, use the https://gosamples.dev/date-time-format-cheatsheet/ to read on how the format works --><!-- #3 is the timezone tz identifier value of the output time --> Time conversion from another format: {{ dtFromDateTime "2023-06-06T15:12:12Z07:00"
"2006-01-02T15:04:05Z07:00" "America/New_York" }}
</p><!-- Manipulate the value of the date--><!-- Reduce by 1 year --><p>Current time reduced by 1 year: {{ dtAdjustDate dtCurrent "year" -1 }}</p><!-- Add 1 year --><p>Current time plus 1 year: {{ dtAdjustDate dtCurrent "year" 1 }}</p><!-- Reduce by 1 month --><p>Current time reduced by 1 month: {{ dtAdjustDate dtCurrent "month" -1 }}</p><!-- Add 1 month --><p>Current time plus 1 month: {{ dtAdjustDate dtCurrent "month" 1 }}</p><!-- Reduce by 1 day --><p>Current time reduced by 1 day: {{ dtAdjustDate dtCurrent "day" -1 }}</p><!-- Add 1 day --><p>Current time plus 1 day: {{ dtAdjustDate dtCurrent "day" 1 }}</p><!-- Get specific values --><!-- First and last day of week --><!-- #1 value of one of the provided functions: dtCurrent, dtCurrentIn or dtFromDateTime --><!-- #2 boolean value - true if week start day is Sunday and false for Monday --><p>First day of week(monday): {{ dtFirstDayOfWeek dtCurrent false }}</p><p>First day of week(sunday): {{ dtFirstDayOfWeek dtCurrent true }}</p><p>Last day of week(monday): {{ dtLastDayOfWeek dtCurrent false }}</p><p>Last day of week(sunday): {{ dtLastDayOfWeek dtCurrent true }}</p><!-- First and last day of the month --><!-- #1 value of one of the provided functions: dtCurrent, dtCurrentIn or dtFromDateTime --><p>First day of month: {{ dtFirstDayOfMonth dtCurrent }}</p><p>Last day of month: {{ dtLastDayOfMonth dtCurrent }}</p><p>First day of next month: {{ dtAdjustDate dtCurrent "month" 1 | dtFirstDayOfMonth }}</p><p>First day of previous month: {{ dtAdjustDate dtCurrent "month" -1 | dtFirstDayOfMonth }}</p><!-- First and last day of the year --><!-- #1 value of one of the provided functions: dtCurrent, dtCurrentIn or dtFromDateTime --><p>First day of the year: {{ dtFirstDayOfYear dtCurrent }}</p><p>Last day of the year: {{ dtLastDayOfYear dtCurrent }}</p><p>First day of next year: {{ dtAdjustDate dtCurrent "year" 1 | dtFirstDayOfYear }}</p><p>Last day of previous year: {{ dtAdjustDate dtCurrent "year" -1 | dtLastDayOfYear }}</p><!-- Format the date to anything thats needed --><!-- #1 dt time object from any of the previous functions --><!-- #2 in what format you need to get the date time format, use https://gosamples.dev/date-time-format-cheatsheet/ as date format reference --><p>Date to UnixDate: {{ dtToFormat dtCurrent "Mon Jan _2 15:04:05 MST 2006" }}</p><p>Date to RFC822: {{ dtToFormat dtCurrent "02 Jan 06 15:04 MST" }}</p><p>Date to RFC1123: {{ dtToFormat dtCurrent "Mon, 02 Jan 2006 15:04:05 MST" }}</p><p>Date to RFC3339Nano: {{ dtToFormat dtCurrent "2006-01-02T15:04:05.999999999Z07:00" }}</p><p>Date only: {{ dtToFormat dtCurrent "2006-01-02" }}</p><p>Time only: {{ dtToFormat dtCurrent "15:04:05" }}</p><p>Custom: {{ dtToFormat dtCurrent "15:04:05 2006/01/02" }}</p><!-- Chain current time -> add 1 year -> first day of the year -> to my format --><!-- With a set variable --><p> {{ $firstDayOfNextYear := dtAdjustDate dtCurrent "year" 1 | dtFirstDayOfYear }}
First day of next year in RFC822: {{ dtToFormat $firstDayOfNextYear "02 Jan 06 15:04 MST" }}
</p><!-- Use helper functions --><!-- #1 date data from the previous functions --><!-- #2 what format to concert to --><!-- Note that these functions alter the date by 1 depending if its first or last, so further adjustments to the input date here is not needed --><p>First day of pervious month: {{ dtFirstDayOfPreviousMonthInFormat dtCurrent "02 Jan 06 15:04 MST"
}}</p><p>First day of current month:{{ dtFirstDayOfCurrentMonthInFormat dtCurrent "02 Jan 06 15:04 MST"
}}</p><p>First day of next month:{{ dtFirstDayOfNextMonthInFormat dtCurrent "02 Jan 06 15:04 MST" }}</p><p>First day of pervious year:{{ dtFirstDayOfPreviousYearInFormat dtCurrent "02 Jan 06 15:04 MST"
}}</p><p>First day of current year:{{ dtFirstDayOfCurrentYearInFormat dtCurrent "02 Jan 06 15:04 MST"
}}</p><p>First day of next year:{{ dtFirstDayOfNextYearInFormat dtCurrent "02 Jan 06 15:04 MST" }}</p><p>Last day of pervious month: {{ dtLastDayOfPreviousMonthInFormat dtCurrent "02 Jan 06 15:04 MST"
}}</p><p>Last day of current month:{{ dtLastDayOfCurrentMonthInFormat dtCurrent "02 Jan 06 15:04 MST"
}}</p><p>Last day of next month:{{ dtLastDayOfNextMonthInFormat dtCurrent "02 Jan 06 15:04 MST" }}</p><p>Last day of pervious year:{{ dtLastDayOfPreviousYearInFormat dtCurrent "02 Jan 06 15:04 MST"
}}</p><p>Last day of current year:{{ dtLastDayOfCurrentYearInFormat dtCurrent "02 Jan 06 15:04 MST" }}</p><p>Last day of next year:{{ dtLastDayOfNextYearInFormat dtCurrent "02 Jan 06 15:04 MST" }}</p><!-- DT future --><h2>Get nearest future quarter, half or full hour for a datetime</h2>{{ $sample := dtFromDateTime "12:14" "03:04" "GMT" }}
<p>{{ dtToFormat (dtFuture $sample "quarter") "03:04" }}</p><p>{{ dtToFormat (dtFuture $sample "half") "03:04" }}</p><p>{{ dtToFormat (dtFuture $sample "full") "03:04" }}</p><!-- Start and end of the day --><p>{{ $timeZone := toString .Data.ErplyApi.ConfigurationList.timezone }}</p><p>{{ $today := dtCurrentIn $timeZone }}</p>{{ $start := dtStartOfDay $today }}
{{ $end := dtEndOfDay $today }}
<!-- Get Unix on any timeObject (from any of the helpers that return that type) value --><p>{{ $start.Unix }}</p><p>{{ $end.Unix }}</p>
Types conversions
Name
Description
Usage
Samples
toString
Attempts to convert a type to a string. Can be used to make sure an interface value is always a string.
toString(undefined)
{{ toString 100 }}
toFloat
Converts a string to float. Created value can be used on other helper functions.
toFloat(string)
{{ toFloat “100.23” }}
toInt
Converts a string to int. Created value can be used on other helper functions.
toInt(string)
{{ toInt “100” }}
toBool
Converts a string, int or float to boolean. Created value can be used on other helper functions.
toBool(string)
{{ toBool “1” }}
intToString
Converts a int to string. Created value can be used on other helper functions.
intToString(int)
{{ intToString 100 }}
stringToUint32
Converts a string to int32. Created value can be used on other helper functions.
stringToUint32(string)
{{ stringToUint32 “100” }}
intToUint32
Converts a int to int32. Created value can be used on other helper functions.
intToUint32(int)
{{ intToUint32 100 }}
floatToString
Converts a float to string. Created value can be used on other helper functions.
floatToString(float64)
{{ floatToString 100.5 }}
floatToInt
Converts a float to int. Created value can be used on other helper functions.
floatToString(float64)
{{ floatToInt 100.5 }}
floatToEvenString
Converts a float to int and returns as a string. Created value can be used on other helper functions.
floatToEvenString(float64)
{{ floatToEvenString 100.5 }}
Example where the data could be stored in a JS variable for js usage.
Creates map[string]string, parameters count must be even (2,4,etc), first is key and second - value
mkMap(key, value, …)
{{ m := mkMap “key” “val” “key2” “val2” }}
mkAnyMap
Creates map[string]any, parameters count must be even (2,4,etc), first is key and second - value
mkAnyMap(key, value, …)
{{ m := mkAnyMap “key” “val” “key2” 2 }}
mkCtxMap
Creates map[string]any, first parameter should be the template context (the dot), rest is the same as mkAnyMap. This function makes sure that everything in the context is still available when used as a passing function to pass data to partials.
mkCtxMap(., key, value, …)
{{ m := mkCtxMap . “key” “val” “key2” 2 }}
mkIntArray
Creates array (slice) of integers, if parameters not passed then empty array created
mkIntArray(1, 2, …)
{{ m := mkIntArray 1 2 }}
mkStringArray
Creates array (slice) of strings, if parameters not passed then empty array created
mkStringArray(“foo”, “bar”, …)
{{ m := mkStringArray “foo” “bar” }}
Math
Name
Description
Function arguments
Usage
round
Rounds the float value to nearest integer value
round(myFloat)
{{ round 100.456 }}
roundToEven
Rounds to the nearest integer, rounding ties to even.
roundToEven(myFloat)
{{ round 100.456 }}
roundTo
Round to the nearest requested precision point.
roundTo(myFloat, decimalPlaces)
{{ roundTo 100.456 2 }}
roundToAndHumanize
Round to the nearest requested precision point and add comma separation for thousands.
roundToAndHumanize(myFloat, decimalPlaces)
{{ roundToAndHumanize 100.456 2 }}
roundToAndHumanizeWithConf
Same as roundToAndHumanize, but with a configuration string — e.g. ", " to use a comma as the decimal separator and a space as the thousands separator.
Similar to in but the last adjustment is done against the current year
getYearRange(from, adjustCurrentYear)
{{ range getYearRange 1800 10 }}
inZeroPadding
Generate a range of string with given amount of zero paddings
inZeroPadding(from, to, numberOfPads)
{{ range inZeroPadding 1 12 2 }}
getSortedKeys
Extracts keys from map then sorts them based on the passed order (asc or desc) and returns keys as []string
getSortedKeys(map[string]any, “desc”)
{{ getSortedKeys $m “desc” }}
Get totals notes
Note that getListTotal, getRoundedListTotal and getRoundedAndHumanizedListTotal functions
under the hood return the value as a string. This means if you intend to
use the value for further processing using the same helper functions then you would need to convert
the values to required types first.
Also note that the function can be used with any integrated lists that contain an integer or float
column.
Working with JSON
This section contains all json related manipulations, using helper
functions, gjson.Result object and modifier functions
that could be used during path assembly for the gjson.Result.Get calls.
Name
Description
Usage
Samples
toJson
Attempts to convert a type to valid json. Can be used on list types or entities to get the structure for JS usage.
toJson(data) string
{{ toJson .Data.WMSApi.InboundEfficiencyList }}
jsonLookup
Looking json value by path. May return different types: int, string, etc… If under path json, returns map[string]any
jsonLookup(jsonStr, path) any
{{ jsonLookup `{“foo”:“bar”}` “foo” }}
jsonLookupRaw
Looking json value by path. Always returns string. If under path json, returns stringified json
JsonLookupRaw(jsonStr, path) string
{{ JsonLookupRaw `{“foo”:“bar”}` “foo” }}
jsonType
Returns json type for path. Values: “Null”, “Number”, “String”, “JSON”, “Boolean”
JsonType(jsonStr, path) string
{{ JsonType `{“foo”:“bar”}` “foo” }}
jsonArrayLen
Returns length of json array. Returns 0 if under path is object
JsonArrayLen(jsonStr, path) int
{{ JsonArrayLen [] "" }}
jsonObjKeys
Returns all keys of json object under path.
JsonObjKeys(jsonStr, path) int
{{ JsonObjKeys `{“foo”:1,“bar”:2}` "" }}
jsonResult
Returns JSON Result object containing many valuable functions and fields. More details
jsonResult(jsonStr, path) gjson.Result
{{ jsonResult `{“foo”:1,“bar”:2}` “foo” }}
jsonPretty
Takes in string or []byte and returns beautified json
jsonPretty(json) string
{{ jsonPretty `{“foo”:1,“bar”:2}` }}
jsonSet
Adds values to and existing json structure
jsonSet(json, path, val) string
{{ jsonSet `{“foo”: 1}` “bar” 2 }}
jsonSetObj
Adds an entire raw json string object or array structure
GOERP uses library gjson to read and process json at specific
path. Helper function jsonResult returns gjson.Result object which contains many valuable fields
and functions for json processing. All those functions and fields may significantly simplify work
with json inside templates.
Fields
Name
Description
Usage
Samples
Type
Type is the json type (Null, False, Number, String, True, JSON)
Result.Type.String() string
{{ $result.Type }}
Raw
Raw is the raw json
Result.Raw string
{{ $result.Raw }}
Index
Index of raw value in original json, zero means index unknown
Result.Index int
{{ $result.Index }}
Indexes
Indexes of all the elements that match on a path containing the ‘#’ query character
Result.Indexes []int
{{ $result.Indexes }}
Functions
Name
Description
Usage
Samples
String
Returns a string representation of the value
String() string
{{ $result.String }}
Bool
Returns a boolean representation of the value
Bool() bool
{{ $result.Bool }}
Int
Returns a integer representation of the value
Int() int64
{{ $result.Int }}
Uint
Returns a unsigned integer representation of the value
Uint() uint64
{{ $result.Uint }}
Float
Returns a float representation of the value
Float() float64
{{ $result.Float }}
Time
Returns a time.Time representation of the value
Time() time.Time
{{ $result.Time }}
Array
Returns array of elements as Result objects
Array() []Result
{{ $result.Array }}
IsObject
Returns true if result is a json object
IsObject() bool
{{ if $result.IsObject }} {{ end }}
IsArray
Returns true if result is a json array
IsArray() bool
{{ if $result.IsArray }} {{ end }}
IsBool
Returns true if result is a json boolean
IsBool() bool
{{ if $result.IsBool }} {{ end }}
Map
Returns map of nested results. root Result must be json object
Map() map[string]Result
{{ $result.Map }}
Get
Searches result for the specified path. Check queries guide for more info and playground
Get(path string) Result
{{ $result.Get $path }}
Exists
Returns true if json value exists
Exists() bool
{{ if $result.Exists }} {{ end }}
Value
Returns value of related type (int, string, etc.), map[string]any for json objects and []any for arrays
Value() any
{{ $result.Value }}
Less
Return true if a token is less than another token. Null < False < Number < String < True < JSON
Less(token Result, caseSensitive bool) bool
{{ $result.Less $result2 false }}
Paths
Paths returns the original GJSON paths for a Result
Paths(json string) []string
{{ $result.Paths $entireJson }}
Path
Paths returns the original GJSON path for a Result
Path(json string) string
{{ $result.Path $entireJson }}
Modifier functions
Modifier functions could be used in paths for the gjson.Result. They always starts with @ (e.g.
@sum) and may be chained using | (e.g. @sum:2|@suffix:$). Also, some modifiers may accept
additional arguments that could be passed through : (e.g. @sum:2, which is decimals in this
case).
Please note, $r in samples is the gjson.Result object.
Name
Description
Usage
Samples
commaSepStr
Converts json array to comma separated string. null, {}s and []s would be skipped. When working with numbers, pass int as an argument
“@commaSepStr:arg”
{{ $r.Get “@commaSepStr” }}
arrToStr
Same as commaSepStr, but allows to define the separator through arguments.
“@arrToStr:arg”
{{ $r.Get “@arrToStr:;” }}
prefix
Sets prefix to the value
“@prefix:arg”
{{ $r.Get “@prefix:pref_” }}
suffix
Sets suffix to the value
“@suffix:arg”
{{ $r.Get “@suffix:_suf” }}
getOldestItemDate
Automation specific. Returns oldest record from items array. Arg: format of output date
Sums up all values in json array, stringified numbers are valid, other types are ignored. Define decimals through arg
“@sum:arg”
{{ $r.Get “@sum:2” }}
min
Extracts minimum number from json array, same restrictions as in sum
“@min”
{{ $r.Get “@min” }}
max
Extracts maximum number from json array, same restrictions as in sum
“@max”
{{ $r.Get “@max” }}
skip
Allows to skip value (returns empty value) based on conditions: Supported args: zero, eq,val, neq,val, gt,val, lt,val
“@skip:arg”
{{ $r.Get “@skip:eq,John” }}
Working with XML
XML payloads in requests and responses
All XML content converted to the JSON when received from the API. And JSON body is converted to the
XML when sending to the API. This allows to work with XML content in the same way as with JSON,
using all available options like chaining, generating, etc. Although, because XML cannot be fully
represented as a JSON structure, some additional rules must be followed while assembling or reading
XML payload through JSON.
Special rules
Use the following rules whenever reading the XML Response or constructing the XML request.
All tag attributes are represented as a separate key with the - prefix. For example, the XML
<tag attr="value"></tag> would be represented as {"tag": {"-attr": "value"}}.
If tag contains attributes and text, the text would be represented as a separate field with
the #text name. For example, the XML <tag attr="value">content</tag> would be represented
as {"tag": {"-attr": "value", "#text": "content"}}.
<?xml version="1.0" encoding="UTF-8"?> header added automatically to the XML request before
sending it to the API.
XML payload in JSON sample
XML
<?xml version="1.0" encoding="UTF-8"?><bookstorexmlns:p="urn:schemas-books-com:prices"><bookcategory="COOKING"><titlelang="en">Everyday Italian</title><author>Giada De Laurentiis</author><year>2005</year><p:price>30.00</p:price></book><bookcategory="CHILDREN"><titlelang="en">Harry Potter</title><author>J K. Rowling</author><year>2005</year><p:price>29.99</p:price></book><bookcategory="WEB"><titlelang="en">XQuery Kick Start</title><author>James McGovern</author><author>Per Bothner</author><author>Kurt Cagle</author><author>James Linn</author><author>Vaidyanathan Nagarajan</author><year>2003</year><p:price>49.99</p:price></book><bookcategory="WEB"><titlelang="en">Learning XML</title><author>Erik T. Ray</author><year>2003</year><p:price>39.95</p:price></book></bookstore>
JSON generated from XML
{"bookstore":{"-xmlns:p":"urn:schemas-books-com:prices","book":[{"-category":"COOKING","author":"Giada De Laurentiis","p:price":"30.00","title":{"#text":"Everyday Italian","-lang":"en"},"year":"2005"},{"-category":"CHILDREN","author":"J K. Rowling","p:price":"29.99","title":{"#text":"Harry Potter","-lang":"en"},"year":"2005"},{"-category":"WEB","author":["James McGovern","Per Bothner","Kurt Cagle","James Linn","Vaidyanathan Nagarajan"],"p:price":"49.99","title":{"#text":"XQuery Kick Start","-lang":"en"},"year":"2003"},{"-category":"WEB","author":"Erik T. Ray","p:price":"39.95","title":{"#text":"Learning XML","-lang":"en"},"year":"2003"}]}}
Simple example of sending and reading XML
{{ template "pg-layout" . }}
{{ define "body" }}
<formmethod="post"><inputtype="hidden"name="CustomApi.Api.Post.soapReq"value="https://www.dataaccess.com/webservicesserver/NumberConversion.wso"><inputtype="hidden"name="CustomApi.Api.Header.soapReq.Content-Type"value="text/xml; charset=utf-8"><inputtype="hidden"name="CustomApi.Api.Xml.soapReq.string.soap:Envelope.-xmlns:soap"value="http://schemas.xmlsoap.org/soap/envelope/"><inputtype="hidden"name="CustomApi.Api.Xml.soapReq.stirng.soap:Envelope.soap:Body.NumberToWords.-xmlns"value="http://www.dataaccess.com/webservicesserver/"><inputtype="text"name="CustomApi.Api.Xml.soapReq.string.soap:Envelope.soap:Body.NumberToWords.ubiNum"value=""><buttontype="submit">Send</button></form><h2>Sent:</h2><pre>{{ .Data.CustomApi.Api.Requests.soapReq.Xml.Raw | jsonPretty }}</pre><h2>Received:</h2><pre>{{ .Data.CustomApi.Api.Requests.soapReq.Response.Raw | jsonPretty }}</pre>Requested number as text:
<b>{{ .Data.CustomApi.Api.Requests.soapReq.Response.Get "Envelope.soap:Body.NumberToWordsResponse.m:NumberToWordsResult" }}</b>{{ end }}
Working with XML in GoErp
Modifying XML document
xmlInsertChildAt
Inserts a child node at the specified by xPath position in the XML document. Optionally, also can
apply indentation to whole document and allows to define position in the path element where to
insert the child.
Parameters
xml - XML document to modify.
child - Child node to insert.
xPath - XPath expression to find the position where to insert the child node.
position - Optional. If provided, the child node will be inserted at the specified position in the path element.
indent - Optional. If provided, the XML document will be indented by a given amount of spaces.
{{ if true }}
<h1>True</h1>{{ else }}
<h1>False</h1>{{ end }}
Note that if condition comparison is type sensitive. If invalid types (types that cannot be compared) are given
the template parser will break from that point onward.
Should always make sure that the types are comparable or cast them to comparable types before the condition check
<!-- Invalid, template will break from this point -->{{ if gt 1 "2" }}
{{ end }}
<!-- Valid -->{{ if g1 1 (toInt "2") }}
{{ end }}
<!-- Valid, type cast from dynamic api result -->{{ if g1 1 ($dynRes.Get "id").Int }}
{{ end }}
Available operators
eq - boolean truth of arg1 == arg2
ne - boolean truth of arg1 != arg2
lt - boolean truth of arg1 < arg2
le - boolean truth of arg1 <= arg2
gt - boolean truth of arg1 > arg2
ge - boolean truth of arg1 >= arg2
md - boolean truth of arg1 % arg2
Multiple conditions
Multiple conditions can also be described. There can be any number of conditions.
{{ if and (condition1) (condition2) }}
{{ end }}
For this we can use and & or. Use “()” to separate arguments.
{{ if and (or (condition1) (condition2)) (condition2) }}
{{ end }}
Sample
{{ if and (eq 1 2) (ne 3 4) }}
{{ end }}
Tools helper
Tools is a special helper that has more powerful access to the contents of the context.
StaticLink
Generates a full path link to the source static file. Makes sure the link does not break if the site is moved
to a custom domain or if the link contains custom path parameters.
This is a replacement for the older staticFileLink and takes care multiple shortcoming of the original.
Also used for automatic sourcemap importing for sub-paths.
GetNavPath
Generates a valid link path that composes of the current client code, language and the given path value.
Counts in possible navigation differences from custom domains.
{{ .Tools.GetNavPath "da-csv-export" }}
This would generate the correct paths according to the current handler
A separate function to parse data from the user agent header to specific data points.
Can be used to determine if dealing with a mobile device or attempt to identify the platform used.
Executes template that can be assigned to the variable and could be passed to other data points
(e.g. email body).
First of all we need to have template with payload:
{{ define "pg-in-build-template-parser-partial" }}
<h2>Hello, {{ .Session.ClientCode }}</h2><divalign="left"> Lorem ipsum dolor sit amet, consectetur adipiscing elit, sed do eiusmod tempor incididunt ut
labore et dolore magna aliqua.
</div><divalign="right"> Lorem ipsum dolor sit amet, consectetur adipiscing elit, sed do eiusmod tempor incididunt ut
labore et dolore magna aliqua.
</div><divalign="center"> Lorem ipsum dolor sit amet, consectetur adipiscing elit, sed do eiusmod tempor incididunt ut
labore et dolore magna aliqua.
</div><divalign="justify"> Lorem ipsum dolor sit amet, consectetur adipiscing elit, sed do eiusmod tempor incididunt ut
labore et dolore magna aliqua.
</div><h2>Using API calls inside executed template</h2>{{ $warehouses := .Data.AccountAdminApi.Api.Requests.getWarehouses.Response.Get "data.warehouses" }}
<ul> {{ range $w := $warehouses.Array }}
<li>{{ $w.Get "id" }}</li> {{ end }}
</ul>{{ end }}
Then we can execute that template on other page and use resulting content wherever needed:
{{ template "pg-layout" . }}
{{ define "body" }}
<inputtype="hidden"name="AccountAdminApi.Api.Get.getWarehouses"value="v1/warehouse"data-preset-val="v1/warehouse"/><inputtype="hidden"name="ErplyApi.Api.Post.getProducts"value="getProducts"data-preset-val="getProducts"/><inputtype="hidden"name="ErplyApi.Api.PostParam.getProducts.getStockInfo"value="1"data-preset-val="1"/><h1>Executing template from page...</h1><!-- We can pass any data to the function, like we do with regular partials inside templates -->{{ $result := .Tools.ExecTemplate "pg-in-build-template-parser-partial" (.) }}
<pre>{{ $result }}</pre>
And result would be:
<h2>Hello, 104670</h2><divalign="left"> Lorem ipsum dolor sit amet, consectetur adipiscing elit, sed do eiusmod tempor incididunt ut
labore et dolore magna aliqua.
</div><divalign="right"> Lorem ipsum dolor sit amet, consectetur adipiscing elit, sed do eiusmod tempor incididunt ut
labore et dolore magna aliqua.
</div><divalign="center"> Lorem ipsum dolor sit amet, consectetur adipiscing elit, sed do eiusmod tempor incididunt ut
labore et dolore magna aliqua.
</div><divalign="justify"> Lorem ipsum dolor sit amet, consectetur adipiscing elit, sed do eiusmod tempor incididunt ut
labore et dolore magna aliqua.
</div><h2>Using API calls inside executed template</h2><ul><li>1</li><li>3</li><li>4</li><li>10</li><li>11</li><li>12</li><li>13</li></ul>
CSP
Used to set server generated nonce to script and styles. When added correctly then the console error
messages should no longer appear.
While using Automat API to make b2b authentication calls, we need to pass the domain which is
available only in the template (and we don’t have connection with template in the API calls).
To get the current domain we can use .Tools.B2bAuthDomain and pass it to the necessary field.
Used to check if a specific module is currently enabled.
Note that this check is always checking against the current application (from the currently rendered template),
so if the uuid being checked is a module for another app then it will always return false for it.
As a parameter give the uuid of the module you want to check.
Returns a boolean value.
We can then generate some logic based on its result
{{ if .Tools.IsModuleConfigured "0cea1a50-5462-4fbc-9160-20ba082ec2be" }}
<p>Extra features enabled</p>{{ else }}
<p>Extra features disabled</p>{{ end }}
GetEnabledModules
Can be used to read a list of currently enabled modules.
Note that this check is always checking against the current application (from the currently rendered template),
so it will not return uuid’s for modules that have been enabled for other applications.
Secret to sign. Can be pulled from either variables or other sources that do not expose it to the html (api, cache).
<!-- Can be a string however the value is exposed in the html -->{{ $claims := mkAnyMap "foo" "bar" }}
{{ $myToken := sign $claims "my-secret" "HS256" 1200 }}
<!-- Reading it from the api will hide the secret from parsed content --><inputtype="hidden"name="CaFaApi.Api.Get.myRequest1"value="v3/configuration"data-preset-val="v3/configuration"><inputtype="hidden"name="CaFaApi.Api.Path.myRequest1.id"value="37"data-preset-val="37">{{ $secret := (.Data.CaFaApi.Api.Requests.myRequest1.Response.Get "value").String }}
{{ $claims := mkAnyMap "foo" "bar" }}
{{ $myToken := sign $claims $secret "HS256" 1200 }}
<!-- Reading from variables is also hidden -->{{ $claims := mkAnyMap "test" "val"}}
{{ $myToken := sign $claims (.Variables.Get "jwt.secret").String "HS256" 1200 }}
Algorithm, currently allowed values are: HS256, HS512, RS256 and RS512.
Expiration that will be added as the exp claim. Value is in seconds.
Verify
Verify the token against the key and expiration
When successful the result claims is a json result object where we can use the same Get fetching functionality as
we use in dynamic api responses.
Import delete confirm modal {{ template "delete-confirm-modal" . }} to the page with the
table. Modal can be custom, but there is few requirements that should be implemented:
Modal confirm button must submit the form with method POST.
Submitted form should include inputs:
<input type="hidden" name="postAction" value="delete">, value delete may be set dynamically
using JS, or statically like in sample if related form used only for the delete action
<input type="hidden" name="postActionEntity" value="ModelDtoList">, where value is the
entity name which table is related to. Usually ends with List
<input type="hidden" name="postActionIds" value="1,2,3">, where value is the ids of each
entity separated by comma. If only one id, then just a number, like value=“1”
There is also a default delete confirmation modal that can be used during custom template
creation. Use the statement from option 1 to import it. Here is a sample how to use it:
<!-- GET may be used for search, after delete confirmation it would be changed to POST --><formmethod="get"id="entity-table-id"><inputtype="hidden"name="postAction"id="table-action"><inputtype="hidden"name="postActionIds"id="table-selected-rows"value="{{ .Data.Parameters.postActionIds }}"><inputtype="hidden"name="postActionEntity"id="table-entity"><buttondata-form-id="entity-table-id"data-delete-identifier="{{ .ID }}"data-post-action-entity="DeviceList"class="table-action-button action-row-red form-delete-button"><iclass="material-icons material-icons-outlined">delete_forever</i></button></form>
Note
Ids and names for inputs should be the same as in sample. Values are optional. The button should
have data-form-id set to the related form id, data-post-action-entity should have the name of the
entity that is related to the table. Button should have class form-delete-button.
Language and translation
Handling languages from api’s and translation helper functions
Current and default languages are stored inside globally available .Session object. There is 2
possible language codes available at the moment, - 2-letter and 3-letter code. 2-letter code is
an iso code, but 3-letter is an internal erply api language code, please
check erply api for more information.
{{ range $row := .Data.PIMApi.ProductList }}
<!-- Print name value in the selected/default language --><!-- Will print empty string if value under language code not found --><p>Name in current lang: {{ index $row.Name $.Session.Language.Code }}</p><p>Name in default lang: {{ index $row.Name $.Session.DefaultLanguage.Code }}</p>{{ end }}
Display in tables
Dynamic sample:
{{ range $row := .Data.PIMApi.Api.Requests.products.Response.Array }}
<tr><td>{{ $row.Get "id" }}</td><td>{{ $row.Get (printf "name.%s" $.Session.Language.Code) }}</td></tr>{{ end }}
Models sample:
<table><thead><tr><th>Id</th><th>Name</th></tr></thead><tbody> {{ range $row := .Data.PIMApi.ProductList }}
<tr><td>{{ $row.ID }}</td><td>{{ index $row.Name $.Session.Language.Code }}</td></tr> {{ end }}
</tbody></table>
Dropdown with translatable fields
Dynamic sample:
<select> {{ range $row := .Data.PIMApi.Api.Requests.products.Response.Array }}
<!-- Print name value in the selected/default language --><optionvalue='{{ $row.Get "id" }}'>{{ $row.Get (printf "name.%s" $.Session.Language.Code) }}</option> {{ end }}
</select>
Models sample:
<select> {{ range $row := .Data.PIMApi.ProductList }}
<!-- Print name value in the selected/default language --><optionvalue="{{$row.ID}}">{{ index $row.Name $.Session.Language.Code }}</option> {{ end }}
</select>
Write (create/update) translatable fields in multiple languages
{{ range.Data.ErplyApi.LanguageList }}
<divclass="form-field"><labelfor="formInputName{{ .IsoCode }}">Name ({{ .IsoCode }}):</label><inputtype="text"id="formInputName{{ .IsoCode }}"name="AccountAdminApi.WarehouseInput.Name.{{ .IsoCode }}"value="{{ index $.Data.AccountAdminApi.WarehouseInput.Name .IsoCode }}"></div>{{ end }}
Translation feature
This feature can be used to define translations for the pages or applications that can be used to work
automatically together with the language parameter from the url.
Translation file structure
The translation files are in json format and the language keys are expected to be in the iso 2 character codes.
{"en":{"key":"value"},"es":{"key":"value"}}
Adding translations
Translations can be added on 2 different levels
Application based translations
Template based translations (page types only)
Application based translations
These are stored as separate files. New ones can be created from CREATE NEW -> Create new page and selecting the type
translation.
These translations are only used by applications and the contents are shared between all the pages of the application
once connected to one.
An application can also have multiple translation files. They are loaded in alphabetical order.
If 2 files contain the same key for the same language then the last loaded item will determine the used value.
Template based translations
These are stored on the templates (pages) and can only be used on the same template.
Translations can be added using the earth icon in the editor.
Template based translations will override application translations if both define the same key for a language.
Reading translations
Get in current language
This function uses the current navigation language code from url /en/ and used this to locate the language
needed.
/000000/en/break-temp-6-page
{"en":{"key":"value"}}
{{ .Translation.Get “key“ }}
This would be loaded as “value” when the page is opened.
Get in specified language
This function takes in a second parameter for the language code we want to get the result for, this one
ignores the url path language.
If the input language cannot be found then it default to the path parameter instead.
/000000/en/break-temp-6-page
{"en":{"key":"value"}}
{{ .Translation.GetIn “key“ “en“ }}
This would be loaded as “value” when the page is opened.
External source for translations
We can also use an external source for the translations, as long as it follows the same json structure.
Values entered with this will overload the translations from both application and the template if they
define the same key.
Load order determines what value is returned if there are multiple sources for translations
Application based translations in alphabetical order
Template based translation
Custom source (if defined)
When a key is not found
If a key is not found then the key itself is printed.
Optional default
You can override this behaviour (where the key is returned when translation is not found) by settings a special value in the translations file.
Using this the methods ‘Get’ and ‘GetWithSource’ will attempt to return the translation in the set default language when the
translation for the initial language code is not found.
{"default":{"to":"en"}}
Translations optimization
There is also option to optimize huge translation files to one single file that will contain only
translations that are actually used in the application. That feature would be useful for translation
files larger than 1MB.
Configuring the optimization
To generate translation file and enable/disable it, just go to the application configuration, select
templates section and click on the “Translations optimization” button.
Then need to generate the file by clicking on the “Generate optimal translations” button. This
action will generate a file in application with name {application UUID}-translationPlease
note: Optimization should be re-generated manually every time when at least one of the original
translation files were modified. Check the Enable optimized translations option and confirm
the action to basically enable the feature.
Note
Translation file generated in scope of main application and does not include translations from
modules. If you have translations in modules, then they should contain only module specific
translations, leaving huge translation files in main application.
Translations from main application can be used inside modules.
When feature is enabled, GoErp will always use generated file instead of all application translation
files.
Handling CaFa JSON configurations
CAFA is storage for layered custom
configurations, more info.
Goerp has an option to change or create json typed values in the CAFA entry. Using xPath, template
creators can define specific location from the json and modify one field. All implementation options
will create field if it is not existing in json. Also, defining new type for the field will update
the type in json as well, so be careful.
The jsonLookup function accepts single json object and path as a parameters. Path supports
standard xpath queries, more info.
Single input (model JsonConfigurationSingleInput) form is always scoped around one
configuration entry, meaning that when submitting the form, only one config entry gets processed and
updated in the database. It is more performant in comparison with Bulk input saving.
This option should be used when page content consists of one or few configuration entries which have
to describe many fields of each entry. Also, this option is simpler to read (and write) from a code
perspective. We need to provide .Key and .Value only once in the form and then
repeat .FieldPath, .FieldValue and .FieldType for every field from json
object (sample have 4 fields from one json object):
<!-- Would be simpler to store reusable parameters into variables -->{{ $key10 := "my-app::Company::::sample::draft-sample-v1" }}
{{ $v10 := index.Data.CaFaApi.ConfigurationMap $key10 }}
<!-- Single input form --><formmethod="post"><!-- Form control parameter allows to link this form to the specific model --><inputtype="hidden"name="postActionEntity"value="JsonConfigurationSingleInput"><!-- fields related to config entry --><inputtype="hidden"name="CaFaApi.JsonConfigurationSingleInput.Key"value="{{ $key10 }}"><inputtype="hidden"name="CaFaApi.JsonConfigurationSingleInput.Value"value="{{ $v10 }}"><!-- multiple fields from config json value --> {{ $path101 := "content.node-obj.child" }}
<inputtype="hidden"name="CaFaApi.JsonConfigurationSingleInput.FieldPath"value={{$path101}}><labelfor="formInputValue101">{{ $path101 }}</label><inputtype="text"id="formInputValue101"name="CaFaApi.JsonConfigurationSingleInput.FieldValue"value="{{ jsonLookup $v10 $path101 }}"><inputtype="hidden"name="CaFaApi.JsonConfigurationSingleInput.FieldType"value="{{ jsonType $v10 $path101 }}"> {{ $path102 := "content.node-bool" }}
<inputtype="hidden"name="CaFaApi.JsonConfigurationSingleInput.FieldPath"value={{$path102}}><labelfor="formInputValue102">{{ $path102 }}</label><inputtype="text"id="formInputValue102"name="CaFaApi.JsonConfigurationSingleInput.FieldValue"value="{{ jsonLookup $v10 $path102 }}"><inputtype="hidden"name="CaFaApi.JsonConfigurationSingleInput.FieldType"value="{{ jsonType $v10 $path102 }}"> {{ $path103 := "content.node-num" }}
<inputtype="hidden"name="CaFaApi.JsonConfigurationSingleInput.FieldPath"value={{$path103}}><labelfor="formInputValue103">{{ $path103 }}</label><inputtype="text"id="formInputValue103"name="CaFaApi.JsonConfigurationSingleInput.FieldValue"value="{{ jsonLookup $v10 $path103 }}"><inputtype="hidden"name="CaFaApi.JsonConfigurationSingleInput.FieldType"value="{{ jsonType $v10 $path103 }}"> {{ $path104 := "status" }}
<inputtype="hidden"name="CaFaApi.JsonConfigurationSingleInput.FieldPath"value={{$path104}}><labelfor="formInputValue104">{{ $path104 }}</label><inputtype="text"id="formInputValue104"name="CaFaApi.JsonConfigurationSingleInput.FieldValue"value="{{ jsonLookup $v10 $path104 }}"><inputtype="hidden"name="CaFaApi.JsonConfigurationSingleInput.FieldType"value="{{ jsonType $v10 $path104 }}"><inputtype="submit"value="Submit draft-sample-v1"></form>
Bulk input sample
Single input (model JsonConfigurationSingleInput) form is scoped around multiple
configuration entries, meaning that when submitting the form, then every entry would be processed
and updated in the database in the loop (uniqueness defined by $key’s). It is less
performant in comparison with Single input saving (later will be processed asynchronously, meaning
without performance loss, but for now prefer using single input option).
This option should be used when page content consists of many entries having few field inputs for
each. Also, this option is harder to read (and write) from a code perspective. We need to
provide .Key, .Value, .FieldPath, .FieldValue and .FieldType
for every field from json objects. We have here 6 entries, please note that final field declaration
assumes that field may not exist and type can be selected.
Sample code uses some fake data. To make it work properly, please populate your test account with
this fake data (or replace all parameters with your data structure). Just insert this data into CAFA
storage using any rest client.
Inbuilt method to store data to the server session and then later reuse it in the same session.
Data is held in the session until it is active, logging out will remove the data.
This can be used as an alternative to shared data between pages or applications.
Data stored here is available for all applications.
Store data
Values will always be stored as strings. If we want to store other types then we can use one of the helper functions
to cast it into different types.
{{ .Storage.Set "key" "value" }}
Store data using input
Simple set command
Starting from version 1.193.0, GoErp provides option to save data through form input parameters, using reserved name Storage.Set.
The value of input should have specific syntax, which allows to pass key and value in one string.
The syntax is {key}->{value}, where {key} is a key for entry and {value} is actual value
In the next sample we are setting entry storage value to the storage under key unique_key.
Using instructions to save data from response payload in dynamics
There is also option to save data from response of specific request to the storage using instructions.
Instructions for dynamics using same searching patterns like in chaining:
<formmethod="post"><inputtype="hidden"name="CRMApi.Api.Post.createCustomer"value="v1/customers/individuals"><inputtype="text"name="CRMApi.Api.Json.createCustomer.string.firstName"value="cool name"><!-- Save newly created customer ID to the storage --><inputtype="hidden"name="Storage.SetInstruction"value="new_customer_id->createCustomer.Response.id"><buttontype="submit">Submit</button></form><!-- Retrieve new customer ID on next page or even in the same page. --><br/>New customer ID: {{ .Storage.Get "new_customer_id" }}
Saving specific parameters from models to storage
Models also supports saving some data based on the path, but options are very restricted in comparison
with dynamics. While using save instructions with models, it is possible to save primitive types only
(like strings, integers, etc.). Although, there is option to access arrays by using the index.
Some rules that need to take into account when using storage:
In the same context .Set and .SetInstruction always called first and .Get call performed last.
Sample for public pages (referring to the customer object which is not available in private):
<h1>Create sales doc</h1><formmethod="post"><inputtype="hidden"name="postActionEntity"value="SalesDocumentInput"/><!-- take customer ID from the session, which will not expose it on the page --><inputtype="hidden"name="ErplyApi.SalesDocumentInput.CustomerID<-"value="Session.customer.ID"><!-- Send instruction for the storage to save the newly created sales document ID to the storage
under name new-invoice-id. Choose any name as you want. --><inputtype="hidden"name="Storage.SetInstruction"value="new-invoice-id->ErplyApi.SalesDocument.ID"><!-- here goes all other inputs related to the sales document --><buttontype="submit">Create</button></form><!-- get newly created document ID from the storage -->New sales doc ID: {{ .Storage.Get "new-invoice-id" }}
<h1>Get sales documents using models and linking</h1><inputname="Preset.ErplyApi.SalesDocumentQuery.ClientID<-"value="Session.customer.ID"><ul> {{ range $row := .Data.ErplyApi.SalesDocumentList }}
<!-- Use any of the available fields here --><li>{{ $row.ID }} | {{ $row.Number }} | {{ $row.ClientID }}</li> {{ end }}
</ul>
Reading data
{{ .Storage.Get "key" }}
Automation
Create api request instruction configurations that can be either triggered based on events or timed triggers.
Automation instructions are json structures where we use the same templating functionalities that we use to generate
pages to generate json instead.
Automation configuration is on the ‘Automation’ tab on the right side menu, and it is only
available for ‘page’ or ‘automation’ type templates. Page types are deprecated for automations, they will still work
but syntax corrections and new features will not be supported on that type.
Warning
As of 1.228+ automation no longer use jwt’s to operate.
Sessions are used instead, this also means that regular user permissions are being used. Automations use a dedicated user group
called ‘automation-group’, if some of the api’s are giving access errors (example: 1060 on erply api) then the rights
on this group need to be adjusted according to the api calls used.
The user group will be generated automatically once a template is either saved or installed.
Details
Automation results now saved to the KVS, but only if this feature is enabled in the erply configuration.
Related configuration parameter goerp_automation_store_result should be set to 1 to enable this feature.
When testing automations from the editor, the results are always saved to the KVS.
To find automation related records in the KVS, use topicId automation-d4ff3077-733e-42fc-ad5c-2788829509b9.
Workflow
Automation templates are processed twice, first when forming the json and second when the post operations are being
triggered.
Template formation step, on this step the json instruction is formed. All preset calls are processed and can be used in
the json instruction generation.
Calls defined in the url configuration presets are triggered on this step
All template functions will run
Result needs to be clean and valid json
Post operations trigger step, on this step the api calls defined in the post operations are triggered.
Calls made in the url configuration cannot be chained to the post operation calls, but the values can just be printed to
the values as they are triggered in different steps
Stage call step. Read staged automation at the end of this page for more information.
Automation triggers
Automation triggering uses hmac (sha256) keys for authentication. Each automation page has a separate
unique key that is occasionally refreshed (refresh will also re-register all webhook triggers).
By default, the key is not visible. Installation, store update or manual triggering will generate one in the
ui.
Structure
Basic structure consists of ‘postOperations’ and ’enabled’ keys. Post operations is a key/value set of
parameters similar to what is being used on templates. Enabled flag can be used to toggle the automation
feature on and off.
Post operations are input parameters on what should be done. These are the same instructions that are being
used on regular html templates. Dynamic api instructions are also supported.
Sets of instructions can be separated by bucketing the instructions, to make the run on separate times. Dynamic
api chaining is also supported here.
Warning
Separate sets here cannot access data between themselves. For example dynamic api chains cannot chain data from an api call
of a separate instruction set. See staging instead for more complex automations.
Url configuration’s static presets work the same way on automations as they do on regular templates.
These calls are processed when the instruction is generated and cannot be chained into the post operation calls.
To use these values in post operations, we can safely just print the values of the calls.
All calls both preset and post operations however are available for stages to be read under the ParentRequests map.
Reading webhook data
Webhook data can be read the limited model based support:
As of 1.288+ the new automation types have the ‘TEST’ button in the editor instead of the preview. This test allows
us to define the hook data (not used for timed triggers) and test the execution of the automation without the need to
construct the hmac ourselves. Output will contain details if it was successful.
In order to test the functionality without using an actual webhook we can construct the webhook data and send it
against the automation endpoint using a generated hmac key.
Warning
To use the following features please make sure that a key has been generated for the page (use the refresh button if not).
Automation will still work if a key is not present (as one will be automatically generated for it) but in order to test
that everything works it’s always best to generate it manually first.
Custom webhook
For custom webhooks use the page trigger key and generate a hmac for the entire json body. Add the key as a header
’trigger-key’ to the request and send it to the appropriate cluster automation endpoint.
We can also use a special helper modifier function to get the oldest date out of the webhook items.
The argument ‘2006-01-02T15:04:05Z07:00’ is the format that the date should be converted to (depends on the api used).
The function will return the oldest date in the items and then the used api should filter items based on that.
Automation page could look something like this then
{
"postOperations": [
{{ range .Data.ServiceApi.Api.Requests.getWorkorders.Response.Array }}
{
"test": "{{ .Get "id" }}"
},{{ end }}],
"enabled": true
}
Logs
From 1.228+ the automations that have been linked to an application will log the failures in the application logs.
Similarly, the debug flag for automation logs works with automations as well.
Staging
Only available for the ‘automation’ file types.
This allows us to make separate stages to automations (up to 5). Useful for cases where we need to perhaps construct
data for the final operations, and we need access data from the original postOperations api calls.
For example api calls defined in postOperations the sample below are executed at the end of the automation, so logic to read the data
cannot be added.
To define a second stage we use the stageTo instruction, name here is the name of the automation to use and data is
representation of the data that we access from .Data.Automation.Request. The data here needs to be a json string.
We can use the jsonSet, jsonSetObj and jsonDel helpers to manipulate possible json for this input.
The entire automation will complete and then when successful it will execute the second stage when defined.
Note that the second stages can access all the api requests made in the first automation without the need to pass that
data specifically to the next.
To read the api calls from the parent stage we can use the parentRequests data element. Note that all calls from the
parent are accessible like this both calls made with presets and post operations.
If the parent defines multiple calls with the same name then only the last one called is accessible (for example in a loop).
Loop index can be used to make unique names for the requests.
It’s possible to trigger automations from the template code by defined conditions, existence of specific parameters
or by submitting a form.
Trigger automations from forms
To trigger an automation we need to add the form parameter with name AutomatApi.AutomationEvent.Name the value of it should
be the automation we want to trigger.
To trigger automation immediately when the page is rendered we can use the tools’ helper. Note that this means that
the automation will always trigger when the page is opened.
{{ .Tools.AutomationEvent "da-at1-automation" }}
Trigger automations conditionally on page load
Sometimes we might want to trigger the automations conditionally on page load, for this the regular if conditions apply.
Wrapping these into the conditions will only make the run when the condition is truthful.
<!-- The automation will only be triggered if there is a custom parameter called triggerMyAutomation in the request -->{{ if .Data.Parameters.triggerMyAutomation }}
{{ .Tools.AutomationEvent "da-at1-automation" }}
{{ end }}
Passing custom data to automation triggers
We can also optionally pass custom data to the automations in json format. This can be some specific id’s, codes etc.
You can pass as many parameters as you want.
Also, there is option to define id of the automation event, which is useful when we need to ensure that automation process
were executed only once during processing time. See example below for each option.
Forms
Note that the value should be in valid json format. The json helpers might be useful here.
To access the parameters we use the regular automation request syntax (.Data.Automation.Request).
Structure after the Request.Get is based on the json we sent as input.
It’s possible to trigger automations when an application is installed or updated.
This allows the automations to set up some application specific configurations (example: cafa configurations or base kvs data).
For this create an automation and set its name in the application edit screen.
Note
Installation will not fail if the automations fail or do not exist, so make sure the given automation exists and is linked to the
application.
Install automation special data
There are 2 special fields available when the automation is triggered from the installation.
fromVersion - the version number the user had before, value will be 0 if this is a fresh install
toVersion - the version that is being installed
These values can be used to produce certain conditions for the automations.
Use server side events to stream data onto the application templates. This allows us to create dynamic operations
in the templates to load specific parts without reloading the entire page.
Any page type can be streamed, but the pages that are streamed should be created specifically for that purpose.
Read about more advanced methods to manipulate the streams
For the feature to work we need to load the erp pkg script package. We can use the tools’ helper .Tools.LoadSSE
that will create the required tag with a dynamic source automatically.
Without this package the sse feature will not work.
data-sse-src - the source of the stream attribute, for this we can again use the tools’ helper .Tools.GetSSESrc with
input parameter of the page that we want to stream
Optional parameters/attributes
data-sse-behaviour - the method that is used to handle the stream
load - the default value, stream will end once it responds with full data
replace - stream will constantly run, and it will replace all the contents of the container node with the events data
push - stream will constantly run, and it will push new content at the end of the nodes content
Contents of th steam can be either simple any type the page template is defined for.
Load behaviour
Using the load behaviour we can create a loader type, the data inside the container will be loaded immediately and once the
event returns the data then the stream is automatically closed
<!DOCTYPE html><html><head> {{ .Tools.LoadSSE }}
</head><body><!-- data-sse-behaviour="load" is the default behaviour and can be skipped if load is used --><divid="t1"data-sse-src="{{ .Tools.GetSSESrc "da-sse-data-page"}}"><!-- contents will be removed once data is 'finished' so loader elements can be added here --><divclass="loader"></div></div></body></html>
Replace behaviour
In this behaviour mode the data of the element will always get replaced when new data is being returned in the stream.
The stream will be open until it returns an error or the window is closed.
Useful to propagate notifications or states.
<!DOCTYPE html><html><head> {{ .Tools.LoadSSE }}
</head><body><!-- data-sse-behaviour="replace" is important here to keep the stream open --><divclass="my-notification-container"id="t1"data-sse-src="{{ .Tools.GetSSESrc "da-sse-notifications-page"}}"data-sse-behaviour="replace"></div></body></html>
Push behaviour
Perhaps the least useful behaviour. Data from the stream is added at the end of the nodes content without replacing the
existing data.
The stream will be open until it returns an error or the window is closed.
Possibly useful for cases where the data is some sort of log.
<!DOCTYPE html><html><head> {{ .Tools.LoadSSE }}
</head><body><!-- data-sse-behaviour="push" is important here to keep the stream open --><divclass="my-log-container"id="t1"data-sse-src="{{ .Tools.GetSSESrc "da-sse-log-page"}}"data-sse-behaviour="push"></div></body></html>
Prepend behaviour
Data from the stream is added at the front of the nodes content without replacing the existing data.
The stream will be open until it returns an error or the window is closed.
<!DOCTYPE html><html><head> {{ .Tools.LoadSSE }}
</head><body><!-- data-sse-behaviour="push" is important here to keep the stream open --><divclass="my-log-container"id="t1"data-sse-src="{{ .Tools.GetSSESrc "da-sse-log-page"}}"data-sse-behaviour="prepend"></div></body></html>
Preload behaviours
The following extra behaviours can be used to first load data and then make it wait for the action to load more data.
Useful for cases where we want to render the content right away in its current state, but we do not want it to re-render
all the time.
loadAndReplace
loadAndPush
loadAndPrepend
Multiple loaders
A page can define multiple loaders, but it’s limited to 6 streams per browser (total of all tabs).
<!DOCTYPE html><html><head> {{ .Tools.LoadSSE }}
<linkrel="stylesheet"href="{{ .Tools.StaticLink "da-sse-styles-css"}}"></head><body><divclass="column full mt-2"><divclass="row"><spanclass="alert"id="notifications"data-sse-src="{{ .Tools.GetSSESrc "da-sse-notifications-page"}}"data-sse-behaviour="replace"></span></div><divclass="column full justify-center mt-2"id="t1"data-sse-src="{{ .Tools.GetSSESrc "da-sse-data-page"}}"><divclass="row justify-center"><divclass="column"><divclass="loader"></div><pclass="text-center">Loading</p></div></div></div></div></body></html>
Subsections of Server side events
Actions and custom data
From version 1.241+
Normally the SSE feature will continue to stream new data, this streams the same contents in a loop, and in most cases is not needed.
To improve this we can use special custom actions on streams to only flush data when there is an
actual change.
Define the custom action to the SSE block
To make the server side events flush data based on actions we need to add the action name to the sse stream.
The name (my-action) is custom that you can define yourself.
With this the data is hidden from the html code. Suitable for actions that contain data that we do
not want the end user to see or edit.
We still use a form but what is being sent is hidden.
<formmethod="post"><inputtype="hidden"name="Send"id="send"value="1"><buttontype="submit"class="form-button">Trigger action</button></form> {{ if .Data.Parameters.Send }}
{{ .Tools.StreamActionEvent "my-action" }}
{{ end }}
Passing data with the action
We can also pass data with the action trigger. We can then read the data on the possible streamed page and change the
rendered content based on the input.
The data should be in json format but the structure is custom.
With forms
With the regular forms data manipulation is limited.
Also note that everything sent like this will be visible in the html code and can be adjusted by the user.
We can read the data that is being passed with the actions and use it to change the data that we render.
We assume the data is:
{"name":"Some user","content":"some text"}
The get method here is the same as elsewhere with dynamics.
<h4> {{ .Data.Stream.Get "name" }} </h4><p><!-- Render server time when content is 'clock' and the content itself when not -->{{ if eq (.Data.Stream.Get "content").String "clock" }}
{{ dtCurrent }}
{{ else }}
{{ .Data.Stream.Get "content" }}
{{ end }}
HTML Stream
This feature can be used to make pages that load a large amount or make a api calls that can take time to load a
bit friendlier to the users.
You will also need to enable the streaming on the page you use this. It’s the last checkbox in the template editors “Publish settings” tab.
Named “HTML content will be streamed from the server until the load break node”.
Load break
To activate the stream feature we only need to add the custom node. Server will stream everything until this point, and the
rest when it has completed all the api requests and processes. Note that the node itself will not be printed.
Note
Webkit (safari and chrome in ios) has a different first paint rule scheme, it will not make the first paint if the rendered
content is not within a certain threshold (~500b), hidden nodes, css or js does not count towards this check.
This mean that if it does not load there then the first visible bytes need to be increased
<load-break></load-break>
Examples
Regular html
In this example the loaded data will remain. Something would need to be implemented to hide it once loaded (js or css)
<!DOCTYPE html><html><head><metacharset="UTF-8"><metaname="viewport"content="width=device-width, user-scalable=no, initial-scale=1.0, maximum-scale=1.0, minimum-scale=1.0"><metahttp-equiv="X-UA-Compatible"content="ie=edge"></head><body><inputtype="hidden"name="ErplyApi.Api.Post.myRequest1"value="getSalesDocuments"data-preset-val="getSalesDocuments"><inputtype="hidden"name="ErplyApi.Api.PostParam.myRequest1.recordsOnPage"value="200"data-preset-val="200"><main><div><h2>Please wait...</h2></div><!-- Background color bytes block, so the size is reached for webkit first paint (safari) --><h2style="color:white;">Lorem Ipsum is simply dummy text of the printing and typesetting industry. Lorem Ipsum has been the industry's
standard
dummy text ever since the 1500s, when an unknown printer took a galley of type and scrambled it to make a type
specimen
book. It has survived not only five centuries, but also the leap into electronic typesetting, remaining essentially
unchanged. It was popularised in the 1960s with the release of Letraset sheets containing Lorem Ipsum passages, and
more
recently with desktop publishing software like Aldus PageMaker including versions of Lorem Ipsum.</h2></template><!-- Everything up until this point will be in the first paint --><load-break></load-break><ul> {{ range (.Data.ErplyApi.Api.Requests.myRequest1.Response.Get "records").Array }}
<li>{{ .Get "id" }} !</li> {{ end }}
</ul></main></body></html>
Shadow dom
In here is an example where we use shadow dom to make the data replacement to the slot. This will not need any
help from js.
<!DOCTYPE html><html><head><metacharset="UTF-8"><metaname="viewport"content="width=device-width, user-scalable=no, initial-scale=1.0, maximum-scale=1.0, minimum-scale=1.0"><metahttp-equiv="X-UA-Compatible"content="ie=edge"></head><body><inputtype="hidden"name="ErplyApi.Api.Post.myRequest1"value="getSalesDocuments"data-preset-val="getSalesDocuments"><inputtype="hidden"name="ErplyApi.Api.PostParam.myRequest1.recordsOnPage"value="200"data-preset-val="200"><main><templateshadowrootmode="open"><!-- Note that by current spec shadow dom does not load styles from parent window, we would need to load
these separately if we have some css/js dependencies--><slotname="content"><div><h2>Please wait...</h2></div><!-- Background color bytes block, so the size is reached for webkit first paint (safari) --><h2style="color:white;">Lorem Ipsum is simply dummy text of the printing and typesetting industry. Lorem Ipsum has been the industry's
standard
dummy text ever since the 1500s, when an unknown printer took a galley of type and scrambled it to make a type
specimen
book. It has survived not only five centuries, but also the leap into electronic typesetting, remaining essentially
unchanged. It was popularised in the 1960s with the release of Letraset sheets containing Lorem Ipsum passages, and
more
recently with desktop publishing software like Aldus PageMaker including versions of Lorem Ipsum.</h2></slot></template><!-- Everything up until this point will be in the first paint --><load-break></load-break><divslot="content"><ul> {{ range (.Data.ErplyApi.Api.Requests.myRequest1.Response.Get "records").Array }}
<li>{{ .Get "id" }} !</li> {{ end }}
</ul></div></main></body></html>
Frequently asked questions
Q: Is there some way to mark which cals in chain are important, and which not (if they failed just keep going)?
A: All chains are important, if one fails then all subsequent requests will be skipped. There is option to make link optional and not skip.
More about chaining.
Q: Why in dynamics when I’m using Form.Redirect, GoErp actually not redirecting to the page?
A: Redirect would trigger only when all the calls in the dynamic request set are succeeded and redirect link is valid.
More about dynamic redirect
Q: How to use path parameters to load separate pages?
A: Construct main page as a data router and load html or partials based on path parameters.
/shop/products
/shop/services
{{ if eq .Data.Parameters.path1 "products" }}
{{ template "products-partial" . }}
{{ else if eq .Data.Parameters.path1 "services" }}
{{ template "services-partial" . }}
{{ end }}
Q: Getting the error Template 'my-page' seems to be linking to an external source 'https://my.css' that are currently not allowed on publish
A: Since there is no security guarantees for outsourced content, it is recommended to use one of the provided methods for storage instead. If nothing is possible
then create a whitelist request for the source.
Q: Template breaks on if conditions
A: The if condition is type sensitive, if the input values are of incomparable types then the template rendering will break from that point forward.
Make sure the types used have been converted to the correct types EX: (.Int for dynamic responses and toInt for everything else if dealing with integers).
Q: Use multiple if conditions
A: The syntax for multiple if conditions is as follows:
MultiConditionOperator can be “and” or “or”
{{ if {MultiConditionOperator}
({condition1})
({condition2})
}}
Q: Chaining from Session or Parameters does not seem to work
A: The chain syntax values can be different from the values that we use it to print values to the templates. This is due to the internals
that chaining works with json and the template print works with structs.
Use toJson helper to find out the correct values that should be used when chaining.
{{ .Session toJson }} <!-- Use the find out what the correct key names are for chaining -->{{ .Session.User.ID }} <!-- When getting the value to template --><inputvalue="Session.user.id"><!-- When using as a chain value -->
Q: Unable to log into public page
A: Make sure your using the public route path of the page. Customer login does not work with regular handlers.
Q: @pimFilter not working on nested values
A: Make sure the nested values are defined using -> instead of . as the . is reserved here for dynamics.
Q: After doing a change operation (create, update or delete) the list of items is not immediately updated (needs another refresh to update)
A: Likely due to incorrect order of dynamic calls. Use ‘|1’ to set the order for the calls and make sure the request that fetches the list is done last.
Q: Not seeing results for created dynamic api calls
A: Either add the errors block (Code samples -> error) to the page or connect the template to an application and check the Application logs tab for results if the calls.
Q: Get current users back office url
A: Users back office link is stored in the session ‘{{ .Session.User.BOLoginUrl }}’
Q: How to concatenate strings and variables using printf
A:printf is a general go template function that can be used to assemble strings from other
strings and variables. It is mapped to the go function fmt.Sprintf,
which means that it supports all options that are described under Printing topic.
Result: My int: 56; my string: foo; my struct: models.Language{Code:"en", LegacyCode:"eng"}
Q: Where can I get timezone while handling dates in templates?
A: Almost every account have default time related configurations, like timezone and formats. Timezone
may not exist for accounts that shares many timezones (e.g. most of the USA accounts), in this case
timezone should be configured by account owners.
If installing an app from the store gives a user- or permission related error (for example “no permission to access the requested resource”), or if automations are never executing (clicking the “Test” button does not run it), there might be an issue with GoERP’s built-in users.
Letting the GoERP server recreate these users might solve the issue:
Go to Settings > Users and delete users named automation-user and goerp-app-users-user.
If deletion returns an error, go to Settings > User group and make sure that your own user group has the permission to manage user groups automation-group and goerp-app-users-group. Then retry the deletion.
Go to Settings > Configuration Admin. Pick application goerp-auth-conf. Delete settings goerp-automation-initialized and goerp-app-users-initialized.
Retry your automation, or try the failed app installation again.
If it still does not work, resave the user group automation-group and then try again.
General
CRSF
The server will start to generate a random crsf token for each request. The token is provided in the domain specific
cookie, and does not require any specific changes from the templates. The feature will be handled automatically by the
server.
Access tokens
Note
Note that the access tokens feature is a work in process feature and will likely have changes going forward.
Access tokens features allows data to be protected using special user defined tokens with api’s that support it.
The update will have 2 separate processes
Regular session handling where access tokens will be taken from user record
B2b session handling where access tokens will be taken from the logged in customer record
Initial version will be looking for the tokens on the record attributes.
Expected name syntax on the records is:
access_token-{api}-{optional id value}
The {api} part can either contain the value of ‘all’ where it will be used for every api call or a specific name according to goerp api names (ex: KvsApi) where it will only be sent to that specific api.
The optional -{optional id value} end value can just be used to identify separate tokens
<!-- Examples of attribute names -->access_token-ServiceApi-x2
access_token-KvsApi-x
access_token-all-x
The attributes need to be of the type string, and the value of it is the token.
Goerp will automatically parse all keys that match this syntax and send all of them to the api call headers.
Automatic and manual steps
Note
This process will be done automatically for GET requests only, for POST, PUT, PATCH and DELETE the developer needs to make the app add the appropriate token to the accessToke header.
For get requests all the found tokens will be sent, if you want to send a specific token then you need to manually set the accessToken header to the request.
For all other types the accessToken header needs to be passed as a header parameter.
Reading current access tokens
Access tokens are stored in the session object (for both the regular and b2b user).
We can attempt to get the tokens directly by a lowercase goerp api name. Note that this is an array and needs to be converted to
a valid string (comma separated string) if using for an api request.
{{ .Session.AccessTokens.ApiTokens.serviceapi }}
We can also access named tokens by the name (the name in this case is the third part of the attribute access_token-ServiceApi-{name}).
Same as with the api token the result is an array as it contains all attributes with that name.
This example demonstrates how to create a 2-stage automation process.
The first stage collects initial data to be able to generate new set of requests that cannot be
performed using regular chaining functionality. Also, it demonstrates how to pass data to the
next stage.
Second stage uses data that was passed from the first stage in combination with parent requests
that was performed on the first stage.
The regular way exposes all fields to the template - this means anyone can alter the field contents before its being sent.
This allows the area to be used for possible phishing attacks.
Secure fields with automations
The best way to hide the fields is to move all functional fields away from the template (in this case into an automation)
These automation fields are never exposed to the public and cannot be intercepted.
The following example contains 3 templates:
check-page - the page where the user inputs the email (public page)
check-emailer-automation - the automation tha actually makes the email send
optional - just for an example we parse a template into the email content in the automation (not public)
check-page
In this example we only render the form when nothing is sent, we also never expose the automation trigger to the
template, thus a user cannot even alter its execution.
We use the input here to trigger the automation, and the only value that is being passed to the e-mailer.
<h1>Secure emailer</h1><p>Email from public/b2b without exposing the fields for editing</p><!-- Optional, we render the form only once and display a message once its already sent -->{{ if .Data.Parameters.inputEmailField }}
{{ .Tools.AutomationEvent "check-emailer-automation" (jsonSet `{}` "email" .Data.Parameters.inputEmailField) }}
<h2>Thanks!</h2>{{ else }}
<h2>Send me something</h2><formmethod="post"><labelfor="email">Add your email</label><inputtype="string"id="email"name="inputEmailField"><buttontype="submit">Send</button></form>{{ end }}
{{ .Data.Parameters.inputEmailField }}
check-emailer-automation
We read the email from the passed data and use it as the email, rest is hardcoded into the automation.
Here we also encode an optional template to the email body.
Create installation and navigate to created account
Create installation and navigate to created account
Method to be used where we would use a separate account to create a new erply account.
And then we would like the user to navigate to the created account without showing the default erply login.
Note that there are multiple workflows this can be used for:
Source account and created accounts are on the same erply domain.
Source account is on custom domain and the created account will use the erply domain.
Source account and created accounts are on the same erply domain
Since both run on the same domain then it’s enough to just run erply createInstallation.
The process there will automatically set the auth cookie for the created account to the browser and since
we are on the same domain then browser will automatically use it when we navigate to the created account.
<form type="post">
<input type="hidden" name="ErplyApi.Api.Post.createInstallation" value="createInstallation">
<!-- Required form fields would be here -->
<input type="text" name="ErplyApi.Api.PostParam.createInstallation.username"
value="15">
<input type="text" name="ErplyApi.Api.PostParam.createInstallation.password"
value="15">
<!-- Depending on what cluster the main account is the target url might need to be adjusted -->
<input type="hidden" name="Form.Redirect" value="https://template-engine-eu10.erply.com/[[ .Data.ErplyApi.Api.Requests.createInstallation.Response.Get `records.0.clientCode` ]]/en/store">
</form>
Source account is on custom domain and the created account will use erply domain
Note
Available from goerp version 1.314.0
In cases where the main app is on a different custom domain. In these case we cannot set cross domain cookies.
Instead, we can pass the session key in the query parameter, goerp will take care of the session creation itself.
<form type="post">
<input type="hidden" name="ErplyApi.Api.Post.createInstallation" value="createInstallation">
<!-- Required form fields would be here -->
<input type="text" name="ErplyApi.Api.PostParam.createInstallation.username"
value="15">
<input type="text" name="ErplyApi.Api.PostParam.createInstallation.password"
value="15">
<!-- Depending on what cluster the main account is the target url might need to be adjusted -->
<input type="hidden" name="Form.Redirect" value="https://template-engine-eu10.erply.com/[[ .Data.ErplyApi.Api.Requests.createInstallation.Response.Get `records.0.clientCode` ]]/en/store?authKey=[[ .Data.ErplyApi.Api.Requests.createInstallation.Response.Get `records.0.sessionKey` ]]">
</form>
Navigating to application routes
By default, accounts do not have any goerp applications installed. If we need to navigate to a new application then we would
need to set the application up to auto install.
Requirements:
The application needs to be published to the clusters store.
The application needs to be set as auto installed (request with a raji ticket).
Note
Also note that passing the key is only needed if we want to navigate the user to a bo user view. If the user is to be
navigated to a public page view then there is no need to pass the auth key.
Document related definitions
Entity - represents API response object. Main responsibility of Goerp is to provide API integrations and tools
to display content from those API on UI applications (.gohtml pages). Entities are not usually visible in the template
editor, but it is critical to understand the difference between model and entity.
Model - represents data definition model. They are view models. By specifying the view model inside the template
(in input tag by setting name parameter or in data sets by using .Data notation), we are providing commands to the
goerp and based on those commands data would be fetched from dependent API’s. Usually models are generated from the
entities and vice versa. However, if entities can be passed to the view “as is” then entities are used as view models
(for example most lists for the dropdowns).
Links
New template editor: Goerp Editor
Before entering the editor, you must maintain the client code and login.