Goerp has some built-in service variables, which can be used to pass some processing settings or to
get some service variables, such as session key, client code, etc.
Dynamic api gives an alternative way to handle the data. As opposed to the older model based handling.
For benefits this functionality relies on the api’s business logic entirely and does not need adjustments to models once
the api’s change.
It also allows to create as many request as you want against the same api and implements various
data manipulation helper functions.
Requests are defined by either input parameters from the browser (query or post) or by
static preset values. Preset values are values that are saved to the template during its
save time and this means that changing values cannot be used with them.
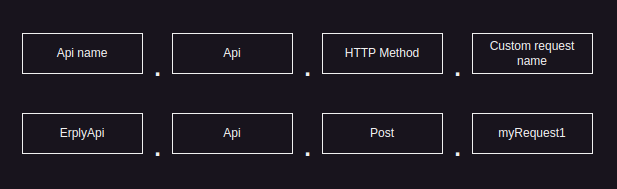
The syntax of the requests is the following
Api name Name of the api in question, reference the dynamic data source docs in the editor
for the full list of options.
Api Always has the value of Api, this tells the system that we intend to use the dynamic
api functionalities.
HTTP Method The http method that is to be used for the api call.
Get
Post
Put
Patch
Delete
FTPGet
FTPPut
Custom request name Custom name for the request you define, we use it later to set parameters
and read the results.
Requests naming
Request names are case-sensitive. Prefer giving self-explanatory names to the requests, so they will not
confuse while developing huge template with many requests. For example, if request made for v1/products
and used method Get, then name it getProducts, but not something like request1, records, etc.
Also, GoErp have reserved names that cannot be used while defining the name for request.
Reserved names:
Session (with Capital S, session is ok to use)
Parameters (with Capital P)
Storage (with Capital S)
Using in a form
The definition of the name is given to the form input name and the endpoint to call from that api is given
as the value.
Note that the value should not start with the character /.
The call is made when the page is accessed only when the parameter is actually passed. In the sample above
the parameter is registered in the form but is never actually sent as a parameter to the server.
In order to load the data we would need to submit the form.
The method of the form would define how the parameter is passed to the server either via query parameter
or a post parameter.
We can also load parameter into links to make the api to be called right away (before the page is enriched with data):
?ReportsApi.Api.Get.someReportsCall=v1/POSDay
This link would load the data when it is opened.
Defining static presets
When opening a page via url that has no query parameters then even if we have defined some api call into form
they would not be triggered.
Regular form values are not read from the template content, rather it is just written there to make the actual calls
by the browser.
There is a way however to set defaults to parameters, these values are saved during template save time
and are static values. This means that dynamic values that change in the template view process cannot be
passed onto them, the values that are added to it are the exact values that will be used for the request.
This allows the request to be made with some default values and to make it load something when a page
is opened without any parameters.
For this we can use the data-preset-val attribute on the inputs
Note that these do not need to be in the form as we might never send the parameter if we never
intend to send the form. In this case a single hidden input that is not part of a form is enough.
If the browser passes a parameter to the same value it will overwrite the preset value.
Url configuration static presets
From version 1.179.1 we can also set static preset values in the editor under the “URL configuration” menu.
These name:value pairs work the same way as regular preset value definitions, but when defined here the values
do not need to be in the template body at all.
Useful for pages that generate content that might not want to view the input but automatic loading of content
is required.
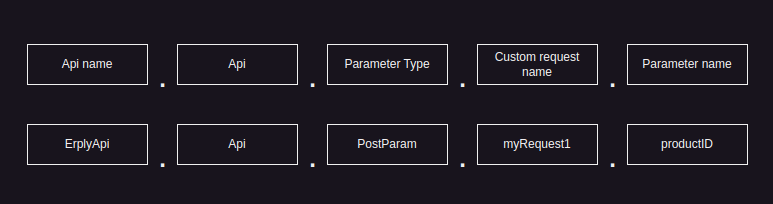
Request parameters
Defining request parameters
To pass parameters to the api we will use similar syntax like the one we use to define the requests.
The custom request name here should match exactly the one we used to define the request.
In the following example we add the query parameter currencyId for the request we defined as myReportsCall
Similar to the way we can give default values to requests we can also give default values to parameters.
Note that the values here are static meaning that we cannot add placeholders to the data-preset-val attribute.
The value is being saved on template save time and will not change during the page view process.
<formmethod="get"><inputtype="hidden"name="ReportsApi.Api.Get.myReportsCall"value="v1/POSDay"data-preset-val="v1/POSDay"><!-- We make the page load with currency ID 1, however we still allow it to be overwritten by the parameter --><labelfor="currencyId">Currency ID</label><inputid="currencyId"type="number"name="ReportsApi.Api.Query.myReportsCall.currencyId"data-preset-val="1"><buttontype="submit">Fetch</button></form>
If the browser passes a parameter to the same value it will overwrite the preset value.
Parameter types
Parameters are passed either via query or as post parameters. Samples here are generated into
form inputs, but they can as well be used in url query parameters (name=value).
This means the input will keep its value after the possible form submit and page reload
QueryBulk
Allows to pass as many query parameters as needed using one input. Parameter name here doesn’t matter
actually as it would be ignored anyway, but we can always name it url just to make it clear to read
If the api expects one of the parameters to be a path parameter we would define the request with
a placeholder and follow it up with a value for this placeholder.
Json inputs can be composed in a couple of different ways.
Input construction
With this method we will construct json with multiple input fields.
We also need to define the type of the field for the json constructor. Type is given just
before the parameter name. In many cases parameter name may represent the xpath in json, like
string.inner.name will result in {"inner":{"name":""}}
Omitting key definition after the dot will result in setting input value as a root object to the
json body.
Supported values
string - result: ({"name":"foo"})
number - result: ({"name":123})
boolean - result: ({"name":true})
json - result: ({"name":{"foo":"bar"}}). Allows to set any json structure.
delete - (special case to delete entire path from the json, value of the input would be ignored because only path is needed)
Starting from version 1.201.1, GoErp allows to make json modifications more flexible, like
predefined json, connecting json parts from another request and many more. Check how it works
with CAFA sample.
Raw
To send some custom data to the api endpoint that does not use a specific format (json, post params etc).
Note that the key name here is not important (myCustomData) and it will not be used in the request.
Usable for franchise accounts. Where the HQ account can make calls against certain stores. Note that the user
on the HQ account needs to have access to the specified store through the multi account users feature.
Using the value here will run the api call against that specific franchise account store.
Cache
Can be used to speed up page loads by caching certain api calls that do not use any parameters and are used mostly to
fill selections. Items will be stored against the session and will refresh automatically within 1 hour (this can be altered
with the duration parameter).
Define the cache key with a value of 1 to use the cache features. Adjusting the value to 0 or removing the key will disable
the feature.
Optionally you can set a different duration for the cached elements (in seconds).
This works together with the cache parameter and needs to exist when the data element is created.
If this value is not provided then the data will be cached by default for 3600 seconds.
The dynamic functionality returns the entire api response json content back as special
json object that we can manipulate with special commands to get back data.
Specifying the request to get the data for
If we had for example previously defined a request like this
The json values by default have special type that is always converted to a string when used in the template.
This means that if the intention is to use these values in some inbuilt helper function that expects a certain type
and the expected types are not what is expected then the function can break the template entirely.
To prevent this we can cast the values to the correct type in the functions.
{{ if eq (.Data.PricingApi.Api.Requests.myCall.Response.Get "age").Int }} 37 }}
<!-- Do something -->{{ end }}
These are special functions that can be used against the dynamic api json response content, to do special
conversions or other special functions with them.
Note that the following functions can also be used on the same result, for example we want to flatten and get unique values
at the same time.
It’s possible to chain different api fetches together. This is useful when a second api call would depend on the
results of the first.
Warning
By default, all subsequent requests will be skipped if parent one fails. Although, it is possible
to configure this behavior by making link optional. More details
Available chaining options
NB! Chaining options supported through value AND through data-preset-val parameters
Every request input parameters may be chained with other request and with data from GoErp in-build data sets.
In-build data sets:
Session (check structure of the Session by printing it out {{ toJson .Session }})
We can use the grouping definition to set the order of calls.
The pipe | at the end indicates grouping and the number says the order.
Multiple requests can have the same group number, this means they would be done at
the same time, and they do not depend on each other.
It is recommended to make as few requests as possible. This means that creating requests in first api response
loops is not recommended as it would take a large performance hit.
Instead, we can use special helper functions to collect the id’s and make a separate calls.
|@commaSepStr converts all the id’s of the get products response to comma separated string input for the pricing api.
Then we assign this value to productId parameter using the <- sign.
The value syntax here is similar to how the Get function works, so we can also assign single values when needed.
<!-- Add the id value of the first result --><inputtype="hidden"name="PricingApi.Api.Query.getPrices.<-productIDs"value="getProducts.Response.0.id">
Make chained link optional
Dynamics provides option to make link optional, which means, if parent request fails or there is no
data in chained location then request would be still executed but with empty parameter (from version 1.262.1: query, path and headers parameters will be skipped instead of empty values).To make link
optional just put ? after the link operator <-, like this <-?:
Dynamics provides option to skip the chain when parent has a value. That option could be useful
when we need to create a new record only if the parent request has no data. To skip the chain,
put ! after the link operator <-, like this <-!:
<!-- getPrices would be not executed if getProducts.Response.0.id has id in there --><inputtype="hidden"name="PricingApi.Api.Query.getPrices.<-!productIDs"value="getProducts.Response.0.id">
Define multiple sources for chaining
Sometimes we need to get first non-empty value from multiple sources. This can be done by using the
|| operator between sources. This will take the first non-empty value from the provided set of
sources. If all sources are empty and chain not optional, then request will be not executed. Works
with presets as well.
We can use the json query mechanism to get items from other api responses, or we can use the old-fashioned
id matching.
Query features
Using the inbuilt query features to return exact values. This can be useful when dealing with more complex
pages that try to compose multiple requests.
<ul>{{ range .Data.PIMApi.Api.Requests.getProducts.Response.Array }}
<!-- As values returned by the _Get_ function do not have a specific type we need to cast it into one --> {{ $productId := (.Get "id").Int }}
<li> Product code: {{ .Get "code" }}<br><!-- Get the price_with_tax value from the prices array by matching the productID there with current iteration id --> Price: {{ .Data.PricingApi.Api.Requests.getPrices.Response.Get (printf `#(productID==%d).price_with_tax` $productId) }}
</li>{{ end }}
</ul>
Id matching
Iterating through the second set is also an option. For something smaller this will probably be enough.
<ul>{{ range $product := .Data.PIMApi.Api.Requests.getProducts.Response.Array }}
<li> Product code: {{ $product.Get "code" }}<br> {{ range $price := $.Data.PricingApi.Api.Requests.getPrices.Response.Array }}
<!-- Still need to cast to the appropriate types --> {{ if eq ($price.Get "productID").Int ($product.Get "id").Int }}
<!-- Get the price_with_tax value if the id matches --> Price: {{ $price.Get "price_with_tax" }}
{{ end }}
{{ end }}
</li>{{ end }}
</ul>
Sample
In here we fetch a list of products and generate a list of images for them.
<divclass="my-error-container"> {{ range .Data.Errors }}
<spanclass="my-error-message">{{ . }}</span> {{ end }}
</div><inputtype="hidden"name="PIMApi.Api.Get.getProducts"data-preset-val="v1/product"><inputtype="hidden"name="PricingApi.Api.Get.getPrices|1"data-preset-val="v1/products/price-tax-rate"><inputtype="hidden"name="PricingApi.Api.Query.getPrices.warehouseID"data-preset-val="1"><inputtype="hidden"name="PricingApi.Api.Query.getPrices.<-productIDs"data-preset-val="getProducts.Response.#.id|@commaSepStr"><ul> {{ range .Data.PIMApi.Api.Requests.getProducts.Response.Array }}
<!-- As values returned by the _Get_ function do not have a specific type we need to cast it into one --> {{ $productId := (.Get "id").Int }}
<li> Product code: {{ .Get "code" }}<br><!-- Get the price_with_tax value from the prices array by matching the productID there with current iteration id --> Price: {{ $.Data.PricingApi.Api.Requests.getPrices.Response.Get (printf `#(productID==%d).price_with_tax` $productId) }}
</li> {{ end }}
</ul>
A more complex sample
This is a more complex sample that uses multiple api calls to save a new customer and various other
elements related to the customer.
Errors: {{ .Data.Errors }}<br/><h1>Customer input with address and fetching customer with all data in place</h1><formmethod="post"><!-- requests initialization --><inputtype="hidden"name="CRMApi.Api.Get.customerGroups"value="v1/customers/groups"data-preset-val="v1/customers/groups"><inputtype="hidden"name="CRMApi.Api.Post.createCustomer"value="v1/customers/individuals"><inputtype="hidden"name="CRMApi.Api.Post.createAddress|1"value="v1/addresses"><inputtype="hidden"name="CRMApi.Api.Get.customer|1"value="v1/customers"><inputtype="hidden"name="CRMApi.Api.Get.getAddress|2"value="v1/addresses"><inputtype="hidden"name="CRMApi.Api.Put.createAttribute|2"value="v1/attributes"><inputtype="hidden"name="CRMApi.Api.Delete.delAttribute|3"value="v1/attributes/{id}"><inputtype="hidden"name="CRMApi.Api.Get.getAddressTypes|3"value="v1/addresses/types"><inputtype="hidden"name="CRMApi.Api.Get.getBusinessAreas|3"value="v1/business/areas"><inputtype="hidden"name="CRMApi.Api.Get.getAttributes|4"value="v1/attributes"><!-- presets data --><inputtype="hidden"name="CRMApi.Api.Query.customerGroups.take"value=""data-preset-val="50"><!-- customer post, depth = 1 --><br/>First name:
<inputtype="text"name="CRMApi.Api.Json.createCustomer.string.firstName"value="{{ .Data.CRMApi.Api.Requests.customer.Json.Get "firstName"}}"><br/>Last name:
<inputtype="text"name="CRMApi.Api.Json.createCustomer.string.lastName"value="{{ .Data.CRMApi.Api.Requests.customer.Json.Get "lastName"}}"> {{ $gId := (.Data.CRMApi.Api.Requests.customer.Json.Get "customerGroupId").Int }}
<br/>Group: <selectname="CRMApi.Api.Json.createCustomer.number.customerGroupId"> {{ range $cg := .Data.CRMApi.Api.Requests.customerGroups.Response.Array }}
<optionvalue="{{ $cg.Get "id"}}"{{ifeq($cg.Get"id").Int$gId}}selected{{end}}> {{ $cg.Get "name.en" }}
</option> {{ end }}
</select><!-- address post, depth = 2 --><br/>Address street:
<inputtype="text"name="CRMApi.Api.Json.createAddress.string.street"value="{{ .Data.CRMApi.Api.Requests.createAddress.Json.Get "street"}}"><inputtype="hidden"name="CRMApi.Api.Json.createAddress.number.<-customerId"value="createCustomer.Response.id"><inputtype="hidden"name="CRMApi.Api.Json.createAddress.number.typeId"value="1"><!-- get created customer, depth = 2 --><inputtype="hidden"name="CRMApi.Api.Query.customer.<-ids"value="createCustomer.Response.id"><!-- get created address, depth = 3 --><inputtype="hidden"name="CRMApi.Api.Query.getAddress.<-customerIds"value="customer.Response.#.id|@commaSepStr"><br/>Attribute int:
<inputtype="number"name="CRMApi.Api.Json.createAttribute.number.value"value="int"><inputtype="hidden"name="CRMApi.Api.Json.createAttribute.string.entity"value="customer"><inputtype="hidden"name="CRMApi.Api.Json.createAttribute.string.name"value="test-dynamic-4"><inputtype="hidden"name="CRMApi.Api.Json.createAttribute.string.type"value="int"><inputtype="hidden"name="CRMApi.Api.Json.createAttribute.number.<-record_id"value="customer.Response.#.id|@commaSepStr"><!-- get created address, depth = 4 --><inputtype="hidden"name="CRMApi.Api.Path.delAttribute.<-id"value="createAttribute.Response.id"><inputtype="hidden"name="CRMApi.Api.Query.getAttributes.entityName"value="customer"><inputtype="hidden"name="CRMApi.Api.Query.getAttributes.<-recordIds"value="customer.Response.#.id|@commaSepStr"><br/><buttontype="submit">Submit</button></form><h1>Created customer</h1>{{ $cs := .Data.CRMApi.Api.Requests.customer.Response.Array }}
{{ if $cs }}
<br/>Response count: {{ len $cs }}
{{ $c := index $cs 0 }}
{{ $cId := ($c.Get "id").Int }}
<br/>ID: {{ $cId }}
<br/>First name: {{ $c.Get "firstName"}}
{{ $cgId := ($c.Get "customerGroupId").Int }}
<br/>Customer group: {{ .Data.CRMApi.Api.Requests.customerGroups.Response.Get (printf `#(id==%d).name.en` $cgId) }}
<br/>Addresses: {{ $.Data.CRMApi.Api.Requests.getAddress.Response.Get (printf `#(customerId==%d)#.street` $cId) }}
{{ end }}
<h1>Attributes</h1>{{ $attrs := .Data.CRMApi.Api.Requests.getAttributes.Response.Array }}
{{ if $attrs }}
{{ range $attrs }}
<br/>{{ .Get "name" }} | {{ .Get "type" }} | {{ .Get "value" }}
{{end}}
{{ end }}
A sample using chaining in reading images
A sample where we connect CDN images to product groups.
In here we can see that we can connect items that naturally do not have a connection in the database.
Before this sample 2 images have been created using the CDN api create image endpoint.
context: erply-product-group
productId: 0 for default and 3 for the existing one
<!-- Define request 1 for product groups --><inputtype="hidden"name="PIMApi.Api.Get.myProdGroups"value="v1/product/group"data-preset-val="v1/product/group"><!-- Chain images from CDN api, use results from first as input --><inputtype="hidden"name="CDNApi.Api.Get.myImages|1"value="images"data-preset-val="images"><inputtype="hidden"name="CDNApi.Api.Query.myImages.context"data-preset-val="erply-product-group"><inputtype="hidden"name="CDNApi.Api.Query.myImages.<-productId"data-preset-val="myProdGroups.Response.#.id|@commaSepStr"><p>Groups</p><ul> {{ range .Data.PIMApi.Api.Requests.myProdGroups.Response.Array }}
{{ $groupId := (.Get "id").Int }}
<li> {{ .Get "name.en" }} (ID: {{ $groupId }})
<!-- Fetch images for this group id using the dynamic query method --> {{ $images := $.Data.CDNApi.Api.Requests.myImages.Response.Get (printf `images.#(productId==%d)#.key` $groupId) }}
<ul> {{ if $images.Array }}
<!-- print matching items --> {{ range $images.Array }}
<li><imgsrc="{{ $.Session.Services.CDNApi.URL }}/images/{{ $.Session.ClientCode }}/{{ . }}?width=200&height=200"></li> {{ end }}
{{ else }}
<!-- Print default --><li><imgsrc="{{ $.Session.Services.CDNApi.URL }}/images/{{ $.Session.ClientCode }}/jJumxcXTSamiGhJgDGJ1kGFyQx4iqtksv4R3MnEsIc4APVqt2v.png?width=200&height=200"></li> {{ end }}
</ul></li> {{ end }}
</ul>
Result should look like this
Form redirect
Form redirect with dynamic api
Dynamic api uses a different kind of redirect from the models.
This redirect is only triggered if all the calls in the request succeed. If even one of them fails
(errors model in the response contains something) then by default redirection is not triggered.
However, there is a way to define optional requests that allowed to fail.
We define the redirection with Form.Redirect parameter
The syntax here is exactly the same as with responses, only difference is that instead of the usual {{ and }}
escapes we use [[ and ]] instead.
Use Form.AllowedToFailRequests input name to pass request names that allowed to fail and make redirect
to the desired page even if they failed. Request names should be separated by comma (,)
<!-- Assign the first id from the response to the redirect link --><inputtype="hidden"name="Form.Redirect"value="da-dynamic-redirect?someParameter=[[ .Data.PIMApi.Api.Requests.request1.Response.Get `0.id` ]]">
Sample
<formmethod="get"><!-- For 'request1' use your own custom identifier, use it to access the results --><inputtype="hidden"name="PIMApi.Api.Get.request1"value="/v1/product"><!-- Only redirects if all form containing requests succeed --><inputtype="hidden"name="Form.Redirect"value="da-dynamic-redirect?wat=[[ .Data.PIMApi.Api.Requests.request1.Response.Get `0.id` ]]"><inputtype="hidden"name="Form.AllowedToFailRequests"value="request1"><buttontype="submit">Redirect on success</button></form>
Input helpers
Helper functions for input
These are functions that help in generating input in a certain format that is difficult to create
using regular html inputs.
@doNotSkipOnEmpty
Allows to set a value to the input even if the value is empty.
@pimFilter & readPimFilter
Note
The regular pimFilter does not support ‘or’ operator between conditions and the operator always set to ‘and’. It also does
not support nested conditions. If the operator between conditions is needed or nesting of conditions then look for
the pimFilterV2 helper instead
PIM api filter structure is in json format and simple input by default cannot use it in a clean way. The following
functions help in generating the filters for it.
This is used at the end of the input name definition
Due to json filter structure and special characters in the instructions it’s not possible to read the value back
into the input fields using regular methods. For this we can use another helper function
Used to help generate pim filter json type structure from html inputs. Similar to the version 1 of the pimFilter
only that this one supports different operators between conditions and optionally also nesting of conditions.
Also since the ordering of the elements is important then the order helper should also be used when using the V2 variant.
Syntax for it is as follows:
Name of the field in pim
Operator: =, !=, >=, <=, in, not in, contains and startswith
Type of the value: string, number, bool
Optional. Add a nested group identifier, this is a random string value that group similar values to a nested group.
Note that in and not in operators expect the value to be a comma separated list of values.
Due to json filter structure and special characters in the instructions it’s not possible to read the value back
into the input fields using regular methods. For this we can use another helper function readPimFilterV2
Optionally we can also create nested filters with the group identifier parameter.
Do not forget to update the order of the functions and also the operator between possible groups.
In the sample we provide it a value of ‘a’, but the value is user defined. Everything with the value
will be nested in the same array.
Functions that related to the Json parameter type.
JSON field names may contain @ symbol, so function section definition starts with @{ and ends with }
to avoid collisions. E.g. @{order(1);foo(bar,rab)}. Functions separated by semicolon ;. Function
parameters separated by comma ,.
@order
Defines the order of inputs related to the json generation process.
In next sample initial structure of the json input would always be executed first and only then all
other inputs. This allows us to predefine the payload of json body and then change only necessary
fields.
(Optional) Adjust by date value (minute, hour, day, month or year)
(Optional) Integer (negative or positive) for the adjustment value
(Optional) Static value to suffix the formatted date on output
(Optional) Turn the static value to a prefix instead
Note it’s important to give the preset value of “default” for the function to insert the date value.
This is so that possible manual values will never be overwritten.
<!-- As suffix, without the 6th optional parameter --><inputtype="hidden"name="PIMApi.Api.Query.myRequest1.date@{setDefaultDate(UTC,2006-01-02,2006-01,day,0, 00:00:00)}"value=""data-preset-val="default"><!-- Would generate: 2024-08 00:00:00 --><!-- As prefix with the 6th parameter --><inputtype="hidden"name="PIMApi.Api.Query.myRequest1.date@{setDefaultDate(UTC,2006-01-02,2006-01,day,0,00:00:00 ,true)}"value=""data-preset-val="default"><!-- Would generate: 00:00:00 2024-08-->
It’s also possible to set the function to read the current accounts timezone configuration value instead.
To do this set the timezone value to from-conf.
Doing this the function will look for the value from accounts configuration:timezone value, if the value is not set
or has an invalid value then it defaults to UTC.
@formatDate
Used to alter the date format to formats that the possible api requires.
Mostly useful when the visual representation of the value in the UI is not the same as the api requires.
For example of the api needs unix but the UI should display regular year, month and day.
Parameters:
Timezone (use ‘from-conf’ to get the timezone value from accounts configuration)
(Optional) Adjust by date value (minute, hour, day, month, year, year, dtFirstDayOfWeek, dtLastDayOfWeek, dtFirstDayOfMonth, dtLastDayOfMonth, dtFirstDayOfYear or dtLastDayOfYear)
(Optional) Integer (negative or positive) for the adjustment value. for “dt” related types first applies adjustment then sets specific time. “dt” for weeks accepts only 0 or 1, which is bool for isSunday
(Optional) Static value to suffix the formatted date on output
(Optional) Turn the static value to a prefix instead
<!-- In this sample we take the value of 2024-04-25 and set it as unix timestamp when the api request is made --><inputtype="text"name="PIMApi.Api.Query.myRequest1.date@{formatDate(UTC,2006-01-02,unix)}"value="2024-04-25">
With the optional date adjustment parameters.
<!-- In this sample we take the value of 2024-04-25, append 5 days and set it as unix timestamp when the api request is made --><inputtype="text"name="PIMApi.Api.Query.myRequest1.date@{formatDate(UTC,2006-01-02,unix,day,5)}"value="2024-04-25">
Using the optional suffix and prefix.
<!-- As suffix, without the 7th optional parameter --><inputtype="hidden"name="PIMApi.Api.Query.myRequest1.date@{formatDate(UTC,2006-01-02,2006-01,day,0, 00:00:00)}"data-preset-val="2024-04-25"><!-- Would generate: 2024-08 00:00:00 --><!-- As prefix with the 7th parameter --><inputtype="hidden"name="PIMApi.Api.Query.myRequest1.date@{formatDate(UTC,2006-01-02,2006-01,day,0,00:00:00 ,true)}"data-preset-val="2024-04-25"><!-- Would generate: 00:00:00 2024-08-->
@encode
Version 1.222+
Can be used to encode the value. Supports base32, base64 and hex.
Default is base64 if parameter is omitted, provide the parameter to use a different encoding.
<!-- Defaults to base64 --><inputtype="text"name="ReportsApi.Api.Query.myRequest1.someData@{encode}"value="some value to be encoded"><!-- Request specific --><inputtype="text"name="ReportsApi.Api.Query.myRequest1.someData@{encode(base64)}"value="some value to be encoded"><!-- Hex example --><inputtype="text"name="ReportsApi.Api.Query.myRequest1.someData@{encode(hex)}"value="some value to be encoded">
@decode
Version 1.222+
Can be used to decode an encoded api response value to a string (supports base32, base64 and hex).
Default is base64 if parameter is omitted, provide the parameter to use a different encoding.
<!-- Defaults to base64 --><inputtype="text"name="ReportsApi.Api.Query.myRequest1.someData@{decode}"value="some value to be encoded"><!-- Request specific --><inputtype="text"name="ReportsApi.Api.Query.myRequest1.someData@{decode(base64)}"value="some value to be encoded"><!-- Hex example --><inputtype="text"name="ReportsApi.Api.Query.myRequest1.someData@{decode(hex)}"value="dGVzdA==">
@hash
Version 1.222+
Can be used to hash an api value according to an algorithm. Supports md5, sha1, sha256 and sha512.
Defaults to sha1 if the parameter is not provided.
<!-- Defaults to sha1 --><inputtype="text"name="ReportsApi.Api.Query.myRequest1.someData@{hash}"value="some value to be encoded"><!-- Request specific --><inputtype="text"name="ReportsApi.Api.Query.myRequest1.someData@{hash(sha1)}"value="some value to be encoded"><!-- md5 example --><inputtype="text"name="ReportsApi.Api.Query.myRequest1.someData@{hash(md5)}"value="value to be hashed">
@encrypt / @decrypt
Version 1.254+
This can be used to encrypt the data that is being saved in the api (kvs for example). This means that the data
will only be readable when the correct key is provided.
The feature uses AES cipher, and the protection strength is determined by the given key length.
Note that the keys need to use the correct length (16, 24 or 32)
16 characters : AES-128
24 characters : AES-192
32 characters : AES-256
Setting the keys to requests
Set the key for the request so the encryption knows what it needs to use.
<!--
Remember that ordering is important here as we need the system to always have the key before any encryption.
In this sample we use the chaining to take the key from the variables file, but the value can be taken from
any other api call or from a hardcoded value.
--><inputtype="hidden"name="KvsApi.Api.Encrypt.myRequest1.<-key@{order(1)}"value="Variables.someKey"data-preset-val="Variables.someKey">
Also note that if the save and read is done on the same page then the key should be added for both calls.
Encrypting the values
Once we have set the key then we can use the encrypt helper on the values we want to protect.
<!--
Use the order here to make sure that this is done after the key set.
Any api string value can be protected like this (limited to the max length of them).
--><inputtype="text"name="KvsApi.Api.Json.myRequest1.string.value@{order(2);encrypt}"value="some value to be encoded">
Decrypting
Remember to set the key for reading, otherwise the api will return an unreadable string.
<!-- When reading we also need to set the key --><inputtype="hidden"name="KvsApi.Api.Encrypt.myRequest2.<-key"value="Variables.someKey"data-preset-val="Variables.someKey">
Use the decrypt tools helper to read the data.
Note
The method will not inform you of an invalid or missing keys, instead it will generate random garbage values every single load.
<ul>{{ range .Data.KvsApi.Api.Requests.myRequest2.Response.Array }}
<li>{{ $.Tools.Decrypt (.Get "value").String }}</li>{{ end }}
<ul>
Sample
A simple save and read sample using kvs api.
<formmethod="post"><inputtype="hidden"name="KvsApi.Api.Post.myRequest1"value="api/v1/entry"><inputtype="hidden"name="KvsApi.Api.Encrypt.myRequest1.<-key@{order(1)}"value="Variables.someKey"data-preset-val="Variables.someKey"><inputtype="hidden"name="KvsApi.Api.Json.myRequest1.string.topicId"value="5afb02fc-04a5-4524-a816-4381f97b1few"><inputtype="hidden"name="KvsApi.Api.Json.myRequest1.string.key"value="my-value"><inputtype="text"name="KvsApi.Api.Json.myRequest1.string.value@{order(2);encrypt}"value="some value to be encoded"><buttontype="submit">send</button></form><inputtype="hidden"name="KvsApi.Api.Get.myRequest2|2"value="api/v1/entry"data-preset-val="api/v1/entry"><inputtype="hidden"name="KvsApi.Api.Encrypt.myRequest2.<-key"value="Variables.someKey"data-preset-val="Variables.someKey"><inputtype="hidden"name="KvsApi.Api.Query.myRequest2.topicId"value="1"data-preset-val="5afb02fc-04a5-4524-a816-4381f97b1few"><br><ul>{{ range .Data.KvsApi.Api.Requests.myRequest2.Response.Array }}
<li>{{ $.Tools.Decrypt (.Get "value").String }}</li>{{ end }}
<ul>
@toArrIndexParameters
Can be used to generate multiple request parameters based on input array from another dynamic result.
For use cases where the api expects indexed requests.
Basically wraps entire content into provided suffix and prefix. This function always accepts two
parameters, if there is more or less than two, then initial value is returned.
Starting from version 1.201.1, GoErp allows to make json modifications more flexible, like
predefined json, connecting json parts from another request and many more.
Let’s take CAFA as an example, as it will use most of the modification options.
<h1>Dynamic CAFA</h1><formmethod="post"><!-- Defining variables to get rid of very long value definitions in the inputs --> {{ $putConfBody := .Data.CaFaApi.Api.Requests.putConf.Json }}
{{ $getConfStateResp := .Data.CaFaApi.Api.Requests.getConfState.Response.Get "0" }}
<!-- 1. Load initial state of the configuration --><inputtype="hidden"name="CaFaApi.Api.Get.getConfState"value="configuration"data-preset-val="configuration"><!-- 2. provide query parameters for the configuration entry --><inputtype="hidden"name="CaFaApi.Api.QueryBulk.getConfState.url"value="application=my-app&level=Company&name=dynamic-sample"data-preset-val="application=my-app&level=Company&name=dynamic-sample"><!-- 3. Create save call with initial json payload --><inputtype="hidden"name="CaFaApi.Api.Put.putConf|1"value="v3/configuration"> {{ if $getConfStateResp.Exists }}
<inputtype="hidden"name="CaFaApi.Api.Json.putConf.json.<-@{order(1)}"value="getConfState.Response.0"> {{ else }}
<inputtype="hidden"name="CaFaApi.Api.Json.putConf.json.@{order(1)}"value='{"application":"my-app","level":"Company","name":"dynamic-sample","value":{}}'> {{ end }}
<!-- 4. Optionally, check updated state of the entry. --><inputtype="hidden"name="CaFaApi.Api.Get.getConfFinal|2"value="v3/configuration/{id}"><inputtype="hidden"name="CaFaApi.Api.Path.getConfFinal.<-id"value="putConf.Response.id"><!-- 5. Modify section, use same approach to as many fields as needed --><br/>Cat Murka age:
<inputtype="text"name="CaFaApi.Api.Json.putConf.number.value.pets.murka.age"value='{{ if $putConfBody.Exists }}{{ $putConfBody.Get "value.pets.murka.age" }}{{ else}}{{ $getConfStateResp.Get "value.pets.murka.age" }}{{ end }}'><buttontype="submit">Submit</button></form><h2>Before update</h2>Murka age: {{ .Data.CaFaApi.Api.Requests.getConfState.Response.Get "0.value.pets.murka.age" }}
<h2>After update</h2>Murka age: {{ .Data.CaFaApi.Api.Requests.getConfFinal.Response.Get "0.value.pets.murka.age" }}
Firstly, we need to have current state of the configuration, so we are loading it from the api
with getConfState request. Later we can use it for the “first page loading” event to display
current state.
Here, with QueryBulk parameter type we are preparing a bunch of static query parameters to get
specific configuration entry, based on application, level and name.
This part of the code allows as to prepare initial body of the json payload. We are getting the
payload from getConfState if it is available, or generating totally new one otherwise. Also,
we are using input functions
feature to define the order for json input parameters. By default, GoErp receives all parameters
in a chaotic order. But we need to be sure that initial structure assignment goes always first,
so we are defining order by setting it to 1. Additionally, we need to assign the payload to body
as a root object. To do that, just omit key definition after the dot (with key: .json.key, and
without: .json.).
Optionally, we are defining request getConfFinal to retrieve configuration updated state,
just to see that configuration was changed. In most cases it is not needed in real applications.
In this section we are making modifications to the configuration object and making sure that
UI displays correct value for each case: 1) first load of the page and 2) after update event.
We know, that if json body of the put request is available, then we came to this page right after
save, otherwise it is first loading. Variables were defined just to make input value look smaller.
The final working example with a couple more fields after removing all unnecessary stuff:
<!-- Vars section -->{{ $putConfBody := .Data.CaFaApi.Api.Requests.putConf.Json }}
{{ $getConfStateResp := .Data.CaFaApi.Api.Requests.getConfState.Response.Get "0" }}
<h1>Dynamic CAFA</h1><formmethod="post"><inputtype="hidden"name="CaFaApi.Api.Get.getConfState"value="configuration"data-preset-val="configuration"><inputtype="hidden"name="CaFaApi.Api.QueryBulk.getConfState.url"value="application=my-app&level=Company&name=dynamic-sample"data-preset-val="application=my-app&level=Company&name=dynamic-sample"><inputtype="hidden"name="CaFaApi.Api.Put.putConf|1"value="v3/configuration"> {{ if $getConfStateResp.Exists }}
<inputtype="hidden"name="CaFaApi.Api.Json.putConf.json.<-@{order(1)}"value="getConfState.Response.0"> {{ else }}
<inputtype="hidden"name="CaFaApi.Api.Json.putConf.json.@{order(1)}"value='{"application":"my-app","level":"Company","name":"dynamic-sample","value":{}}'> {{ end }}
<inputtype="hidden"name="CaFaApi.Api.Get.getConfFinal|2"value="v3/configuration/{id}"><inputtype="hidden"name="CaFaApi.Api.Path.getConfFinal.<-id"value="putConf.Response.id"><!-- Modify section --><br/>Cat Murka age: <inputtype="text"name="CaFaApi.Api.Json.putConf.number.value.pets.murka.age"value='{{ if $putConfBody.Exists }}{{ ($putConfBody.Get "value.pets.murka.age").String }}{{ else}}{{ ($getConfStateResp.Get "value.pets.murka.age").String }}{{ end }}'><br/>Cat Murka breed: <inputtype="text"name="CaFaApi.Api.Json.putConf.string.value.pets.murka.breed"value='{{ if $putConfBody.Exists }}{{ ($putConfBody.Get "value.pets.murka.breed").String }}{{ else}}{{ ($getConfStateResp.Get "value.pets.murka.breed").String }}{{ end }}'><br/>Cat Murka kind: <inputtype="text"name="CaFaApi.Api.Json.putConf.string.value.pets.murka.kind"value='{{ if $putConfBody.Exists }}{{ ($putConfBody.Get "value.pets.murka.kind").String }}{{ else}}{{ ($getConfStateResp.Get "value.pets.murka.kind").String }}{{ end }}'><br/><buttontype="submit">Submit </button></form>
Form drafts
It’s possible to instruct the form to keep certain dynamic api parameters for api requests but not trigger the corresponding
api request with the post until instructed to do so.
This can be used to make ‘drafts’ from inputs that will not trigger the api calls.
Hold all api request
The following form entry will prevent all dynamic api calls from triggering, but keeps all the parameters intact.
Note that this also affects api calls that are done by presets.
Server will not run any dynamic api calls when the value of the Form.HoldDraft is true. Inputs against these calls can be changed
and posted without the actual calls being initiated.
<formmethod="post"><inputtype="hidden"id="req"name="ErplyApi.Api.Post.myRequest1"value="getProducts"><labelfor="id">Records on page</label><inputtype="text"id="id"name="ErplyApi.Api.PostParam.myRequest1.recordsOnPage"value="{{ index .Data.Parameters "ErplyApi.Api.PostParam.myRequest1.recordsOnPage"}}"><labelfor="hold-state">Hold draft</label><inputtype="checkbox"id="hold-state"name="Form.HoldDraft"value="true"><buttontype="submit">send</button></form>
Hold specific api calls
In order the enrich data with additional possible api calls but hold others as drafts we can use a different input.
All dynamic requests that have the names will not be executed.
Can possibly make stepper type templates using this method.
In this sample the same ‘Send’ will run request1 and request2 in sequence.
<formmethod="post"><inputtype="hidden"id="req"name="ErplyApi.Api.Post.myRequest1"value="getProducts"><inputtype="hidden"id="req"name="ErplyApi.Api.Post.myRequest2"value="getProducts"><labelfor="id">Records on page</label><inputtype="text"id="id"name="ErplyApi.Api.PostParam.myRequest1.recordsOnPage"value="{{ index .Data.Parameters "ErplyApi.Api.PostParam.myRequest1.recordsOnPage"}}"><labelfor="id">Records 2 on page</label><inputtype="text"id="id"name="ErplyApi.Api.PostParam.myRequest2.recordsOnPage"value="{{ index .Data.Parameters "ErplyApi.Api.PostParam.myRequest2.recordsOnPage"}}"> {{ if ne .Data.ErplyApi.Api.Requests.myRequest1.Response.Exists true }}
<inputtype="text"id="hold-state"name="Form.HoldDraftFor"value="myRequest2"> {{ end }}
<buttontype="submit">send</button></form>
Making FTP requests
Since v1.277.0 GoErp supports FTP requests in dynamics. This feature allows to upload or
download files to/from servers through FTP protocol as well as a couple of additional actions like
moving files, getting directory list, etc.
Warning
Since v1.301.3FTPGet and FTPPut are deprecated and will be removed in future versions.
Instead, use FTP as a method while initializing the request and pass action name in cmd
through PostParam.
Input parameters
Initialization of the request is made through FTP method type. Like so:
<input type="hidden" name="CustomApi.Api.FTP.file" value="localhost:2121">. Value in this case
contains the FTP server host with port. Port is mandatory parameter. If provider not specified the
port, then the default ports for ftp 21,2121, and for ftps 990.
Actions request and response parameters
All requests expecting credentials and cmd to be passed through PostParam type:
cmd - FTP command (or action). All available commands are listed below.
schema - ftp or ftps. If not set, then GoErp will try to get it from the link and if fails then uses ftp.
username - FTP server username.
password - FTP server password.
get
Input parameters:
cmd - get
path - Path to the file on the server. Example: /path/to/file.txt.
Displaying the names of files and directories in the specified path (subdirectories not included). Every element in the list has detailed information about entry.
{"error":"550 Could not access file: open /tmp/my-data: no such file or directory","status":"error"}
Form control
Always used with forms. Goerp application handles all pages with one dynamic handler and pages may
have multiple forms. When the page is processed by the handler, then all forms and related input
models are involved. We need to know the exact model to be sure that after submitting the form POST
request, the right model gets processed. This model name should be passed with the postActionEntity
input name.
All form control fields:
postAction - what action should be applied to the entity, currently there is only one option -
delete, if passed then form control should also have postActionIds input included. If postAction
is not specified, then by default applied save/update action.
postActionIds - entity ID’s separated by comma (,). Those are input parameters for performing
changes under specific entities (in most cases deleting them)
postActionEntity - defines the model name which is related to the form. Needed only for the
save, update and delete options (not needed in query type forms). Supports multiple entities, each
of them should be defined in separate input with the same name, check Multi-entity form topic in
this section.
postActionRedirect - defines the link where to redirect after successful post action (not
applied to delete action and to forms with GET method)
Do not use any form control inputs while submitting the form using GET method (at least for now
there is no practical use of form control options in GET requests).
Use GET requests to fetch multiple data for tables using Query model, or to fetch
single Input entity (usually just passing its ID) while defining link to the edit form.
Query models always connected with the List models. When defining the List model in your
template,
GOERP will make request to the related API and fetch data based on the Query parameters.
<formmethod="get"id="query-form"><labelfor="query-parameter-1">Query parameter 1:</label><inputtype="text"id="query-parameter-1"name="Api.ModelQuery.Field"value="{{ .Data.Api.ModelQuery.Field }}"><labelfor="query-parameter-2">Query parameter 2:</label><inputtype="text"id="query-parameter-2"name="Api.ModelQuery.AnotherField"value="{{ .Data.Api.ModelQuery.AnotherField }}"><buttontype="submit">Find</button></form><!-- Use List entities to actually apply the query, otherwise Query parameters will be ignored --><ul> {{ range .Data.Api.ModelList }}
<li>{{ .Name }}</li> {{ end }}
</ul>
POST for create and update actions
Let’s take a look into simple create/update example form:
<formmethod="post"id="post-form"><!-- For saving action need to pass only postActionEntity, which will ensure that you are working with correct model --><inputtype="hidden"name="postActionEntity"value="ModelInput"><!-- Optionally, use redirect option to redirect to the specified page after successful saving --><inputtype="hidden"name="postActionRedirect"value="https://erply.com/"><!-- Next 2 fields are related to actual model parameters --><labelfor="input-1">Input 1:</label><inputtype="text"id="input-1"name="Api.ModelInput.Field"value="{{ .Data.Api.ModelInput.Field }}"><labelfor="input-2">Input 2:</label><inputtype="text"id="input-2"name="Api.ModelInput.AnotherField"value="{{ .Data.Api.ModelInput.AnotherField }}"><buttontype="submit"id="save">Save</button></form>
Often we need to make reference from the list of rows to the specific entity edit form. In this case
pass entity ID from the selected row to the edit link by attaching it to the Input ID (some input
models doesn’t have Input suffix, but you can check in data source definitions in editor if model
have “write” option):
<!-- Use built-in .Session object to access account related configuration --><!-- Use prefix '$' if linking made inside the range loop, otherwise omit it --><ahref="/{{ $.Session.ClientCode }}/{{ $.Session.Language.Code }}/example-page?Api.ModelInput.Id={{ .Id }}"target="_self"class="table-action-button"><iclass="button nowrap button--transparent icon-Edit-Line"></i></a>
POST for delete action
Delete actions should be made by following next steps:
Form must have method parameter set to POST
Inside the form set hidden postAction input to delete
Inside the form set hidden postActionIds input to entity IDs (separated by comma) that should be
deleted (using custom JS or predefined goerp components)
Inside the form set hidden postActionEntity input to the entity name that should be deleted. If
it is row in the table, then that entity should have suffix List (e.g. WarehouseDtoList
or WarehouseDtoList). If deleting from the single entity edit form, then suffix may be Input
or just model name, check data sources definition in the editor for exact model names. Please
note, postActionEntity value shouldn’t have API definition, just model name.
<formmethod="get"id="entity-table-id"><inputtype="hidden"name="postAction"value="delete"><inputtype="hidden"name="postActionIds"value=""><inputtype="hidden"name="postActionEntity"value="ModelList"><!-- Add submit button if delete modal not used --><!-- <button type="submit">DELETE</button>--></form><!-- and then somewhere in the list range --><ul> {{ range .Data.Api.ModelList }}
<li>{{ .Name }}</li><!-- If used delete-confirm-partial component, then define next parameters inside the button --><buttondata-form-id="entity-table-id"data-delete-identifier="{{ .Id }}"data-post-action-entity="ModelList"class="button button--transparent nowrap table-action-button action-row-red form-delete-button"><iclass="icon-Trash-Empty-NotFilled"></i></button> {{ end }}
</ul><!-- As an option, somewhere in the end of the page import delete-confirm-modal from goerp components and use it --><!-- to delete one or many entities. Or write your own deletion logic -->{{ template "delete-confirm-partial" .}}
Multi-entity form
GOERP now supports multiple entities definitions in one form, which allows to save data of many
different, unrelated entities at once.
Note
Multi-entity form supports only one postAction type for all scoped entities. For example, it cannot
be used to delete one and create another entity at once. Only delete for all related entities OR
create/update for all related entities.
Let’s say we need to create warehouse and point of sale records by submitting them in one form, then
code would look like this:
<formmethod="POST"> {{/* Define entity names that should be processed */}}
<inputtype="hidden"name="postActionEntity"value="WarehouseInput"><inputtype="hidden"name="postActionEntity"value="PointOfSale"> {{/* Warehouse input data */}}
<fieldset><legend>Warehouse:</legend><labelfor="name-eng">Name eng:</label><inputtype="text"id="name-eng"name="AccountAdminApi.WarehouseInput.Name.en"value="{{ .Data.AccountAdminApi.WarehouseInput.Name.en }}"><labelfor="name-est">Name est:</label><inputtype="text"id="name-est"name="AccountAdminApi.WarehouseInput.Name.et"value="{{ .Data.AccountAdminApi.WarehouseInput.Name.et }}"></fieldset> {{/* Point of sale input data */}}
<fieldset><legend>Point of sale:</legend><labelfor="name-pos">Name:</label><inputtype="text"id="name-pos"name="AccountAdminApi.PointOfSale.Name"value="{{ .Data.AccountAdminApi.PointOfSale.Name }}"><labelfor="name-shop">Shop name:</label><inputtype="text"id="name-shop"name="AccountAdminApi.PointOfSale.ShopName"value="{{ .Data.AccountAdminApi.PointOfSale.ShopName }}"></fieldset></form>
Bulk-entity form
Some input entities in GOERP may be submitted as a bulk (having multiple records in scope of one
form submit), allowing to create or update multiple records at once. Such inputs have array types in
data source definition - []string (e.g. ErplyApi.ProductInSupplierPriceList). Also, bulk
input fields may be a part of some complex input entities (e.g. ErplyApi.SalesDocumentInput)
accepts many Row’s as part of the input.
Warning
Every row in the bulk should always have same order of inputs as others (check samples).
All rows in the bulk should always have same amount of inputs. For example, goerp will fail
if one row contains Name and Code and second one have ID, Name and Code. If ID
undefined, then pass empty value with an input.
Bulk-entity form sample
<formmethod="POST"> {{/* Define entity name that should be processed */}}
<inputtype="hidden"name="postActionEntity"value="ProductInSupplierPriceList"> {{/* Empty row (to add new) */}}
<fieldset><legend>Create row:</legend><labelfor="spl-id">Supplier price list ID:</label><inputtype="text"id="spl-id"name="ErplyApi.ProductInSupplierPriceList.SupplierPriceListID"><labelfor="product-id">Product ID:</label><inputtype="text"id="product-id"name="ErplyApi.ProductInSupplierPriceList.ProductID"></fieldset><h2>Existing rows</h2> {{/* Populate existing rows for update */}}
{{ range $i, $el := .Data.ErplyApi.ProductInSupplierPriceListList }}
<fieldset><legend>Row {{$i}}:</legend><labelfor="spl-id-{{$i}}">Supplier price list ID:</label><inputtype="text"id="spl-id-{{$i}}"name="ErplyApi.ProductInSupplierPriceList.SupplierPriceListID"value="{{$el.SupplierPriceListID}}"><labelfor="product-id-{{$i}}">Product ID:</label><inputtype="text"id="product-id-{{$i}}"name="ErplyApi.ProductInSupplierPriceList.ProductID"value="{{$el.ProductID}}"></fieldset> {{ end }}
</form>
Subsections of Bulk-entity form
Sales document sample
<!-- Display possible api errors --><div> {{ range .Data.Errors }}
<span>{{ . }}</span> {{ end }}
</div><formmethod="post"><!-- Field used by goErp to state what we want to save --><inputtype="hidden"name="postActionEntity"value="SalesDocumentInput"/><!-- Need to set the ID of the existing document --><inputtype="hidden"name="ErplyApi.SalesDocumentInput.ID"value="{{ .Data.ErplyApi.SalesDocumentInput.ID }}"><table><thead><tr><th>Product ID</th><th>Amount</th><th>Price</th></tr></thead><tbody> {{ range $row := .Data.ErplyApi.SalesDocument.Rows }}
<tr><td><!-- Stable row id is used by erply api to determine existing rows
the api always replaces all rows so adding a single row means all rows need to be resaved --><inputtype="hidden"name="ErplyApi.SalesDocumentInput.RowStableRowID"value="{{ $row.StableRowID }}"><inputname="ErplyApi.SalesDocumentInput.RowProductID"value="{{ $row.ProductID }}"></td><td><inputname="ErplyApi.SalesDocumentInput.RowAmount"value="{{ $row.Amount }}"></td><td><inputname="ErplyApi.SalesDocumentInput.RowPrice"value="{{ $row.Price }}"></td></tr> {{ end }}
<tr><td><inputtype="hidden"name="ErplyApi.SalesDocumentInput.RowStableRowID"value="0"><inputname="ErplyApi.SalesDocumentInput.RowProductID"value=""placeholder="Product ID"></td><td><inputname="ErplyApi.SalesDocumentInput.RowAmount"value="0"></td><!-- Manual pricing allowed? --><td><inputname="ErplyApi.SalesDocumentInput.RowPrice"value="0"></td></tr></tbody></table><!-- Erply api returns this boolean as a string 0 or 1 for some reason --> {{ if eq .Data.ErplyApi.SalesDocument.Confirmed "1" }}
<h2>Confirmed documents cannot be edited</h2> {{ else }}
<buttontype="submit">Save</button> {{ end }}
</form>
Session
Contains service information, like session key, client code, etc…
Syntax: {{ .Session.ClientCode }} Full list of parameters:
.Session.ClientCode
.Session.SessionKey

.Session.User.ID
.Session.User.FullName
.Session.User.EmployeeID
.Session.User.EmployeeName
.Session.User.GroupID
.Session.User.BOLoginUrl // Back office url for current user

<!-- Services May be extended in feature -->
.Session.Services.ErplyApi.URL
.Session.Services.Auth.URL
.Session.Services.AccountAdmin.URL
.Session.Services.Assignments.URL
.Session.Services.CaFa.URL
.Session.Services.PointOfSaleApi.URL
.Session.Services.UserApi.URL
.Session.Services.WMSApi.URL
.Session.Services.CrmApi.URL
.Session.Services.PricingApi.URL
.Session.Services.PimApi.URL
.Session.Services.VinApi.URL
.Session.Services.InventoryTransactionApi.URL
.Session.Services.InventoryDocumentApi.URL
.Session.Services.IntLog.URL
.Session.Services.ReportsApi.URL
.Session.Services.WebhookManager.URL
.Session.Services.EMSApi.URL
.Session.Services.EInvoiceApi.URL
.Session.Services.KvsApi.URL

.Session.Language.Code
.Session.DefaultLanguage.Code

.Session.AccountConfiguration.configurations
Some notes about specific parameters:
.Session.AccountConfiguration.configurations contains all erply configuration parameters
.Session.Language.Code two letter code of the currently set account language
.Session.DefaultLanguage.Code two letter code of the default account language
Parameters
Not controlled by goerp, can be used to mirror some data after submitting the form. Basically, goerp
will return all assigned parameters data with the response.
Let’s say we want to pass some data to the next page, using regular query parameter:
It’s possible to instruct the server to validate incoming parameters to certain rules.
Register the rules on page “Form validation” configuration section.
Enable and disable feature
You can use the toggle button to disable or enable the entered rules.
Rules
The parameter name is the full parameter name to be validated.
Type can be any of the following:
required - checks that the parameter exists
type - currently can have the value of a number, checks if the parameter is a valid number
min - checks that the numeric value is higher or equal to the given value
max - checks that the numeric value is lower or equal to the given value
minLength - checks that the string value is at-least the given characters long
maxLength - checks that the string value does not exceed the given amount of characters
pattern - checks if the input is valid to the regex pattern (ex: .{8,})
Validation
The validation is completed for each rule and the errors are returned in the regular .Data.Errors array.
{{ range .Data.Errors }}
    {{ . }}
{{ end }}
Version
Holds current version of the goerp server, usage: {{ .Version }}
Preset queries
Goerp have an option to define Preset queries, which will be saved into the template data and
executed every time when page loaded without passing any form data. Usually preset option is used
while querying the table of records. However, inputs also may have preset option in very specific
cases. Check data source definitions in editor to ensure if model supports presets or not.
To use presets, just add input tags somewhere in the template, but outside any form, and set desired
values:
<body><inputtype="hidden"name="Preset.Api.ModelQuery.FieldOne"value="1"><inputtype="hidden"name="Preset.Api.ModelQuery.FieldTwo"value="two"><!-- When template loaded from the store, goerp already knows the filter criteria based on presets --><!-- and this list will contain records that are corresponds to preset query inputs --><ul> {{ range .Data.Api.ModelList }}
<li>{{ .Name }}</li> {{ end }}
</ul></body>
Warning
Define all Preset inputs outside the form, so they will not mess up with form data (In most cases
goerp editor will throw an error during saving). That make sense, because
they are not related to the form at all, consider them as “imports” in javascript, so write them
somewhere in the beginning of the document (page or partial, in case of partial inside
“content-block”)
Chaining models
Tip
Despite dynamics, models have very restricted options for data chaining. Switching to the dynamic
data model
is strongly recommended, except cases when using model approach is more convenient or dynamic model
not usable at all. But keep in mind, models are significantly less flexible in comparison with
dynamics.
Chain models with in-build data sources
Currently, models supports chaining with in-built data sources only. Those are: Session, Storage
and Parameters.
Note
If source doesn’t contain data, then chaining would be skipped and target
parameter would be set to the empty value.
Tip
There is also option to save data from data models to the Storage. Check storage guides
for more information.
Session
<!-- in presets --><inputname="Preset.ErplyApi.SalesDocumentQuery.ClientID<-"value="Session.customer.ID"><!-- inside the form --><formmethod="post"><inputname="ErplyApi.SalesDocumentQuery.ClientID<-"value="Session.customer.ID"></form>
Storage
<!-- in presets, expects that storage have the value, otherwise chaining would be skipped --><inputname="Preset.ErplyApi.SalesDocumentQuery.ClientID<-"value="Storage.customerID"><!-- inside the form, expects that storage have the value, otherwise chaining would be skipped --><formmethod="post"><inputname="ErplyApi.SalesDocumentQuery.ClientID<-"value="Storage.customerID"></form>
Parameters
<!-- in presets, expects that storage have the value, otherwise chaining would be skipped --><inputname="Preset.ErplyApi.SalesDocumentQuery.ClientID<-"value="Parameters.customerID"><!-- inside the form, expects that storage have the value, otherwise chaining would be skipped --><formmethod="post"><inputname="ErplyApi.SalesDocumentQuery.ClientID<-"value="Parameters.customerID"></form>
Request statistics
Response data now contains some statistics of performed request. Current structure of the
.Data.RequestStats parameter is:
RequestStats.TotalTime (Total time spent by performing entire request, including parsing and api calls)
RequestStats.TemplateProcessingTime (Time spent on template preparation and processing)
RequestStats.APICallsTotalTime (Total time of API calls, for DTO may exceed Total request time because some requests performed in parallel)
RequestStats.APICallsCount (Number of API calls)
RequestStats.APICalls[] (Array containing APICall elements)
RequestStats.CacheTotalTime (Total time spent on caching, not available at the moment)

APICall.Took (Time spent on this particular call, without parsing)
APICall.Endpoint (API endpoint)
APICall.ResponseCode (API http response code)