Regular pages will be restricted with the erply back-office sessions, this means that the pages cannot be viewed without
a valid erply user session.
We can use the b2b/public sessions to set pages to no use the back-office session.
For that we have 2 options:
Public session - these sessions are completely public and do not require a user to log in at all.
Protected session (app user) - pages that can only be viewed by logged in app user. App users are special users
that are managed in the application itself.
Permission
Public pages are protected by 3 different methods.
Erply user group permissions - on installation a user group is created
goerp-app-users-group, all data fetches to erply api’s will use
the rights of this group.
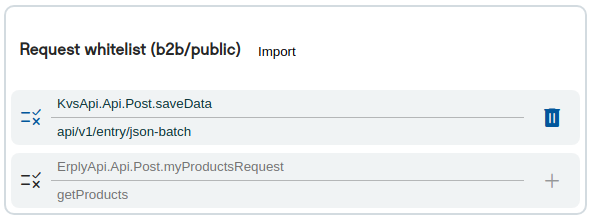
Dynamic api request whitelist - a list of calls that are allowed with the dynamic api feature.
Parameter whitelist - a list of parameters that we allow to be used.
Dynamic api request whitelist
The whitelist is under the ‘Publish settings’ tab in the editor view.
When enabled the dynamic requests would need to be added to the page
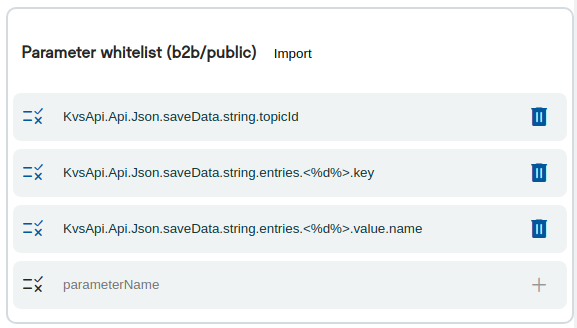
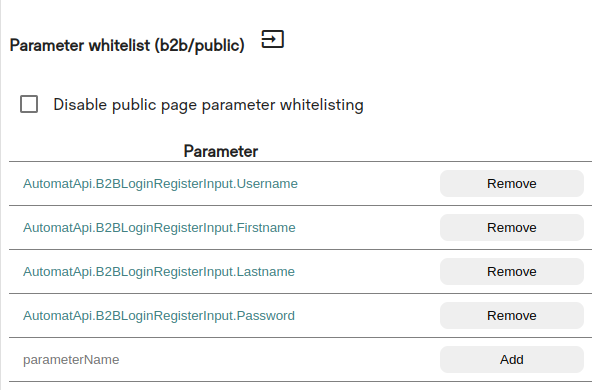
Parameters whitelist
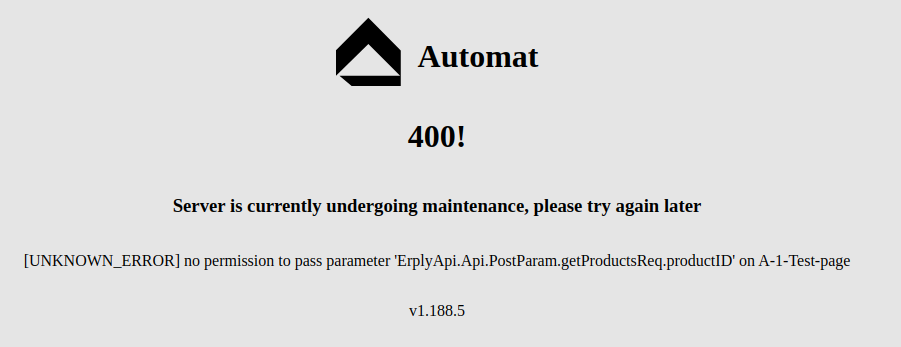
The following error is given when on public pages we send a parameter that is not added to the whitelist.
The whitelist can be accessed under the ‘Publish settings’ in the editor view. The parameter whitelist counts
in presets and request the whitelist (when used) so the values there do not need to be duplicated here.
When enabled the used parameters need to be filled to the list of the page.
If the permissions were previously set to the aliases then we can also use the ‘Import from alias’ button
to automatically fill them based on the alias settings.
As of 1.234.5+ disabling of these features is not recommended and will be disabled for new templates.
Pattern matching rules for parameter whitelist
The whitelist supports pattern matching for the parameters. That would be very helpful when working
with the json that contains or generates arrays. At the moment pattern matching is supported
for digits <%d%> and string <%s%>.
To define a placeholder just put a <%d%> in the place where actual parameter name may have a
number. Can be defined as many placeholders per parameter as needed.
Protected pages can only be accessed with a logged in app user. App users are special app specific users that can
be set up to access specific applications.
Login and registration is up to the specific applications. Either it allows user registration from a public page
or user creation is handled in some admin panel instead.
Note that app users cannot exist without an application, and the users cannot access or log in if they are not associated
with an existing application (as opposed to erply account users). These user sessions cannot access erply back-office
applications and regular pages.
Public routes always are prefixed with either public/ or b2b/ (except on custom domains).
Setup
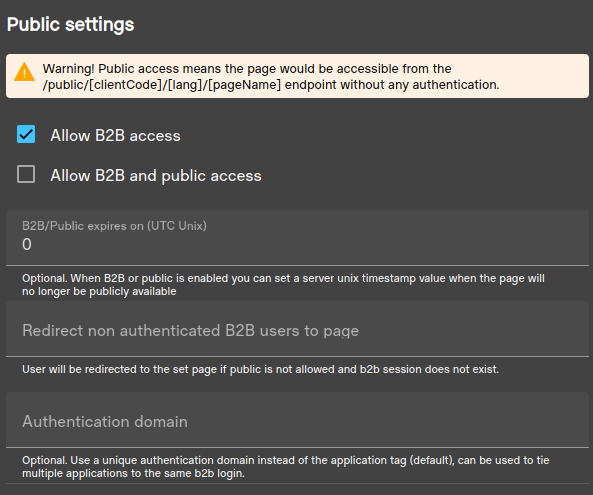
Set the page to allow b2b access to set this protection level.
This can be configured in the template editor mode under the ‘Publish setting’ right menu.
Note
It is also possible to set an optional expiration date to the page (UTC unix value) after this
timestamp has passed on the server the will no longer be accessible using the b2b endpoint.
Use authentication config input set the value.
Also note that this setting is based on applications or auth domains.
Each user requires the application domain to be able to create a valid session for the application. By default,
the application domain is the applications uuid. You can use the ‘Authentication domain’ field to set a custom value -
if the same value is set for multiple applications then the applications can share the users.
Use the ‘Redirect non-authenticated B2B users to page’ option to automatically redirect to login or error
page invalid accesses.
User creation/registration
Users can either be created using a public registration form (for stores, b2b pages etc), or creation is managed internally
within another page or application.
Domains under the user determine what application pages the user can access.
Auth drivers
Auth drivers indicate what authentication methods the user is allowed to use to log in.
Inbuilt methods: password, pin and openid
Open id
Open ID setup can be used to create custom sso methods for login. Each provider that is set up for the login page
can then be used with the users to log in.
Creating a custom open id driver:
In the login page template, navigate to the Publish settings -> OpenID Configuration tab.
Use the ‘Add new configuration’ button to register a new open id provided (driver). Fill in the required fields and
fields related to the provider. Note that the ‘Provider’ field will be used as the driver name.
The ’email’ scope is also required as app users will be matched with the email.
In the login command set the auth driver to the created one.
In order for the users to be able to use it they would need to have the ‘ms_entra’ auth driver. Note that for open id
auth drivers the value field will not be used.
The jwksUrl endpoint needs to point to the public keys configuration.
This example assumes the open id configuration was given the provider name of ‘ms_entra’.
<formmethod="post"><inputtype="hidden"name="AutomatApi.B2BLoginInput.Redirect"value="b2b-2-members-page"><inputtype="hidden"name="AutomatApi.B2BLoginInput.AuthDriver"value="ms_entra"><buttontype="submit"> Microsoft SSO
</button></form>
There is no limit to the open id providers. You can set up multiple providers to the same auth provider as-well (multiple app’s in ms entra for example).
Public registration page
With this you can create public facing endpoint where users can be created by customers themselves.
Domains
With inbuilt forms the domain is always taken from the registration template.
Auth drivers
With inbuilt from the auth driver used is always ‘password’
Setting up public registration page
Create a public page that implements the automat api’s registration form.
Use the Session.Customer.ID to detect if the user is already logged in.
Optionally, the AutomatApi.B2BLoginRegisterInput.LoginOnSuccess can be used to automatically login
newly created user and AutomatApi.B2BLoginRegisterInput.Redirect to redirect the user to a specific
page after successful login.
Check the automat api B2BLoginRegisterInput data source docs for additional available fields.
<!-- Read registration errors --><divclass="my-error-container"> {{ range .Data.Errors }}
<spanclass="my-error-message">{{ . }}</span> {{ end }}
</div>{{ if .Session.Customer.ID }}
<h1>Already registered</h1>{{ else }}
<h1>Register a new user</h1><formmethod="post"><inputtype="hidden"name="postActionEntity"value="B2BLoginRegisterInput"><inputtype="hidden"name="postActionRedirect"value="b2b-login-demo-page"><!-- Configure autologin and redirect --><inputtype="hidden"name="AutomatApi.B2BLoginRegisterInput.LoginOnSuccess"value="1"><inputtype="hidden"name="AutomatApi.B2BLoginRegisterInput.Redirect"value="b2b-2-members-page"><br><labelfor="firstName">First name</label><inputtype="text"id="firstName"name="AutomatApi.B2BLoginRegisterInput.Firstname"><br><labelfor="lastName">Last name</label><inputtype="text"id="lastName"name="AutomatApi.B2BLoginRegisterInput.Lastname"><br><labelfor="email">Email</label><inputtype="text"id="email"name="AutomatApi.B2BLoginRegisterInput.Username"><br><labelfor="password">Password</label><inputtype="password"id="password"name="AutomatApi.B2BLoginRegisterInput.Password"><br><buttontype="submit">Register</button></form>{{ end }}
Setting up public login page
Create a public page that implements the automat api’s login form.
Use the Session.Customer.ID to detect if the user is already logged in.
Optionally the AutomatApi.B2BLoginInput.Redirect can be used to redirect the user
to a specific page after successful login
<!-- Read login errors --><divclass="my-error-container"> {{ range .Data.Errors }}
<spanclass="my-error-message">{{ . }}</span> {{ end }}
</div>{{ if .Session.Customer.ID }}
<p>Welcome {{ .Session.Customer.FirstName }}</p>{{ else }}
<formmethod="post"><labelfor="username">Email</label><inputtype="text"id="username"name="AutomatApi.B2BLoginInput.Username"/><br><labelfor="password">Password</label><inputtype="password"id="password"name="AutomatApi.B2BLoginInput.Password"/><br><buttontype="submit">Login</button></form>{{ end }}
Back office auth driver
This is a special auth driver that will:
Automatically create a connected app user to the back office user when it does not exist (or connect it if one with the same username exists).
Log the app user in to goerp without exposing the erply session (meaning the user cannot switch to regular back office applications).
To enable this driver, set the following to the app users login:
Set the login driver to ‘back-office’ (depending on if the api is used the input might look different)
Allow to use back-office driver on the login template settings tab : Publish settings -> Login -> Allow back office auth driver
When this is set the login form checks against the back office user (username and password).
Public
Introduction
Public pages are accessible without any login.
Setup
This can be added in the template edit view and enabling the “Allow B2B and public access” setting.
Note
It is also possible to set an optional expiration date to the page (UTC unix value) after this
timestamp has passed on the server the will no longer be accessible using the b2b endpoint.
Use authentication config input set the value.
These routes can be accessed by prefixing the routes with /public/
Starting from version 1.246.0, GoErp allows to use dynamic api features while creating register,
login and others b2b authentication calls. This allows to create multiple requests and chain data
between them, including authorization calls.
Note
Those API calls works properly only inside GoErp templates, because b2b (public) authentication
depends on the template configuration, therefore all b2b API endpoints requires b2bKey to be
sent in the request header. This key is available inside session and could be chained to the
API request header.
A simple registration page using API and dynamics. All page configuration steps remains same as for
model based b2b authentication.
<h1>Register page</h1><formmethod="post"><inputtype="hidden"name="AutomatApi.Api.Post.register"value="v1/b2b/register-user"><!-- Use chaining to pass b2b key to the header --><inputtype="hidden"name="AutomatApi.Api.Header.register.<-b2bKey"value="Session.key"><!-- Use .Tools.B2bAuthDomain to get the domain --><inputtype="hidden"name="AutomatApi.Api.Json.register.string.domain"value="{{ .Tools.B2bAuthDomain }}"><!-- Setup redirect on succeed, if needed. It will be triggered only if all calls in this
template are successful. So, if registration fails, we stay on this page, very useful. --><inputtype="hidden"name="Form.Redirect"value="10-b2b-in-page"><fieldset><labelfor="firstname">Firstname:</label><inputid="firstname"name="AutomatApi.Api.Json.register.string.firstname"value=""><labelfor="lastname">Lastname:</label><inputid="lastname"name="AutomatApi.Api.Json.register.string.lastname"value=""></fieldset><fieldset><labelfor="username">Username:</label><inputid="username"name="AutomatApi.Api.Json.register.string.username"value=""><labelfor="password">Password:</label><inputid="password"name="AutomatApi.Api.Json.register.string.password"value=""></fieldset><!-- Login would be performed automatically only if this parameter set to 1 --><inputtype="hidden"name="AutomatApi.Api.Json.register.string.triggerLoginAfterRegister"value="1"><buttontype="submit">Register</button></form>
Note
Please note that if the triggerLoginAfterRegister parameter is not passed or set to 0, the user
will be registered but not logged in. Although, Form.Redirect will be triggered anyway and try to
access the protected area (10-b2b-in-page in this case). Therefore, while user not logged in, the
10-b2b-in-page page configuration will redirect to the login page (if configured). So, this could
be confusing.
Login page
Here we will just use the username and password, and redirect to the protected area when successful.
<h1>Login page</h1><formmethod="post"><inputtype="hidden"name="AutomatApi.Api.Post.login"value="v1/b2b/login"><!-- Use chaining to pass b2b key to the header --><inputtype="hidden"name="AutomatApi.Api.Header.login.<-b2bKey"value="Session.key"><!-- Use .Tools.B2bAuthDomain to get the domain --><inputtype="hidden"name="AutomatApi.Api.Json.login.string.domain"value="{{ .Tools.B2bAuthDomain }}"><!-- Setup redirect on succeed, if needed. It will be triggered only if all calls in this
template are successful. So, if login fails, we stay on this page, very useful. --><inputtype="hidden"name="Form.Redirect"value="10-b2b-in-page"><fieldset><labelfor="username">Username:</label><inputid="username"name="AutomatApi.Api.Json.login.string.username"value=""><labelfor="password">Password:</label><inputid="password"name="AutomatApi.Api.Json.login.string.password"value=""></fieldset><buttontype="submit">Login</button></form>
Samples
In the following sample we have a registration, login and a members area. This shows how we restrict the members area
to only read results for the logged in customer.
Page setup
Note
The public features only work if the registration, login and any members pages belong to the same application or auth
domain.
Registration page
A simple registration page with minimal inputs.
<!DOCTYPE html><html><body><h2>Register a new user</h2><formmethod="post"><inputtype="hidden"name="postActionEntity"value="B2BLoginRegisterInput"><inputtype="hidden"name="postActionRedirect"value="b2b-2-login-page"><divclass="user-box"><inputtype="text"name="AutomatApi.B2BLoginRegisterInput.Firstname"required=""><label>Firstname</label></div><divclass="user-box"><inputtype="text"name="AutomatApi.B2BLoginRegisterInput.Lastname"required=""><label>Lastname</label></div><divclass="user-box"><inputtype="text"name="AutomatApi.B2BLoginRegisterInput.Username"required=""><label>Email</label></div><divclass="user-box"><inputtype="password"name="AutomatApi.B2BLoginRegisterInput.Password"required=""><label>Password</label></div><!-- Read possible registration errors --><div> {{ range .Data.Errors }}
<span>{{ . }}</span> {{ end }}
</div><buttontype="submit">Register</button></form></body></html>
For publish settings we enable the ‘Allow B2B and public access’ checkbox
Also since registration allows more fields to be used we also need to fill in the parameter whitelist of
the value we will allow to be used, in this case we will fill the ones we have defined in the form.
Login page
Here we will just use the username and password, and redirect to the members area when successful.
<!DOCTYPE html><html><body> {{ if .Session.Customer.ID }}
<h2>Already logged on!</h2> {{ else }}
<h2>Login</h2><formmethod="post"><inputtype="hidden"name="AutomatApi.B2BLoginInput.Redirect"value="b2b-2-members-page"><divclass="user-box"><inputtype="text"name="AutomatApi.B2BLoginInput.Username"required=""><label>Username</label></div><divclass="user-box"><inputtype="password"name="AutomatApi.B2BLoginInput.Password"required=""><label>Password</label></div><divclass="my-error-container"> {{ range .Data.Errors }}
<spanclass="my-error-message">{{ . }}</span> {{ end }}
</div><buttontype="submit">Login</button></form> {{ end }}
</body></html>
For publish settings we enable the ‘Allow B2B and public access’ checkbox.
Login model parameters are automatically whitelisted, so we should not need to fill them here.
Members page
On the members page we will generate a simple list of documents for the currently logged on member.
We use the preset to read session id to the request and prevent it from being adjusted via any parameters.
<!DOCTYPE html><html><body><h1>Members page</h1><formmethod="post"><inputtype="hidden"name="AutomatApi.B2BLogoutInput.Logout"value="1"><buttontype="submit">Logout</button></form><h2>Welcome {{ .Session.Customer.FirstName }} to the members area</h2><!-- Erply api response data in the 'records' field --><h2>My orders</h2><formmethod="POST"><!-- Request definition --><inputtype="hidden"name="ErplyApi.Api.Post.getDocs"value="getSalesDocuments"data-preset-val="getSalesDocuments"><buttontype="submit">Reload orders</button></form><ul> {{ $salesDocs := (.Data.ErplyApi.Api.Requests.getDocs.Response.Get "records").Array }}
{{ if $salesDocs }}
{{ range $salesDocs }}
<li>{{ .Get "id" }} / {{ .Get "type" }} / {{ .Get "clientName" }}</li> {{ end }}
{{ else }}
<li>You currently have no orders!</li> {{ end }}
</ul></body></html>
Note
By default all public access groups do not have access to read documents. This right needs to be given under the public
user groups (starting with ‘app_public’ and ‘app_b2b’) by the account administrator in the backoffice.
Every application or authentication domain will have a separate user group with rights assigned to them.
For publish settings we enable the ‘Allow B2B access’ checkbox as we will only want logged in members to access it.
We also set the redirection to the name of the login page, so whenever its being accessed without a proper session
it will be automatically redirected.
We are also using dynamic api here, so we will add the ErplyApi.Api.Post.getDocs -> getSalesDocuments to the request
whitelist.
Under URl configuration we add the preset ErplyApi.Api.PostParam.getDocs.<-clientID : Session.customer.ID
This will write the current session customer id to the request when it is being done, since we do not allow the parameter
to be adjusted in the parameters list then it cannot be changed to anything else.
Workflow
To test it:
Register a new user
Login with the created customer
The members area only displays the members sales documents (use backoffice to create them or create a new page
that creates the documents for the member using the same method)