Subsections of UI/UX implementation guides
Making templates
Subsections of Making templates
Pages
GOERP uses golang templates while assembling the pages, so any options that are supported by go templates may be applied here. Please refer to the official docs to get more information. Pages creation process is like writing html code, including some features from go templating system.
Alternatively, GOERP have in-build layout system, so one layout can be re-used on many pages. All default layouts located in the partials section of the editor. Layouts have suffix -layout.
Here is example for the complex page, using layouts:
Content partials
Note
This section describes content partials, which have go-html content only. For java-script and css partials check “JS and CSS partials” section.
Partial is a part of document that can be re-used in several pages, which may be convenient if application consists of several pages with same content in some places. Let’s say we have application where navigation content repeated in every page, with partial we can put this content in one template and re-use it in every page. Sounds very convenient, but still they have some restrictions:
- Partials can also contain unlimited partials, but the maximum depth (nested levels) is currently limited to 5
- Partials cannot have js and css imports/blocks
Create partial
To create a partial, go to the template editor
and pick Create -> Create new template, then define name and select type Partial from the dropdown.
Editor will generate very simple initial code for the partial and append suffix -partial to the
template name:
So lets update newly created partial with some content
and now let’s inject partial into the page:
Passing data to the partial
In the last section we created simple partial and injected into the page. There is dot in the end
of partial injection statement, which means that we are passing all data that was sent from back-end
with the response to the partial. In this case we can use any available variable field, for example
changing our <h1>Hello Goerp!</h1> to the <h1>Hello Goerp! Client code {{ .Data.Session.ClientCode }}</h1>
will print the client code number.
However, in some cases we may want to pass specific set of variables instead of all available ones.
In this case we can use in-build function that will produce variable of the key-value pairs (check
Built-in helper functions topic mkMap func for more details). So we need to update our partial to use the variable:
<h1>Hello Goerp! Client code {{ .clientCode }}</h1> and then pass this variable while injecting
the template in our page: {{ template "my-cool-partial" mkMap "clientCode" 123456 }}. Or we can
pass any part of available in page data, this will also work: {{ template "my-cool-partial" .Data.Session }}
and then <h1>Hello Goerp! Client code {{ .ClientCode }}; session key {{ .SessionKey }}</h1>
JS and CSS partials
Warning
According to the new CSP (Content Security Policy) requirements, all inline css and js content will be blocked by browser.
Samples that would be blocked:
<p style="padding: 5px;">blocked</p><script>console.log("blocked")</script><header><stile>html {padding:5px;}</style></header><button onclick="funccall()">blocked</button>
Valid samples:
<header><link rel="stylesheet" href="{{ "partial-css" | staticFileLink }}"></header><header><link rel="stylesheet" href="https://link.to.my.css"></header><body><script src="{{ staticFileLink "partial-js" }}"></script></body>
To create a css/js partial, go to the template editor
and pick Create -> Create new template, then define name and select type JS or CSS respectively.
Editor will create empty file and append suffix -css or -js respectively to the
template name. Now we can write any valid css/js code there, just like we would do in regular
.js or .css files.
Now, when static partial is ready, we can link it with the page like this:
Java-script and css partials are static files, and they are not part of the goerp template.
To link our templates with the static partials (js, css), we can use helper function staticFileLink
like this: <link rel="stylesheet" href="{{ "partial-css" | staticFileLink }}">. Or make linking as
usual css and js imports: <link rel="stylesheet" href="https://link.to.css.file">
Layouts
GOERP have in-build layout system, so one layout can be re-used on many pages. This feature would be very useful if application have many templates (pages) because with layouts we can encapsulate all general html into one component (e.g. css and js dependencies, general html like header, footer, menu, etc…).
Note
Layouts usage may look similar to the regular partial logic, however, they behave in absolutely different way. The main difference between layout and regular partial is that the former one contains code placeholders that are replaced with actual payload on the related page template, and the latter one doesn’t have any placeholders and contains only code that is related to this specific partial.
In other words:
- in case of layouts, page template exports go-html content to the layout
through
blockkeywords bydefine‘ing those blocks; - in case of partial, page template imports go-html content from the partial through
the
templatenotation; - both, layout and partial, should be defined inside page by using
templatekeyword, the only difference is that layouts must be defined at very beginning of the page template. - both, layout and partial cannot include other partials as dependencies
Under pages topic we already covered briefly layouts feature. Let’s dive into more details now.
Very simple example (layout)
First of all, we are defining name of the layout, which must end with layout suffix. Don’t worry,
suffix will be added automatically when creating new template from editor and selecting layout
template type. So, for our sample during layout creation we enter simple name and -layout added
by default.
Next, we have some regular page content that is, potentially, repeated on every page in our application.
The first block that would be replaced by content from the page that will use this layout is
{{ block "css-block" . }} {{ end }}. Then we have title placeholder:
{{ block "title-block" . }} Default title {{ end }} and then placeholder for the biggest part
of the page, - main section: {{ block "content-block" . }} {{ end }}. Check default (fall back)
content of this block in the sample. Finally, we have js placeholder where we can include any
js related to the page, please refer to css and js partials for more information on how to include
js and css code.
Warning
While defining blocks inside layout, always put -block suffix in names. If name will end with
something else then goerp parser will process them as regular partials and mess up template
parameters. This may lead to appear some unknown partials and mey produce unexpected behavior.
Very simple example (page)
Now, when we have defined the layout, we may want to use it inside our pages. Let’s say it 10th page of our application:
First of all, we are importing layout to the page.
Tip
Notice dot at the end of layout definition? Yes, we can pass any data to the layout, with the dot we are passing everything that page have. However, we can pass some custom data and, for example, add tabs logic to the layout. Just a tip.
Next, we are defining title of our page with
{{ define "title-block" }} 10th page of application {{ end }}. Next, in our template we have
css-block, but we don’t need to include any css links/deps here, so we just skip this block.
Next goes content of the page, the biggest part. There we can use other templates-partials and
goerp templating logic.
Finally, we have js block implementation which includes static file.
When to use layouts?
Layouts are powerful feature of the goerp template engine. However, it is quite complex and may produce some wierd behaviour if it is used in a wrong way. Better to avoid using layouts if they are not simplifying your work, just follow KISS principles. Same advice regarding partials. For example, if your application have 3 pages with simple form and a couple of tables, then maybe would be more convenient to write all content inside one template-page, so don’t need to jump between partials during development or maintaining.
Here is a short tips list when to use layout and when to avoid it:
Layouts are handy when
- My application have many pages with repeated content (such as menu, tabs, dependencies, etc.)
- I have many applications that reuses same code on every page. Please note, in this case you still need to create duplicate layout and give it a new name, but you need just copy-paste the content.
Avoid layouts when
- My application have few pages and duplicating similar content wouldn’t take much effort
Pagination
To implement pagination, query parameters are usually used, which indicate how much data should be returned on the current page, how many records per page should be displayed, and what page number should be shown. The most commonly used query parameters for pagination are:
Page or PageNo: current page number (starting from 1). RecordsOnPage: number of elements per page (usually used to limit the amount of data returned per page).
For example, a request to get the first 20 items of a product listing on the second page might look like this:
Note
NOTE For pagination to work it is important to place it inside the GET form and add the pagination data.
Pagination example
This code is for a pagination component that displays and navigates through a table of data with 20 records per page by default. It includes previous and next page buttons, a dropdown menu for selecting the number of records to display per page, and a button to update the table based on the selected number of records.
HTML layouts, components, etc.
- Check our UI components page for samples
Subsections of HTML layouts, components, etc.
Error and success states
Goerp server returns errors with every response. Errors are available in .Data.Errors variable which is array of strings. So it is possible to go through this array and display errors on page.
Adding small block into the page (or into layout) may look like that:
In addition to errors, response contains success flag which is available only after posting form with POST action and may be found in .Data.FormControl.PostActionSuccessful. So, right after errors block may be reasonable to add success message as well.
Note
NOTE When you add the errors and success flag, you are not writing any flags. Goerp editor will check errors and success flag by itself.
Form inputs
Subsections of Form inputs
Validation
The validation script is already embedded inside the script bundle.js
In order for the field to be important, it is enough to write in the required in input
Ready patterns For email
This pattern checks that an email address starts with one or more alphanumeric characters, which can be followed by any number of dots, hyphens, plus signs, and percent signs. This is followed by the @ symbol followed by the domain name For zipcode
This pattern checks that the Zipcode meets the following criteria: Consists of 5 digits For phone
Ready patterns Types For string
For numbers
Checkbox
The value of the checkbox is set based on the checkbox state. If checked, then it is true, otherwise false. Please note that input should have form-input class.
Public/b2b pages
Introduction
Regular pages will be restricted with the erply back-office sessions, this means that the pages cannot be viewed without a valid erply user session.
We can use the b2b/public sessions to set pages to no use the back-office session. For that we have 2 options:
- Public session - these sessions are completely public and do not require a user to log in at all.
- Protected session (app user) - pages that can only be viewed by logged in app user. App users are special users that are managed in the application itself.
Permission
Public pages are protected by 3 different methods.
- Erply user group permissions - on installation a user group is created goerp-app-users-group, all data fetches to erply api’s will use the rights of this group.
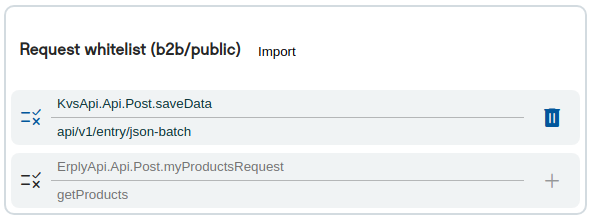
- Dynamic api request whitelist - a list of calls that are allowed with the dynamic api feature.
- Parameter whitelist - a list of parameters that we allow to be used.
Dynamic api request whitelist
The whitelist is under the ‘Publish settings’ tab in the editor view.
When enabled the dynamic requests would need to be added to the page
Parameters whitelist
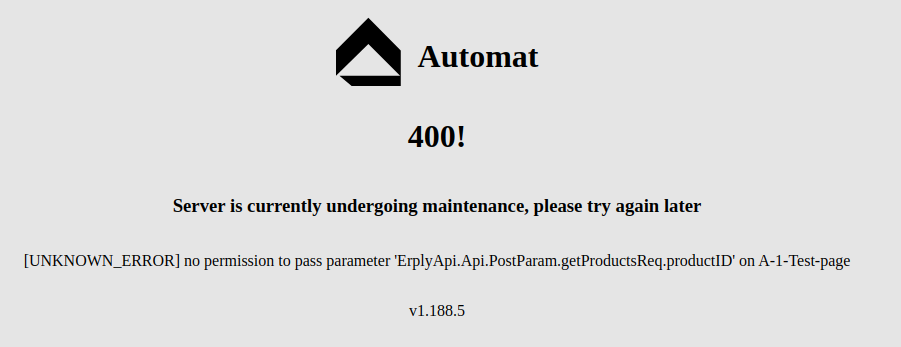
The following error is given when on public pages we send a parameter that is not added to the whitelist.
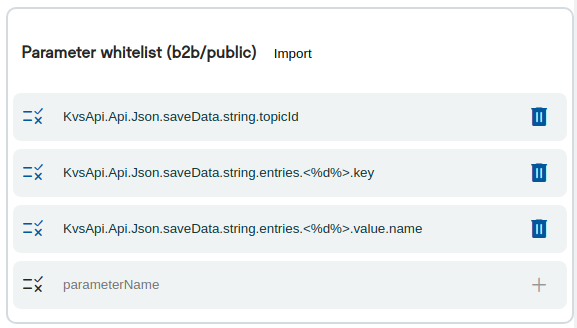
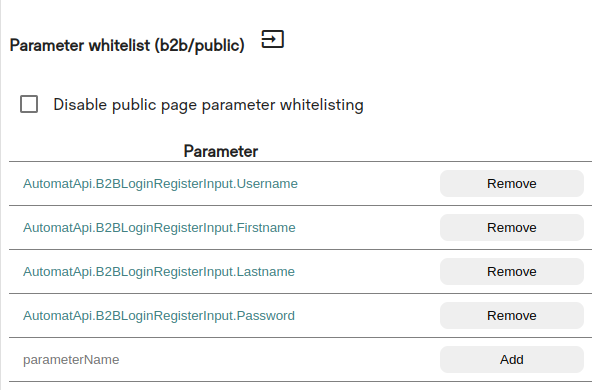
The whitelist can be accessed under the ‘Publish settings’ in the editor view. The parameter whitelist counts in presets and request the whitelist (when used) so the values there do not need to be duplicated here.
When enabled the used parameters need to be filled to the list of the page.
If the permissions were previously set to the aliases then we can also use the ‘Import from alias’ button to automatically fill them based on the alias settings.
As of 1.234.5+ disabling of these features is not recommended and will be disabled for new templates.
Pattern matching rules for parameter whitelist
The whitelist supports pattern matching for the parameters. That would be very helpful when working
with the json that contains or generates arrays. At the moment pattern matching is supported
for digits <%d%> and string <%s%>.
To define a placeholder just put a <%d%> in the place where actual parameter name may have a
number. Can be defined as many placeholders per parameter as needed.
For example, this rule:
will much any of the following parameters:
Subsections of Public/b2b pages
Protected
Introduction
Protected pages can only be accessed with a logged in app user. App users are special app specific users that can be set up to access specific applications.
Login and registration is up to the specific applications. Either it allows user registration from a public page or user creation is handled in some admin panel instead.
Note that app users cannot exist without an application, and the users cannot access or log in if they are not associated with an existing application (as opposed to erply account users). These user sessions cannot access erply back-office applications and regular pages.
Public routes always are prefixed with either public/ or b2b/ (except on custom domains).
Setup
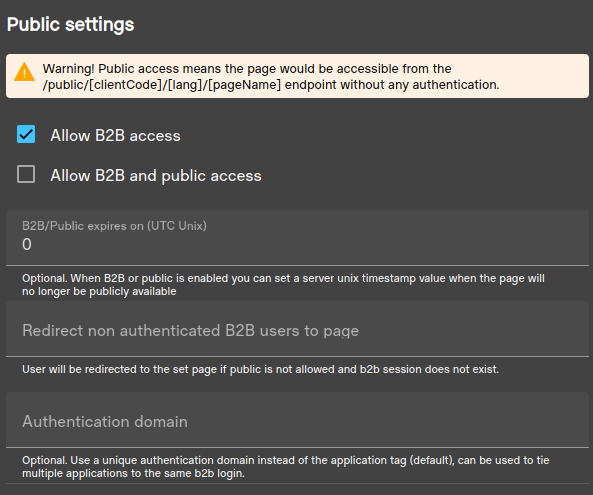
Set the page to allow b2b access to set this protection level.
This can be configured in the template editor mode under the ‘Publish setting’ right menu.
Note
It is also possible to set an optional expiration date to the page (UTC unix value) after this timestamp has passed on the server the will no longer be accessible using the b2b endpoint. Use authentication config input set the value.
Also note that this setting is based on applications or auth domains.
Each user requires the application domain to be able to create a valid session for the application. By default, the application domain is the applications uuid. You can use the ‘Authentication domain’ field to set a custom value - if the same value is set for multiple applications then the applications can share the users.
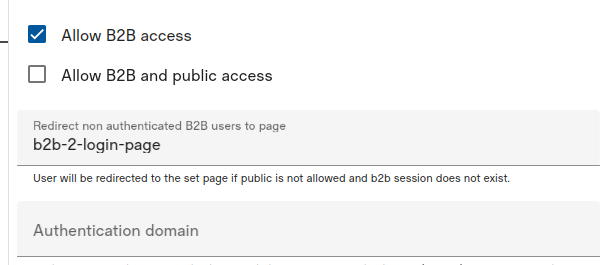
Use the ‘Redirect non-authenticated B2B users to page’ option to automatically redirect to login or error page invalid accesses.
User creation/registration
Users can either be created using a public registration form (for stores, b2b pages etc), or creation is managed internally within another page or application.
Manual app user creation
Here the creation and management of users would be handled by a protected page (either erply session or a different set of app users). Use the automat api endpoints to create the users and manage them. https://template-engine-eu10.erply.com/api/documentation/index.html#/app-user
Domains
Domains under the user determine what application pages the user can access.
Auth drivers
Auth drivers indicate what authentication methods the user is allowed to use to log in. Inbuilt methods: password, pin and openid
Open id
Open ID setup can be used to create custom sso methods for login. Each provider that is set up for the login page can then be used with the users to log in.
Creating a custom open id driver:
- In the login page template, navigate to the Publish settings -> OpenID Configuration tab.
- Use the ‘Add new configuration’ button to register a new open id provided (driver). Fill in the required fields and fields related to the provider. Note that the ‘Provider’ field will be used as the driver name. The ’email’ scope is also required as app users will be matched with the email.
- In the login command set the auth driver to the created one.
- In order for the users to be able to use it they would need to have the ‘ms_entra’ auth driver. Note that for open id auth drivers the value field will not be used.
- The jwksUrl endpoint needs to point to the public keys configuration.
This example assumes the open id configuration was given the provider name of ‘ms_entra’.
There is no limit to the open id providers. You can set up multiple providers to the same auth provider as-well (multiple app’s in ms entra for example).
Public registration page
With this you can create public facing endpoint where users can be created by customers themselves.
Domains
With inbuilt forms the domain is always taken from the registration template.
Auth drivers
With inbuilt from the auth driver used is always ‘password’
Setting up public registration page
Create a public page that implements the automat api’s registration form. Use the Session.Customer.ID to detect if the user is already logged in.
Optionally, the AutomatApi.B2BLoginRegisterInput.LoginOnSuccess can be used to automatically login
newly created user and AutomatApi.B2BLoginRegisterInput.Redirect to redirect the user to a specific
page after successful login.
Check the automat api B2BLoginRegisterInput data source docs for additional available fields.
Setting up public login page
Create a public page that implements the automat api’s login form. Use the Session.Customer.ID to detect if the user is already logged in.
Optionally the AutomatApi.B2BLoginInput.Redirect can be used to redirect the user to a specific page after successful login
Public
Introduction
Public pages are accessible without any login.
Setup
This can be added in the template edit view and enabling the “Allow B2B and public access” setting.
Note
It is also possible to set an optional expiration date to the page (UTC unix value) after this timestamp has passed on the server the will no longer be accessible using the b2b endpoint. Use authentication config input set the value.
These routes can be accessed by prefixing the routes with /public/
Example:
- automat-eu.erply.com/104146/en/my-test-page
- automat-eu.erply.com/public/104146/en/my-test-page
Using dynamics
Starting from version 1.246.0, GoErp allows to use dynamic api features while creating register, login and others b2b authentication calls. This allows to create multiple requests and chain data between them, including authorization calls.
Note
Those API calls works properly only inside GoErp templates, because b2b (public) authentication
depends on the template configuration, therefore all b2b API endpoints requires b2bKey to be
sent in the request header. This key is available inside session and could be chained to the
API request header.
More about b2b API calls read in the Automat API documentation.
Registration page
A simple registration page using API and dynamics. All page configuration steps remains same as for model based b2b authentication.
Note
Please note that if the triggerLoginAfterRegister parameter is not passed or set to 0, the user
will be registered but not logged in. Although, Form.Redirect will be triggered anyway and try to
access the protected area (10-b2b-in-page in this case). Therefore, while user not logged in, the
10-b2b-in-page page configuration will redirect to the login page (if configured). So, this could
be confusing.
Login page
Here we will just use the username and password, and redirect to the protected area when successful.
Samples
In the following sample we have a registration, login and a members area. This shows how we restrict the members area to only read results for the logged in customer.
Page setup
Note
The public features only work if the registration, login and any members pages belong to the same application or auth domain.
Registration page
A simple registration page with minimal inputs.
For publish settings we enable the ‘Allow B2B and public access’ checkbox
Also since registration allows more fields to be used we also need to fill in the parameter whitelist of the value we will allow to be used, in this case we will fill the ones we have defined in the form.
Login page
Here we will just use the username and password, and redirect to the members area when successful.
For publish settings we enable the ‘Allow B2B and public access’ checkbox.
Login model parameters are automatically whitelisted, so we should not need to fill them here.
Members page
On the members page we will generate a simple list of documents for the currently logged on member. We use the preset to read session id to the request and prevent it from being adjusted via any parameters.
Note
By default all public access groups do not have access to read documents. This right needs to be given under the public user groups (starting with ‘app_public’ and ‘app_b2b’) by the account administrator in the backoffice.
Every application or authentication domain will have a separate user group with rights assigned to them.
For publish settings we enable the ‘Allow B2B access’ checkbox as we will only want logged in members to access it.
We also set the redirection to the name of the login page, so whenever its being accessed without a proper session it will be automatically redirected.
We are also using dynamic api here, so we will add the ErplyApi.Api.Post.getDocs -> getSalesDocuments to the request whitelist.
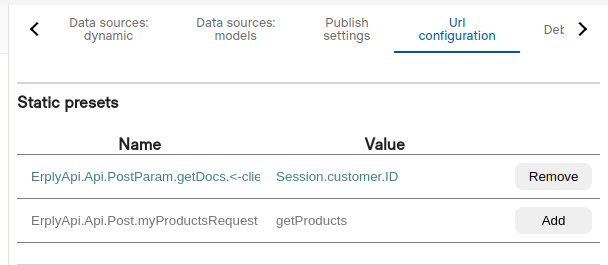
Under URl configuration we add the preset ErplyApi.Api.PostParam.getDocs.<-clientID : Session.customer.ID This will write the current session customer id to the request when it is being done, since we do not allow the parameter to be adjusted in the parameters list then it cannot be changed to anything else.
Workflow
To test it:
- Register a new user
- Login with the created customer
- The members area only displays the members sales documents (use backoffice to create them or create a new page that creates the documents for the member using the same method)
Url alias
Introduction
Url alias features allow as to generate better url’s for the application. Using of dynamic api can generate a large url parameters set that cannot be easily read.
Alias feature adds the following functionalities:
- Custom path parameters that can be used on any page
- Alias mapping that can be used to map parameter values to other parameters
- Single parameter can be assigned to multiple values so multiple api calls would not require a separate parameter if the value is the same.
Custom path parameters
Each route can use up to 3 custom parameters (path1, path2 and path3).
If we had a page accessible from /my-store. We can navigate to the page also with /my-store/something_1 , /my-store/something_1/something_1 and /my-store/something_1/something_2/something_3
To read the values we can use regular custom parameters fetch.
Alias mapping
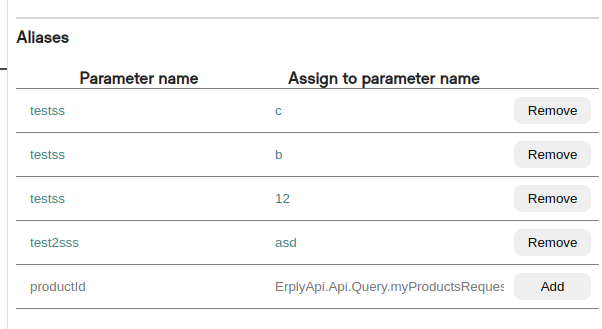
Aliases can be added from the url configuration menu
Parameter name would be the alias (some parameter) whose value would be moved to the configured parameters.
If we had a request with a custom parameter /my-store?productId=100 then we can use the alias to set value for the dynamic input.
productId -> ErplyApi.Api.PostParam.productsRq.productID
this would mean that we can load the product api call with the custom parameter, and we would not need to use the dynamic api parameter declaration syntax in the url as it would be aliased to the correct value.
Note that the same parameter can be mapped to multiple parameters so if there are multiple api calls that expect the same value then we can use this to just use one in the url.
Path to alias
We can also map path parameters to the aliases. For this just use the one of the path parameters (path1, path2 or path3).
path1 -> ErplyApi.Api.PostParam.productsRq.productID
This would mean that we can navigate to the page by just /my-store/101 and this would map the value of 101 to the ErplyApi.Api.PostParam.productsRq.productID parameter.
Content types
Introduction
With inbuilt methods its possible to make the server render page content data with different content type header or even produce a file stream for the content.
For this to work we would need to construct the data in the template in correct format we expect to return.
Methods to return
There are 2 ways we can make these calls
- Using the appropriate query parameters
- Using file type suffix
Note that -page suffix is not required, a link without it will lead to the correct route.
Supported content types
| Type | Parameter | Path suffix |
|---|---|---|
| Xml | ?XML | .xml |
| Csv | ?CSV | .csv |
| Json | ?JSON | .json |
| Txt | ?TXT | .txt |
Additional parameters
- PDF.FileName - Server will produce the data as a file stream instead, giving the file the requested name
- PDF.DPI - Dpi of the pdf, default 300
- PDF.Orientation - Orientation, default Portrait (Portrait, Landscape)
- DF.PageSize - File size, default A4 (A0, A1, A2, A3, A4, A5, A6, A7, Letter, Legal, Ledger, Tabloid, Folio, Executive)
- PDF.MarginTopMM - Set a top margin
- PDF.MarginBottomMM - Set a bottom margin
- PDF.MarginLeftMM - Set a left margin
- PDF.MarginRightMM - Set a right margin
- PDF.PageWidth - Set a custom page width (this will override the page size value)
- PDF.PageHeight - Set a custom page height (this will override the page size value)
Xml
- XML.FileName - Server will produce the data as a file stream instead, giving the file the requested name
Csv
- CSV.FileName - Server will produce the data as a file stream instead, giving the file the requested name
Json
- JSON.FileName - Server will produce the data as a file stream instead, giving the file the requested name
Txt
- TXT.FileName - Server will produce the data as a file stream instead, giving the file the requested name
Setting content type in the template
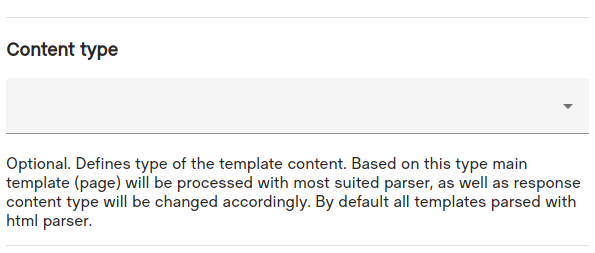
This will apply same rules as setting the content type in the url, but in this case entire template would be processed using most suited template processor (not related to PDF). For example, setting content type to json or xml would process template through text processor, not html, removes all html related validations/encoding and makes process much faster.
Navigation
Introduction
Only page, css and js types can be accessed with the url. Regular implementation url’s in the editor would look like this
This would be accessible from
Note that -page suffix is not required and a link without it would still be routing to the correct location
Public / B2B
If the public features are used then the endpoint would prefix it with public
Sub paths for navigation
We can use the sub paths for navigation inside the templates.
Usually 3 extra sub paths can be used. We can access the path values with an indexed value from the path.
Goerp has a special parameter that can be used to get the last path parameter as well (all content after the last non-encoded /) https://template-engine-eu10.erply.com/public/104146/et/some-page/test1/test2/test3/test4%2Ftest5
These routes will always navigate to the parent page, but we can set up special rules in the page to make some changes based on the path parameters.
We can use the tools helper to make navigating sub paths easier
Subsections of Navigation
Sitemap
To produce a sitemap we can use the combination of multiple features
- The .xml document type suffix
- Application url configurations
- Automat api helper to produce us a list of possible pages
Create the file
Create a new page type and make it publicly accessible.
Under url configuration lets fill a static preset for the automat api for the application we want to produce the list for.
Name: AutomatApi.Api.Get.myRequest1 Value: v1/application-sitemap/{My_app_uuid_here}
Also add the name and value pair to the request whitelist.
Add the following content to the page
This will produce the sitemap file for us when accessing it from the approriate endpoint with the correct document type suffix.
You can also manually produce and edit as you like.
Mapping sub paths
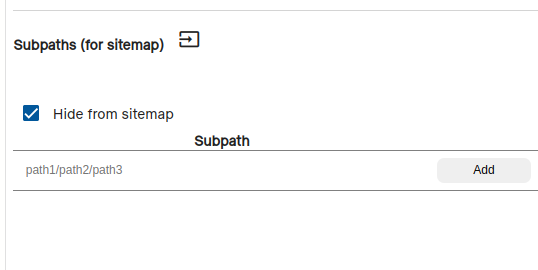
If some pages are using the sub paths features then we can use the url configuration sub paths area to map them. This will make the automat api return all mapped sub paths to the sitemap.
We can use the hide checkbox there to make the page not be generated into the sitemap aswell.
Robots
We can use the txt type renderer to output the robots.txt file. Note that this is only useful for instances that implement a custom domain, as the robots file needs to be at the root of the page.
A basic robots file would have the following content and would be called using the .txt document type suffix.
Application menu
GoERP UI library contains a standard component named “Unified menu”. Applications must use this component for navigation within the app.
Menu position
The menu bar can appear at the top of the page — or the left side of the screen. Menu position can be set in HTML by toggling a class name:
The position should be set according to user preference, so that when the user navigates from app to app, the menu always appears in the same position.
Read the preference from a CAFA setting, using the call GET /configuration. Parameters:
NB! Set the following header to the request:
If there is no preference set for this particular user, CAFA will return the accountwide setting as the fallback.
Possible values:
If the setting does not exist or the value is empty, assume side as the default.
(If you want to create a settings page where the user can change the preference, use the same “application” and “name” to update the setting in CAFA.)
Tailoring the menu to your app
When integrating the component, make sure that the following elements display information appropriate to your app:
- App name
- App icon
- Version number
- Link to app store (the “Upgrade” button)
Standard elements
The component also contains several standard navigation elements, to let the user navigate between apps, tell them where they are right now and give them a set of base features on every screen:
- Account number
- Company name
- Username
- Language switcher
- Account switcher
- Link to dashboard: “Switch application”
- Logout link
- Wiki link
Dashboard
On new accounts, the whole “back office” is meant to be a collection of GoERP apps. The user logs in and arrives at a dashboard that presents these apps as a grid of icons.
Clicking an icon launches the respective app (and installs it if needed).
To switch to another application, the user needs to return to the dashboard. Therefore, apps must have a “Home” icon or a link labeled as “Switch application” that would let them navigate back.
Dashboard URL
GoERP has a special URL for representing the dashboard; navigating to this URL auto-forwards the user to an actual dashboard page.
The special URL is:
Example:
By default, it redirects to
“start-main” is a page from the GoERP app “Start page”. This app gets autoinstalled when needed.
Configuring the URL
The default can be overridden with a CAFA setting:
Both level=Company and level=User CAFA settings are respected; therefore
it is possible to create
this config as either a user preference (level=User, level_id=<user's ID>)
or an accountwide setting (level=Company).
The value of the CAFA setting must be a string. The following placeholders are supported:
{GOERP_URL}- GoERP server root URL (for example https://template-engine-example.erply.com/){ERPLY_BO_URL}- Back office root URL (for example https://example.erply.com){CLIENTCODE}- Account number{ISO_LANG}- Current language, two-letter ISO code (for exampleen){LEGACY_LANG}- Current language, three-letter code (for exampleeng)
Sample value (GoERP):
Resolves to:
Sample value (back office):
Resolves to:
Linking to back office
Back office URLs have a predictable structure. Here is a sample URL (a product card):
- The base URL (
https://example.erply.com/12345/) is available as variable{{ .Session.User.BOLoginUrl }}. - Parameter
langis the current language. Use{{ .Session.Language.LegacyCode }}. Please always set this parameter; if the user has switched to a particular language, they want this language to be remembered as they navigate through the system. - Parameter
sectionidentifies the page: the form or the list view. - Parameter
editis used on forms and indicates the ID of the record. If you want to open a new empty form, useedit=new.
Prefilling back office forms
On an empty form, any field can be prefilled with a URL parameter. Use the form field’s name attribute
as the URL parameter name.
The following URL opens a new invoice form. (For clarity, it has been split into multiple lines.)
- The document’s type will be set to “Receipt” (ID = 2),
- customer ID will be set to 99
- and warehouse ID to 2.
This approach only works for an empty form, not for saved records.
Prefilling back office list filters
Use this approach if a GoERP page must link to a legacy back office list view.
Erply back office list views use method="post" forms, so filter presets need to be supplied
as POST parameters.
For example, opening the invoices page with the “Creator” filter applied (invoices created by employee with ID 123) requires submitting a form:
Replacing back office pages
Back office forms can be configured to redirect to other URLs.
If a customer installs an app that manages products, they can make a product card always open in that app. (And likewise, employee forms can open in an employee app, and customer cards in a CRM app).
At the moment this is a manual CAFA configuration step that must be done individually on each account.
- Go to Settings > Configuration Admin > App configuration.
- Click “Add new configuration” to create a new setting.
- Fill in the form as follows:
| Field | Value |
|---|---|
| Application | bo_ui |
| Level | Company |
| Level ID | leave empty |
| Type | ui_replacements |
| Name | Use any value, for example the name of the app that is going to handle the redirects |
| Value Type | JSON |
| Value | Define a JSON object as instructed below. |
Example (shown with all possible supported adjustments, all components optional):
Erply section name can be found from the URL: it’s the keyword following “§ion=…” Product card is product,
inventory registration form is prodin, employee form is orgperB and so on.
The redirect URL supports placeholders:
{GOERP_URL}- Base URL of Erply app store apps.{CLIENT_CODE}- Account number{RECORD_ID}- Record ID{LANGUAGE}- Three-letter language code (used in Erply back office){ISO_LANGUAGE}- Two-letter language code (used in app store apps)
As many JSON objects can be created as needed.
Cache
Introduction
Cache features are optional features that can be used to make the page loads quite a bit faster. These features mean that api requests are not always made and the created content is loaded from cache instead.
GoErp implements 2 different caching options. The options are disabled by default as it can affect the behaviour of the pages quite a bit.
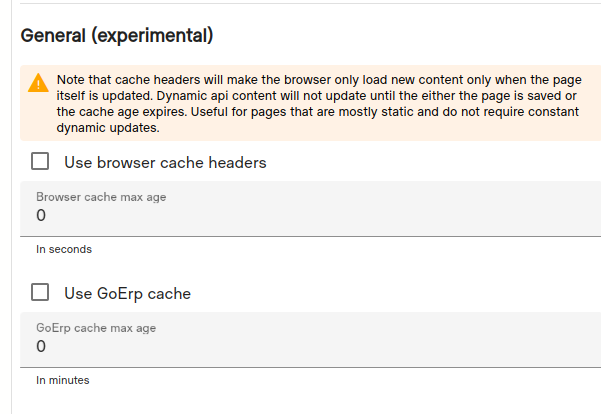
The cache settings are only available for page type templates. The settings area can be found under the ‘Publish settings’ area in the template edit view.
Browser cache headers
Cache is separate for every client.
This feature utilizes the default browsers cache mechanism using the modified date values and cache max-age modifiers. With this feature the browser caches the contents and sends a request with the modified date value on the next request, the server will respond with not modified if the value has not changed.
Note that the modified value in this case it the date when the page template was updated, any changes from used api’s in the template do not update the value.
Can be used to speed up templates that do not always need the most up-to-date values. You can specify the max-age in seconds. Content will be re-loaded if the max-age is reached or the template page is updated.
GoErp server cache
Single cached element for all clients.
The feature caches the contents on the server instead and returns the data without running the api requests. The cached data is shared between multiple requests.
Should only be used on pure static pages or pages that serve non-current session related data.
A custom age value can be provided in minutes.
Use cases
- Mostly static data pages.
- Pages that run slow running api requests or api mock pages where fresh by the second data is not always required.
- Browser cache headers with a small age can also be used to make a false sense of speed or reduce possible flickering, but note if the data indeed changes it can appear jumpy depending on the layout of the page.
Domain setup for cloudflare
Internal configuration
Access cloudflare dashboard at https://dash.cloudflare.com/ Select add site as illustrated in the below picture
Enter the name of the domain you wish to add eg example.com
Select a plan for the domain
Next you will see which DNS records will be imported automatically
Press next once configured
Now you will see the nameservers that have to be configured in the domain registrar
External configuration
Client will receive nameservers they must point their domain towards For example
liz.ns.cloudflare.com ram.ns.cloudflare.com
This process varies from registrar to registrar Example instructions based on registrar
https://www.ionos.com/help/domains/using-your-own-name-servers/using-your-own-name-servers-for-a-domain/ https://help.101domain.com/kb/managing-name-server-records https://docs.aws.amazon.com/Route53/latest/DeveloperGuide/domain-name-servers-glue-records.html#domain-name-servers-glue-records-adding-changing https://help.blacknight.com/hc/en-us/articles/212512229-Changing-nameservers-in-cp-blacknight-com https://www.bluehost.com/help/article/custom-nameservers https://directnic.com/knowledge/article/33:how%2Bdo%2Bi%2Bmodify%2Bname%2Bservers%2Bfor%2Bmy%2Bdomain%2Bname%253F http://www.dnsmadeeasy.com/support/faq/ https://www.domain.com/help/article/domain-management-how-to-update-nameservers https://www.dotster.com/help/article/domain-management-how-to-update-nameservers https://help.dreamhost.com/hc/en-us/articles/360038897151 https://kb.easydns.com/knowledge/settingchanging-nameservers/ https://help.enom.com/hc/en-us/articles/115000486451-Nameservers-NS https://www.fastdomain.com/hosting/help/transfer_client_start https://billing.flokinet.is/index.php?rp=/knowledgebase/57/Nameserver-and-DNS-records.html https://docs.gandi.net/en/domain_names/common_operations/changing_nameservers.html https://www.godaddy.com/help/change-nameservers-for-your-domain-names-664 https://www.hostgator.com/help/article/changing-name-servers https://hostico.ro/docs/setarea-nameserverelor-din-contul-de-client-hostico/ https://my.hostmonster.com/cgi/help/222 https://support.hover.com/support/solutions/articles/201000064742-changing-your-domain-nameservers https://faq.internetbs.net/hc/en-gb/articles/4516921367837-How-to-update-Nameservers-for-a-domain https://www.ipage.com/help/article/domain-management-how-to-update-nameservers https://support.melbourneit.au/docs/modifying-domain-nameservers-or-dns-records https://support.moniker.com/hc/en-gb/articles/10101271418653-How-to-update-Nameservers-for-a-domain https://www.name.com/support/articles/205934457-registering-custom-nameservers https://www.namecheap.com/support/knowledgebase/article.aspx/767/10/how-can-i-change-the-nameservers-for-my-domain https://www.networksolutions.com/manage-it/edit-nameservers.jsp https://docs.ovh.com/gb/en/domains/web_hosting_general_information_about_dns_servers/#step-2-edit-your-domains-dns-servers https://kb.porkbun.com/article/22-how-to-change-your-nameservers https://support.rackspace.com/how-to/rackspace-name-servers/ https://www.register.com/knowledge https://support.squarespace.com/hc/articles/4404183898125-Nameservers-and-DNSSEC-for-Squarespace-managed-domains#toc-open-the-domain-s-advanced-settings https://kb.site5.com/dns-2/custom-nameservers/ https://cloud.ibm.com/docs/dns?topic=dns-add-edit-or-delete-custom-name-servers-for-a-domain https://helpcenter.yola.com/hc/articles/360012492660-Changing-your-name-servers
Once done it might take up to 24 hours for the changes to take effect.
Func type templates
Custom functions (func type templates)
Custom func template can be used as functions. These templates only return the specified content and ignore the rest of the string content on them.
Note that func template do not have access to the usual .Data values in the template, anything that is to be used in there would need to be passed as arguments or loaded in the func with api calls.
Returning values
We specify the content we want to return with .Return in the func type templates.
For example (da-test-func):
And to call the func template we use it like this (da-test-page):
The output printed to the template here would be “this-will-be-returned”
Note that the function will return the first .Return value, anything that is after the first return will not be executed.
We can use regular template logic to pick the first value
Reading arguments
We can read arguments with the .Arg {index} command. Note that out of index arguments will always return an empty string.
To pass arguments to the functions we append the values to the func like with regular templates (da-test-page):
To read the arguments in the func template (da-test-func):
Api calls in functions
Func types have access to the app state functionality. This gives us better control over the api calls. Read about the functionality in the App state section.
Error
On extreme cases we can also make the function fail the entire flow. Calling this will display the goerp error page with the given error message.
Nothing after the error call will execute.
{{ .Error “my error message” }}
Subsections of Func type templates
App state
App state
Note
The app state object is currently only available in the func type templates
The app state object can be used to make immediate api calls using the same dynamic api instructions. The object can also store the instructions and results for later use.
Simple call api (.Fetch)
This method does not store the instructions or the result. Use for one time api calls that always need to have fresh data.
The call has 1 argument, that it expects to be a map of dynamic api instructions. Same as form inputs or static url configuration values.
For example: “ErplyApi.Api.Post.myRequest1”: “getProducts”
Note that the instructions support all the same functionalities as the regular dynamic api (multiple requests, grouping, chaining etc).
Use the ‘mkMap’ helper to create the instructions set.
Using the fetch here will run the instructions immediately and will not proceed with template execution until the api calls are complete. We can use the results immediately in the template code.
The calls object organizes the api calls from the instructions similarly to dynamic api. For example, we called erply api with our own request name “myRequest1”, so we will read the results like this:
If the instruction set included more api calls then the results would be available according to the api and request names.
Call api and store instructions and results (.FetchAndStore)
This method stores the instructions and the results. We can then use shorter versions of the call to run the instructions again for fresh data or return the already completed results.
Note
Note the store will share data based on the following rules:
- Regular - client code, app and current session
- Automation - each automation will have a separate context (2 separate automations cannot share data)
- Shared - client code and app
Note
Like all store functions, they support an optional second arguments (string value). That can be used to group the instructions. We can then use the given name to either run the same instructions again or return the stored results.
If we do not provide the name value then by default all instructions will be set to the empty name (all further updates and runs will overwrite the values).
Named example:
Call api using stored instructions
This method runs stored instructions and returns fresh data. Note that the call will not return anything if we do not have any stored instructions.
Using empty namespace (default):
Using a custom namespace:
Return stored results or re-run if nothing stored
This method returns stored results or re-runs the stored instructions if there are not stored results. Note that the call will not return anything if we do not have any stored instructions.
Using empty namespace (default):
Using a custom namespace:
To refresh the stored results we can just run the FetchAndStore call on the same set name.
Store instructions without running them immediately
Stores the call instructions but does not run them immediately. Can be used to initialize api calls for later use.
In this example we store 2 different sets with “p1” and “p2” names, but we do not run them. We can later than just use the FetchStoredResults to run the calls.
For example, we can create a condition here to switch between the calls.
Patch stored instructions
If we call the store function on an existing namespace then it will replace all values. If we want to just replace a single value in an existing set then we can use the patch call.
Expecting that we have previously stored and instruction set to “p1” name:
We can use the patch call to just replace the productID instruction
Patch call will replace the value if it exists and add as new if it does not.
Shared variants
Note
Shared variants share the results and instructions on the same client code and application. So only use for data that is meant to be shared.
On automations the shared variant has no effect as data is still only available to the same automation.
This feature can speed up application loads considerably as api call needs to be done only once between multiple sessions. For use in stores for data that does not really change. Making a fresh call on the same set can be used to refresh the set.
Functionality of the shared sets is the same as the other store capable functions, just append the name with Shared.
- SharedFetchAndStore
- SharedFetchStored
- SharedFetchStoredResults
- SharedStore
- SharedPatchStore
Signup
If you are building a B2B software product on top of GoERP, read this guide to learn how to implement sign-up, onboarding and login.
B2B (business-to-business) products have a two-level hierarchy: there is a company (or a “business”, “tenant”, or “organization”) and multiple user accounts underneath it. The person signing up is a representative of a business, and most likely, they will want to share the environment with co-workers or employees.
In contrast, if your software product is oriented to the B2C market, you can skip most of the advice in this document and check out only the section on custom domain names and app users.
Signup in short
The company signing up needs an Erply account (even if the users are not supposed to interact with Erply directly).
The account will be identified by a six digit “account number” or “client code”. It is a multi-user environment. Permissions can be adjusted via user groups.
A few user groups are created by default, and the person signing up will automatically get a user account with administrator permissions.
User and group management does not have to be built from scratch; there is a standard Erply app, “Users and Employees”, that already does that.
Next topics
Subsections of Signup
Customize signup & login
Copy and customize the signup & login pages
Log into Erply and open the app store (Apps -> App Store). Search for the apps named “SignUp App” and “Login app”.
Clone these apps (copy their templates into a new app). Change the HTML templates, replace the standard Erply design with your own. Add other helper pages as needed (landing, features, FAQ, pricing, support).
All the fields you see on the default signup form are required for creating an Erply account (but you can add more fields if needed).
The “Country” dropdown determines which datacenter the Erply account will be created in. If you do not offer these options and the account gets created in an inappropriate datacenter, the server maintenance windows will conflict with customer’s hours of business.
Make the signup and login templates public (“Publish settings” > “Allow B2B and public access” in the editor sidebar). This means that everyone can visit the URL without authentication.
Verify in an incognito window that you can open the pages.
Further customization
Within the signup app, it is possible to do more setup work. In the repository there is a page with plain signup only (template "sign-up-page") and an alternative page that also sets a default dashboard page to the account (template "sgn-signup-cafa-page")
Possible extra steps:
- Create an account (organization, tenant) on another software platform as well
- Change configuration parameters or CAFA settings
- Including the dashboard URL. This is explained on the next page.
- Prefill the Erply account with data
- Delete, create or modify user groups
Create a wizard app if needed
If the setup process is lengthier, or it requires the user to give input and make choices, it is better to write it as a separate “wizard app”. This can be a conventional GoERP app. Ask GoERP team to make it autoinstallable, and redirect user to that app once the signup is complete.
The user can then continue the process in the wizard app.
Post-signup experience
After the signup (or the setup wizard), and after each login, the user should be redirected to a dashboard.
This is meant to be the “navigation home”, the place where the user returns to after completing a task, and where they pick the next feature they want to use.
Build a dashboard that matches the needs of your user. It does not have to be dynamic or configurable; a simple static page is fine.
Once you have the page, you can issue a CAFA call from the signup app, to designate it as the account’s dashboard. Detailed instructions are here.
Within you apps, always use the special redirection URL "go-to-landing" to link to the dashboard (do not hardcode dashboard URL)
The dashboard can also be part of the main app, but it is recommended to keep apps modularized and small. Smaller apps are easier to develop and there is less risk when pushing updates.
One way to split the functionality into apps is:
- core features
- setups, wizards, importers, admin pages
- optional add-ons (as separate apps, or as modules of the main app)
The GoERP team can configure any app as autoinstallable (so that if a user attempts to open a page from that app, and the app is not installed yet, the installation process will start automatically).
Domain name
The signup / landing page can be set up on a non-Erply domain.
This process is similar to setting up a GoERP-powered website (erply.com, salonkeep.com, finetrek.com) and is done using Cloudfront.
At the moment, it is a manual setup process that Erply Ops can perform upon request. Routes of the new domain are mapped to the corresponding GoERP URLs—for example, so that
maps to
The GoERP-powered signup / landing page still needs to be served from one designated account.
Create an Erply account specially for serving this website, keep access controlled and enable two-step authentication. Separate sandbox/development from production.
Make changes to your signup page on a development account, publish a new version of the app, then log into the designated account and install the app update. When publishing, it is possible to restrict which other accounts will see this app in the store.
After authentication, though, the user will be redirected to erply.com environment.
Even if the public site, signup and login are set up under a custom domain, authenticated pages are still served from https://automat-eu.erply.com, https://template-engine-eu10.erply.com or any other GoERP hostname. There are two reasons for that:
- Authentication is tied to the erply.com domain. After login, the server sets a client cookie that is scoped to the erply.com domain. This is necessary since all the APIs are also located under erply.com.
- Creating a large set of Cloudfront routes that would cover every possible account number, is unfeasible.
Regular users and app users
GoERP supports two classes of users: regular users and app users.
Regular users are traditional Erply users. A user is always linked to an employee record and belongs to (one) user group; the permissions are inherited from the user group. The predefined user groups are “administrators”, “sales representatives”, “cashiers” and “accountants”, but the administrators are free to rename those, create additional groups and so on.
For managing regular users, see the “Users & Employees” app in the app store. You can add a link to this app to your custom dashboard.
App users are more lightweight and are native to the GoERP platform. Authenticating an app user is not dependent on any Erply APIs.
App users come especially handy in two scenarios:
1 - When the users of this app are supposed to interact with this app only, and must be isolated from the core business. Ecommerce sites are a good example; you want to implement customer logins, without giving the customers access to billing, inventory, pricing and customer data.
However, we also implemented app users in Erply cost reporting app. Although cost reporting is used by employees most of the time, there might also be a partner or a contractor who needs to submit a reimbursement report,
2 - When you compile the app into WebAssembly and ship it as a native app (iOS, Android, Windows, Linux, Mac), or when it has to work offline. Therefore, apps with app user support by design do not/cannot redirect to an external login page (like GoERP does by default). Login must be compiled into the app.
Therefore, implementing app users requires the following steps:
- Mark the templates as “B2B access”
- Copy the login, registration and password reset pages from another application. Here is a sample app package you can download.

