This will produce the sitemap file for us when accessing it from the approriate endpoint with the correct
document type suffix.
{instance}/{clientCode}/en/editor/my-sitemap.xml
You can also manually produce and edit as you like.
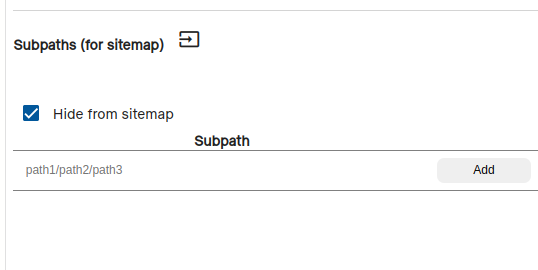
Mapping sub paths
If some pages are using the sub paths features then we can use the url configuration sub paths area to map them. This
will make the automat api return all mapped sub paths to the sitemap.
We can use the hide checkbox there to make the page not be generated into the sitemap aswell.
Robots
We can use the txt type renderer to output the robots.txt file.
Note that this is only useful for instances that implement a custom domain, as the robots file
needs to be at the root of the page.
A basic robots file would have the following content and would be called using the .txt document type suffix.
GoERP UI library contains a standard component named “Unified menu”. Applications must use this component
for navigation within the app.
Menu position
The menu bar can appear at the top of the page — or the left side of the screen.
Menu position can be set in HTML by toggling a class name:
class="menu--topnav"
vs
class="menu--sidebar"
The position should be set according to user preference, so that when the
user navigates from app
to app, the menu always appears in the same position.
Read the preference from a CAFA setting, using the call GET /configuration. Parameters:
application=GOERP
name=goerp-menu-position
level=User
level_id=<current user ID>
NB! Set the following header to the request:
Look-Deeper: true
If there is no preference set for this particular user, CAFA will return the accountwide setting
as the fallback.
Possible values:
top
side
If the setting does not exist or the value is empty, assume side as the default.
(If you want to create a settings page where the user can change the preference, use the same
“application” and “name” to update the setting in CAFA.)
Tailoring the menu to your app
When integrating the component, make sure that the following elements display information
appropriate to your app:
App name
App icon
Version number
Link to app store (the “Upgrade” button)
Standard elements
The component also contains several standard navigation elements, to let the user navigate
between apps, tell them where they are right now and give them a
set of base features on every screen:
Account number
Company name
Username
Language switcher
Account switcher
Link to dashboard: “Switch application”
Logout link
Wiki link
Dashboard
On new accounts, the whole “back office” is meant to be a collection of GoERP apps.
The user logs in and arrives at a dashboard that presents these apps as a grid of icons.
Clicking an icon launches the respective app (and installs it if needed).
To switch to another application, the user needs to return to the dashboard.
Therefore, apps must have a “Home” icon or a link labeled as “Switch application” that would let
them navigate back.
Dashboard URL
GoERP has a special URL for representing the dashboard; navigating to this URL
auto-forwards the user to an actual dashboard page.
The special URL is:
/{clientCode}/{isoLanguageCode}/go-to-landing
Example:
/12345/en/go-to-landing
By default, it redirects to
/{clientCode}/{isoLanguageCode}/start-main
“start-main” is a page from the GoERP app “Start page”. This app gets autoinstalled when needed.
Configuring the URL
The default can be overridden with a CAFA setting:
Both level=Company and level=User CAFA settings are respected; therefore
it is possible to create
this config as either a user preference (level=User, level_id=<user's ID>)
or an accountwide setting (level=Company).
The value of the CAFA setting must be a string. The following placeholders are supported:
The base URL (https://example.erply.com/12345/) is available as variable {{ .Session.User.BOLoginUrl }}.
Parameter lang is the current language. Use {{ .Session.Language.LegacyCode }}. Please always set this parameter; if the user has switched to a particular language, they want this language to be remembered as they navigate through the system.
Parameter section identifies the page: the form or the list view.
Parameter edit is used on forms and indicates the ID of the record. If you want to open a new empty form, use edit=new.
Prefilling back office forms
On an empty form, any field can be prefilled with a URL parameter. Use the form field’s name attribute
as the URL parameter name.
The following URL opens a new invoice form. (For clarity, it has been split into multiple lines.)
The document’s type will be set to “Receipt” (ID = 2),
Back office forms can be configured to redirect to other URLs.
If a customer installs an app that manages products, they can make a product card always open in that app.
(And likewise, employee forms can open in an employee app, and customer cards in a CRM app).
At the moment this is a manual CAFA configuration step that must be done individually on each account.
Go to Settings > Configuration Admin > App configuration.
Click “Add new configuration” to create a new setting.
Fill in the form as follows:
Field
Value
Application
bo_ui
Level
Company
Level ID
leave empty
Type
ui_replacements
Name
Use any value, for example the name of the app that is going to handle the redirects
Value Type
JSON
Value
Define a JSON object as instructed below.
Example (shown with all possible supported adjustments, all components optional):
{"redirect_creation_form":[{"section":"prodin","url":"https://example.com/{CLIENT_CODE}/new-inventory-registration-page"}],"redirect_edit_form":[{"section":"product","url":"{GOERP_URL}/{CLIENT_CODE}/{ISO_LANGUAGE}/edit-product-page?productID={RECORD_ID}"}],"redirect_page":[{"section":"products","url":"https://example.com/{CLIENT_CODE}/product-list"}],"add_tabs":[{"section":"orgperC","name":"metadata","title":{"en":"Metadata","fr":"Métadonnées"},"url":"{GOERP_URL}/{CLIENT_CODE}/{ISO_LANGUAGE}/customer-metadata-page?customerID={RECORD_ID}"}],"replace_tabs":[{"section":"orgperC","name":"contracts_new","title":{"en":"A better tab for customer contracts"},"url":"{GOERP_URL}/{CLIENT_CODE}/{ISO_LANGUAGE}/customer-contracts-page?customerID={RECORD_ID}","replace":"orgperC_contracts"}]}
Erply section name can be found from the URL: it’s the keyword following “§ion=…” Product card is product,
inventory registration form is prodin, employee form is orgperB and so on.
The redirect URL supports placeholders:
{GOERP_URL} - Base URL of Erply app store apps.
{CLIENT_CODE} - Account number
{RECORD_ID} - Record ID
{LANGUAGE} - Three-letter language code (used in Erply back office)
{ISO_LANGUAGE} - Two-letter language code (used in app store apps)