Applications
Introduction
Applications are collections of templates and their dependencies that have been added to a single package, so it can be installed together in one go.
Applications allow the templates to be shared with other accounts.
Applications are collections of templates and their dependencies that have been added to a single package, so it can be installed together in one go.
Applications allow the templates to be shared with other accounts.
Applications have 4 types
Standalone application, selected by default when creating a new application
A listing of several applications that do not need to be connected with each-other. Serves as a bundle to install or update several applications in one go.
As of version 1.319.0 the new module v2 features are released. Read about its functionality here: Read more about module v2
Extension to a specific full application. Files in the module can be set as replacements for files in the target full application.
Modules will be installed when the full app is installed automatically but the replacements will not be enabled until the user uses the configure modules functionality to enable it.
There is no limit to how many modules can be enabled at the same time, but only a single module can be active if multiple of them target the same file in the full application. Goerp will generate the module configuration groups based on this - modules that target unique files will be in a separate group and modules that target the same files will be in the same group.
Applications that can be shared between multiple applications.
Used to share styles, js functions or general purpose partials/pages.
Note that the version of the asset in the application indicates the minimum required version of the asset, installation will make sure that at-least this version is installed. It will not downgrade the version on the account if it has a higher version installed.
Asset package creator needs to make sure that updates to the app does not break used elements in previous versions, if this cannot be done then a new application should be created instead.
Module v2 features released as of version 1.319.0
Modules can be used to easily enable or disable certain features on existing applications with a toggle.
Modules can be created for any application. V2 modules do not need to be added to the parent application, instead it is connected to the applications from the module application itself.
The enable and disable checkbox here can be used to immediately enable the module.
By default, goerp does not limit the modules to groups like v1 modules did, but the following grouping can be used to create a custom behaviour similar to it. The custom group name field can be used to group modules to a custom radio group on the store and on the parent applications configure modules area.
Note that if the module contains translations or variables then these are automatically merged to the applications data when the module is enabled.
With modules v2 the main file type for adjustments is the new type ‘modification’. By itself it does nothing. We need to configure it to alter something on a source page.
Multiple modifications can alter the same source (no defined limit).
You will see several options:
For template - Select the target template we want to alter
Module type - Select the module behaviour
Use the configure v2 modules button on the parent application ‘Modules’ tab or in the editor application structure view to enable and disable the modules.
Note that v2 modules are not installed automatically from the store with the parent. Instead, the store will list all available modules from the store to the user, and the user can decide what to install.
However, the application type ‘bundle’ can be used to package the parent and modules into a single installation.
Here we add an extra static css dependency to the original, adding a new line to the head of the document.
For-template: index-page Module type: Append by name Module tag: head
Here we use the anchor to just replace it in the source. Note that the anchor can be any value in the source.
For-template: index-page Module type: Anchor Module tag: {{/* anchor */}}
To use applications for files, first we need to create an application entity.
Use the CREATE NEW -> Create new application from the menu to create one. Give the application a good clean name, it should follow the following rules:
You can link templates to the application from the application view screen, or you can link the template to the application in the template view under the ‘Publish settings’ right panel.
Note that templates in the application should have a unique name. Recommendation is to use some kind of prefix related to the application to describe the templates.
Example: My Test App -> mta-my-page
The linked templates list can be used to make the application create links to the application. There are 2 kinds of links
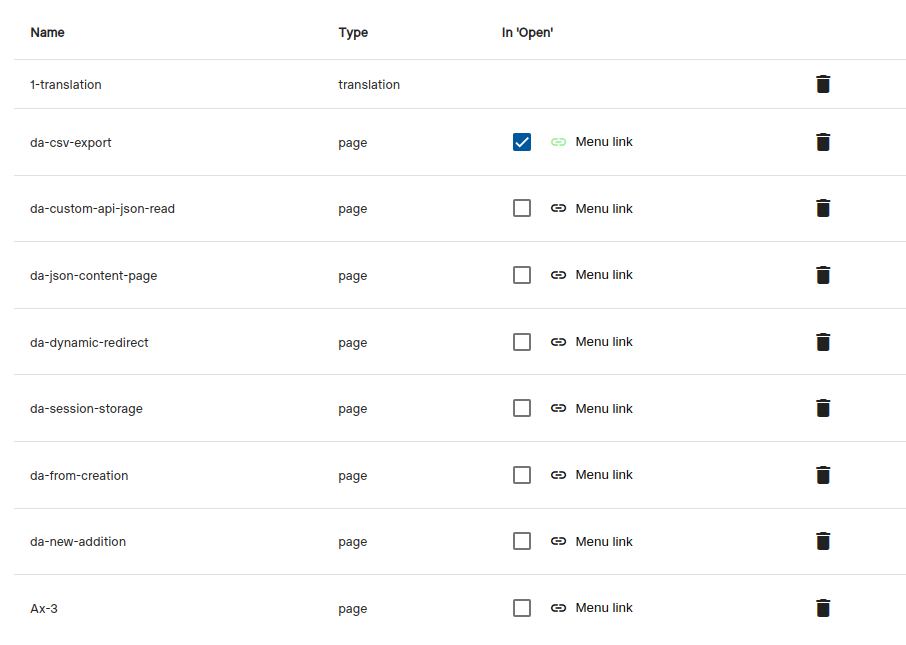
Green icon on the link button means a link has been defined.
Currently, the application can be either a full, asset or module.
Read more about application types
Use the ‘Publish settings -> Module replacement’ configuration on templates to same what template its meant to replace as a module. Note that this setting is only used on module app’s and the replacement template type cannot be different from the current templates.

Asset and module type’s use a different kind of rating scheme and are not shown in the shop by default (visible with a filter).
Only full application can have assets and modules. In the application edit screen navigate to the asset or module connection area (under templates).
Note that the asset or module needs to be published to the store first.
In order to share the application to other accounts we need to publish to the store. Before the application can be published it needs to meet the following conditions:
To publish the application the workflow would be the following: Validate version -> Create version -> Publish to the selected cluster
The system collects application based errors into a short-lived memory that we can access for approximate 1 hour.
This can be used for debugging purposes or to check if the application is causing errors.
These logs are only captured for items that are connected to an application.
This will make the application records all requests it makes even successful ones.

The store will also indicate with a bug icon for the application if it has recently encountered errors.
Note that this will also capture template editing errors and can be used to reference encountered errors.
Applications can be moved from one account to another without using the store interface. For this we can export the application and then import it to the other account using the export and import functionality.
Edit the application under ‘Developer mode’

Open the ‘Export’ tab and click on the ‘Export’ button to download the application package

Open the account you wish to move the application to and open the ‘Developer mode’ view. Hover to the ‘Applications’ row to make the import button visible. On the new modal select the previously exported zip file and click ‘Import’.
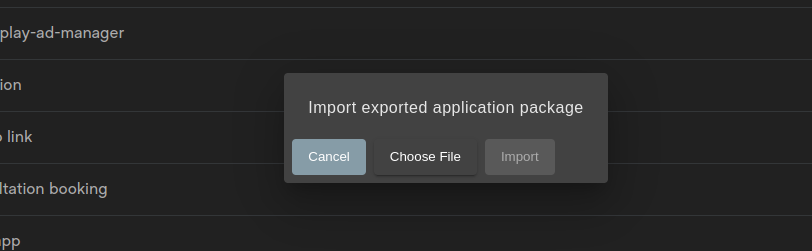
Wait for the process to complete. After this all the application should be available on the account.
Applications can use application accessible static variables that can then be used on all application connected templates.
Useful when a similar value is being used in multiple templates and for optimization where a static value is faster than trying to fetch one from an api.
These values can also be assigned into dynamic api requests parameters.
In order to use the feature, first we need to create a ‘variables’ type file that is connected to the application.
Application should only have a single variables file, if multiple are connected only the first one of them will be used.
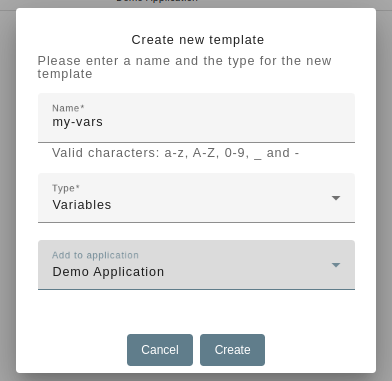
Contents of the variables file is in json format. The structure can have any kind of nesting or value types.
The values can just be printed to the template or be used in dynamic api chaining features. The reading syntax is the same as reading dynamic api responses so all the same features and rules apply. More about dynamic response reading
Reading values from the sample above
Reading value from the sample above
Security settings that can be changed per application
Note that the setting here only apply to the selected application, they are not global.
Where to change:
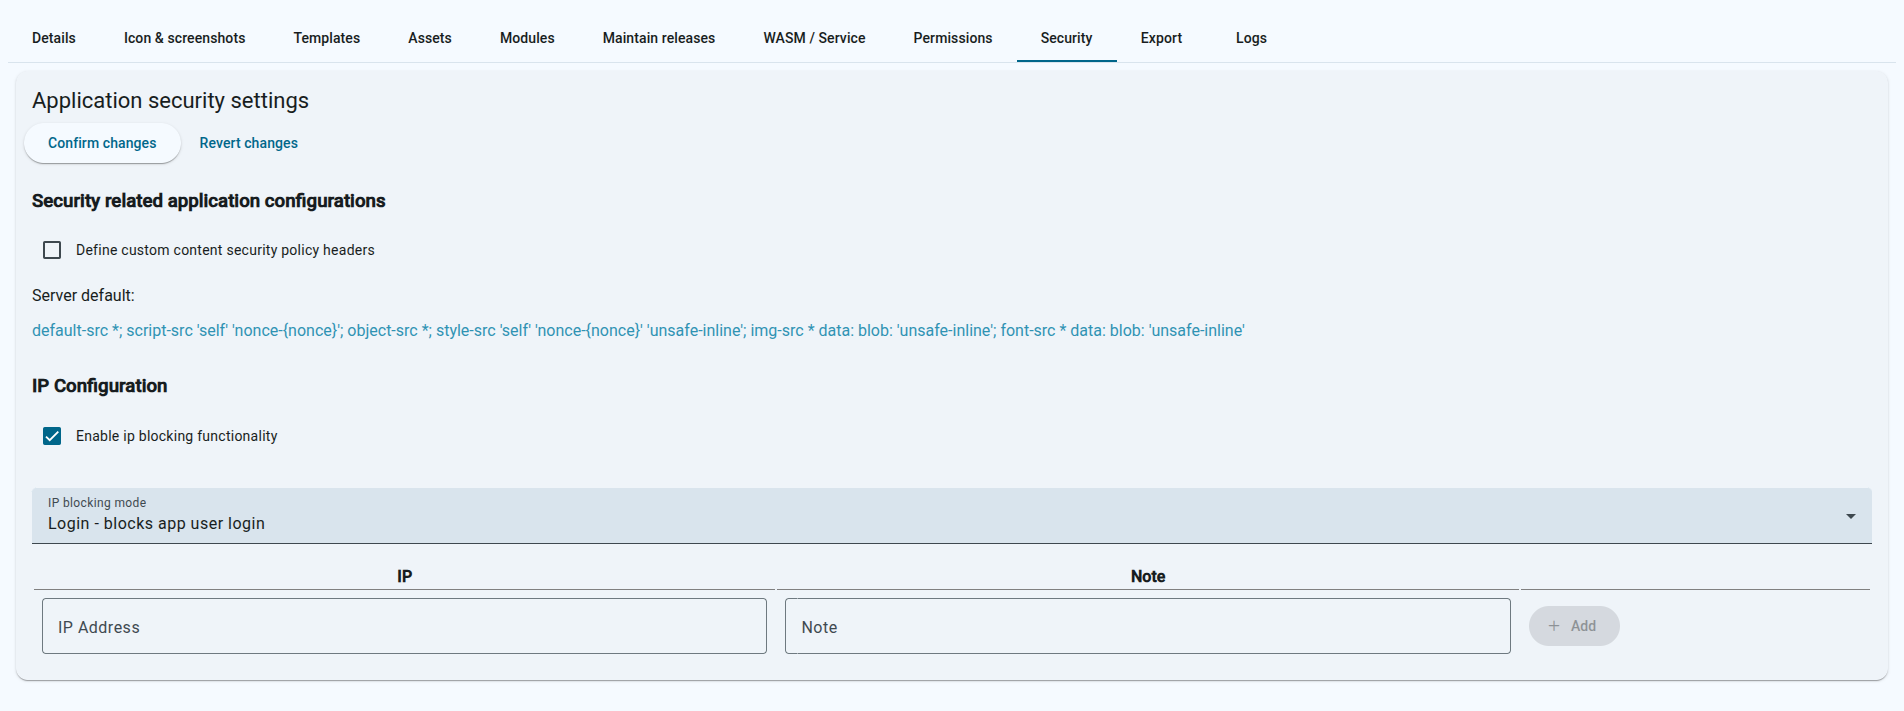
The server will apply a default CSP ruleset (shown below), but you can disable this in the application security settings and provide a custom one instead. The changes here will only take effect for the edited application.
The default ruleset:
It’s possible to also start blocking access to the application routes (or app user login) by IP. The settings here work as a whitelist, this means when enabled without any ip inputs then all accesses are blocked.
Enter the allowed IP’s and an optional note who the IP belongs to. When done then don’t forget to click on the “Confirm changes” button.
There are 2 modes for the blocking functionality:
This mode does not prevent access to view the pages but does block the app users from logging in.
This mode blocks views of the pages entirely.
The application permissions are used to control access to the application features. The permissions are defined in the application permissions file and can be assigned to app users by their groups. Currently this works with app users only.
Groups are used to assign permissions to app users. A user can have multiple groups. Use the api to set the groups value for the users. The groups value is free text field that can have any value.
Create the ‘permissions’ type file in the application. The contents of the file are in json format.
First field is the type of the permissions (ex: UI) Second field is the group name. This can be any value and is checked againts the current app user. If the current user does not have the group assigned then the given permission action will be applied.
Ui rules alter the ui elements based on the defined rules. The rules are applied in the order they are defined in the permissions file.
Currently the feature supports the following nodes: “input”, “button”, “a”, “form”, “div”, “select”, “textarea”, “aside”, “ul” and “label”
The element field is a css selector that is used to select the elements that the rule will be applied to. The selector is applied to the entire application page, so it can be used to select any element on the page.
We can select by dom element, class or id. For example:
#email - selects the element with id “email”.submit-btn - selects all elements with class “submit-btn”button - selects all button elementsThe action field defines what will be done to the selected elements. The available actions are:
remove-no-group, remove - removes the element if the current user does not have the group assignedremove-has-group - removes the element if the current user has the group assignedadd-class-no-group, add-class - adds a class to the element if the current user does not have the group assigned, class name is defined by the “class” field in the ruleadd-class-has-group - adds a class to the element if the current user has the group assigned, class name is defined by the “class” field in the ruleThe class field is used to define the class name that will be added to the element when the action is “add-class”. This field is required when the action is “add-class” and is ignored for other actions.